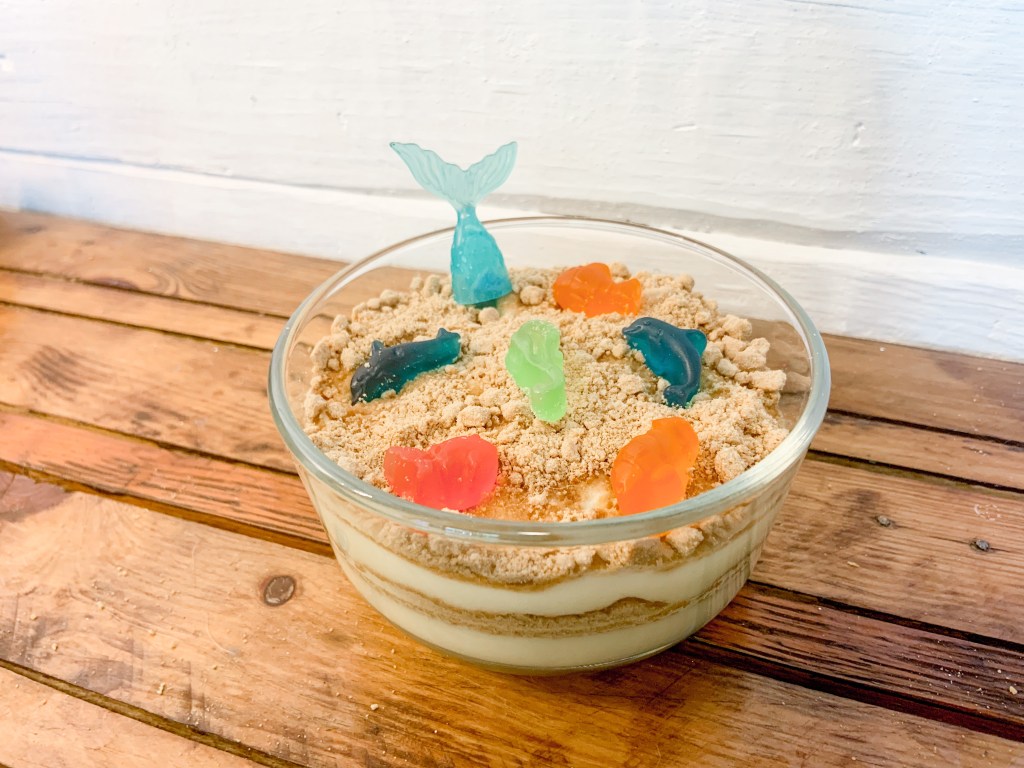
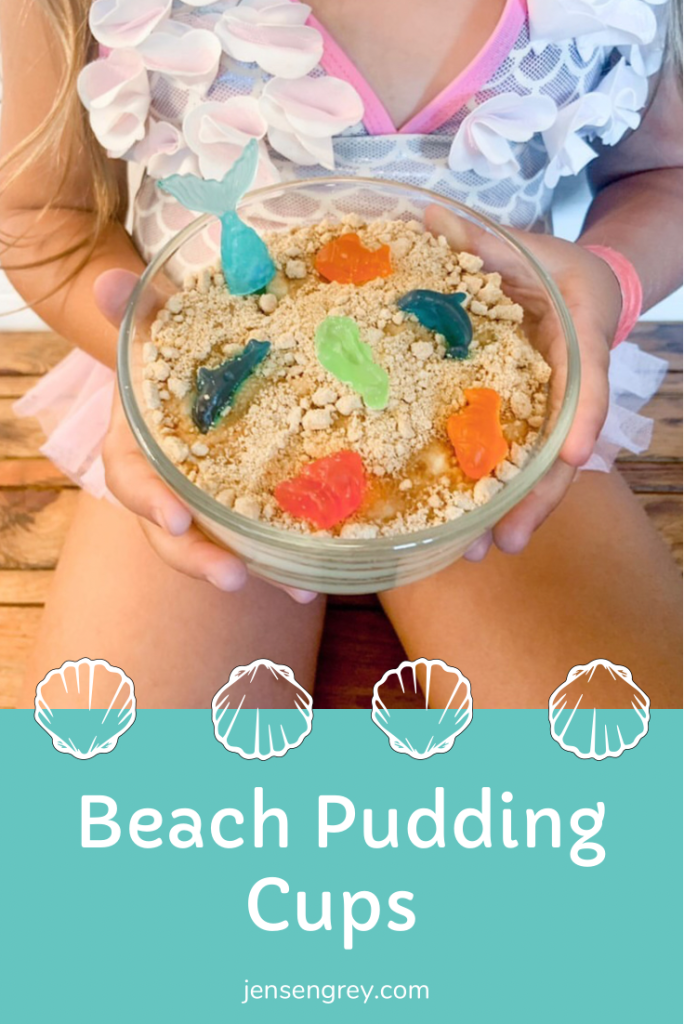
It’s no secret, Mila and I love the beach. With her Mermaid Activity Box last week, I had her make a snack that matched: Beach Pudding Cups.
Honestly, I love that Mila loves the beach. She’s been to so many different beaches during her three years and each time she’s been obsessed. When we’re not there, she’s always asking to go back.
Anytime I can bring beach life to Ohio, I do my best to do so. I think this is why this snack was a hit with Mila.
Here’s what you’ll need to make this beachy snack:
Instant Vanilla Pudding
Graham Crackers
Gummy Fish or Sea Animals
First, make the instant pudding as directed in the box. I think all you need is milk with the pudding powder. It’s (the instant pudding) really simple if you’ve never made it.
Then, make graham cracker crumbs. I just blended in my blender!
Now it’s time to put it all together.
Get a clear bowl or cup and do a pudding layer first. I just eyeballed all the layers and didn’t do a specific amount.
Next, add a layer of graham crackers.
Repeat these steps until you get to the top. You want your final layer to be the graham crackers.
To finish it off, add fish and sea animal gummies. I also added a mermaid tail on top too. Next time I make this, I’ll mix blue food coloring to cool whip to make water too.
I think these Beach Pudding Cups are so cute for at home or even at the beach. Since I used our small Tupperware containers, it’d be perfect to put the top on and serve for a beach picnic.
Mila’s favorite part were the gummy creatures on top! She ate them all before she got to the ‘beach.’
This would also be a perfect after school snack since it’s so easy to make and out together. It made me feel like such a creative mom to do this with her.
She wanted to help layer the ingredients and did good too. So kids can essentially make their own after school snack!
What’s your favorite way to bring the beach home? Snacks, activities, or looking at old vacation pictures? Let me know in the comments.
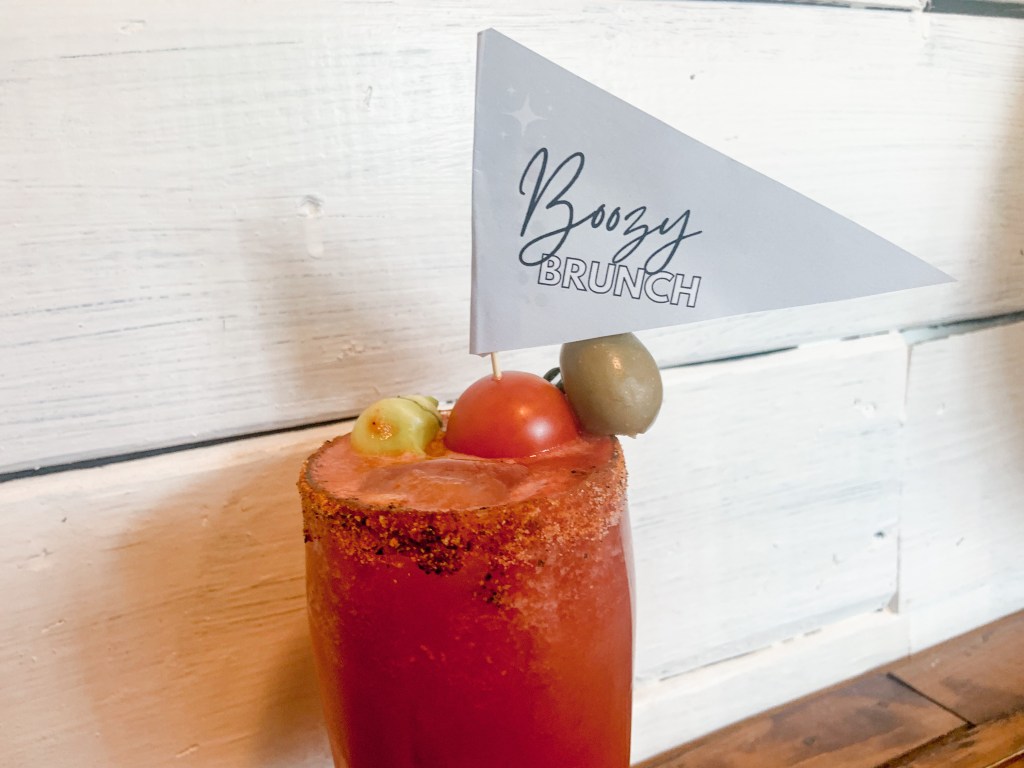
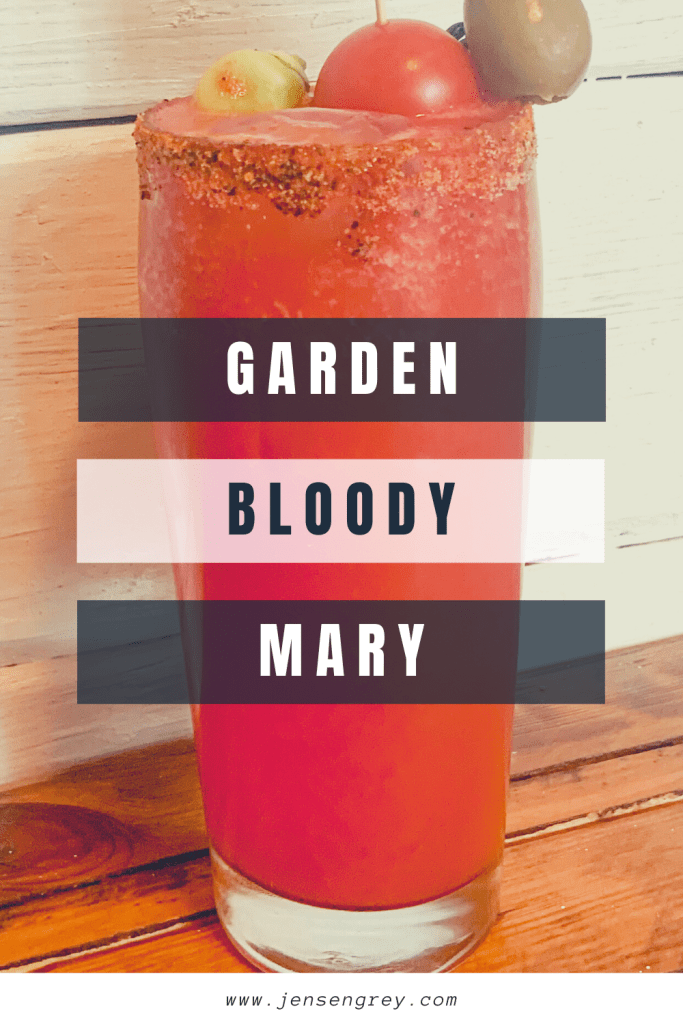
Sundays are perfect days for a little boozy brunch. This weekend I’m making a Garden Bloody Mary by using tomatoes from backyard!
It might sound a little daunting, but making your own tomato juice only takes on more step.
All you need for this drink is:
Tomatoes (1/2 pint of cherry tomatoes)
Olive Oil
8 Basil Leaves
Lemon Juice (half a lemon)
1/4 Cup of Water
2 Ounces of Vodka
Salt (to taste)
Pepper (to taste)
Pinch of Cayenne Pepper
Dash of Worcestershire Sauce
Dash of Hot Sauce
Drink Mix
First, halve tomatoes. Then, put in a baking dish and drizzle with police oil and salt. After, place on the top rack of the oven and broil on high for 10 minutes.
Let the tomatoes cook before the next step.
Next, add cooled tomatoes to a food processor as well as the rest of the ingredients. Blend to a runny consistency. If it’s too thick, add more water… or vodka.
While it’s blending, prepare your cup. I love adding seasoning to the rim of any Bloody Mary. For this particular Garden Bloody Mary, I used lemon to coat the top ring. Then I poured salt, pepper, celery salt, cumin, granulated garlic, smoke paprika, and powdered garlic in a small bowl.
Once it was all mixed, I rolled the lid of the cup in the mixture. Any places that I missed, I added more lemon juice.
Then, add ice to the cup.
After it’s blended, you can either strain or put the mixture over ice in the cup.
Garnish
To top it all off, I had to garnish will veggies from the garden and the CUTEST little pennant from The DIY Party Co.
I just grabbed another cherry tomato, hot pepper, and an olive (from my refrigerator) and skewed them on a toothpick. You can use any ingredients you love to garnish, this is just my favorite, besides bacon!
Then, I got another toothpick and tape to assemble the pennant. I stuck this toothpick in the tomato to keep it upright.
This recipe was so much fun to make and I know it’d be a hit at any brunch party.
The BEST part about it is, I know where almost all the main ingredients come from. It brings me so much pride to be able to make my food after growing it. There’s a few more recipes from our garden that I can’t wait to share with all of you.
Let me know if you try this recipe OR your favorite Garden Bloody Mary garnish. If you don’t drink, I’d love to hear your favorite brunch food.
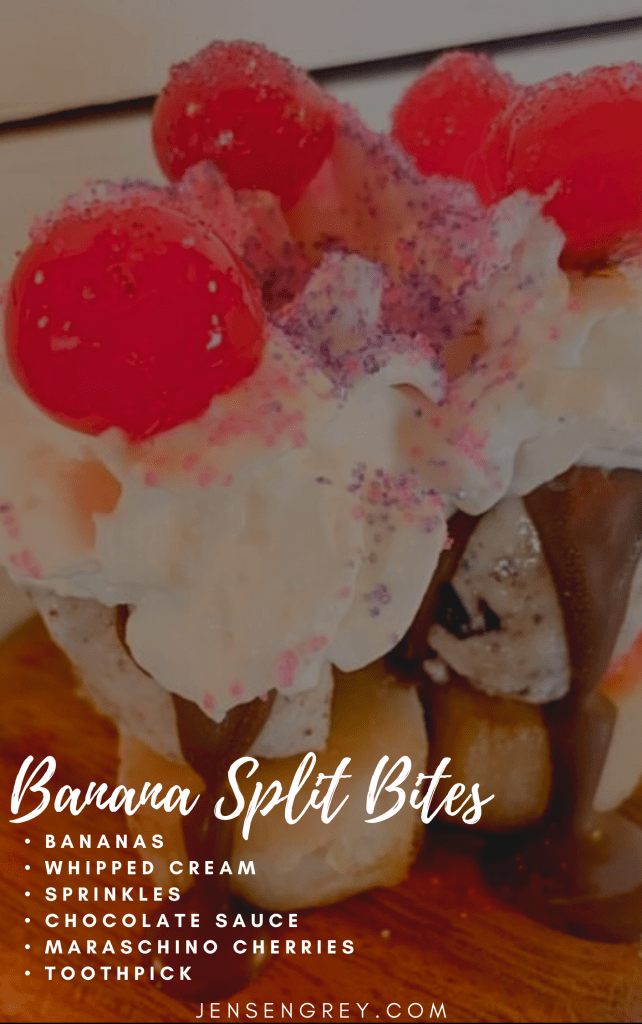
It’s National Banana Split Day! Mila and I put a spin on this summer treat and made it bite sized. This recipe is perfect for toddlers or adults who want the taste of a banana split, but don’t want to commit to a regular sized one. I promise, these Banana Split Bites pack all the things you love about a banana split in one bite!
Before I go on… did you know banana splits originated from Ohio? Ernest R. Hazard invented the banana split in Wilmington, Ohio in efforts to attract college students to his restaurant. I think he was on to something!
Anyways, here’s what you need for this tasty treat:
Bananas
Whipped Cream
Sprinkles
Chocolate Sauce
Maraschino Cherries
Toothpicks
Any other ice cream toppings!
To start off, just cut your banana in little circles. I ended up freezing mine before assembling too because I love the taste of frozen bananas. Then, spoon ice cream on the banana. Add ice cream toppings and secure everything with a toothpick.
It really is that easy!
Mila and I used whipped cream, sprinkles, chocolate sauce, and maraschino cherries. It would be fun to do classic toppings on different bites too!
This treat would have been awesome for our Ice Cream Bonanza. We did an ice cream topping charcuterie board. It would be so cute to do a Banana Split Bites bar where people can assemble what they wanted themselves. I think that’s a perfect fourth birthday idea for Mila…
We hope that you like our little bite-sized desserts! Let us know how you like it if you make them. Let me know in the comments your favorite banana split toppings.
I’m officially twenty-eight years old! It seems like the years are getting shorter, but way more fuller.
To make my life even crazier and busier than it currently is, I surprised myself with a little gift. Our family has grown… again. This time by four more furry feet.
Yes…we got a puppy!
It was sort of spur of the moment, but the idea of a new dog has been in my head for the last few weeks. I feel like Max has been super lonely with school starting. He loves other dogs too and it’s just been something I’ve considered.
Plus, Mila and I love puppies and dogs too! The more craziness in our house, the better.
So yesterday, I found the perfect little guy for our family. I can’t wait to see how big he grows and how he fits right in with us.
Everyone… meet Toby!
He’s a Bernese Mountain Dog who is twelve weeks old. His paws are massive and he has the prettiest grey eyes. For a puppy, he’s calm and just loves on us.
Mila knows his name is Toby, but calls him ‘tube-y.’ It’s cute and he still runs to her.
Even though puppies are SO much work, he’s the perfect birthday present. I’m so happy with him and just smile when I look his way.
Max is obsessed with him and was like a mother hen helping him out on his first night at home.
Fingers crossed for more sleep tonight though!
Do you have any puppy tips or tricks? I’d love to hear more in the comments!
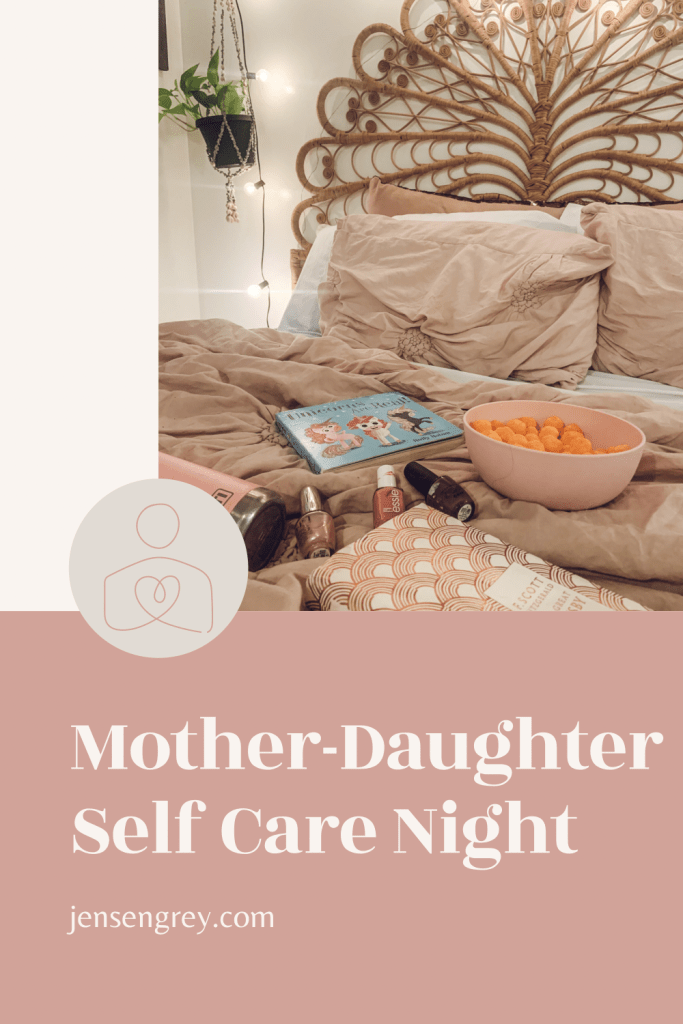
There’s nothing more special than a mother daughter date night! Instead of going out, Mila and I stayed in and practiced self care.
Since this first week back to school has been hectic, staying in and relaxing felt right. We both needed the rest and the together time to recharge for the upcoming week. Plus, we got to just focus on what self care we needed.
To begin the night, I took a hot shower where I put on a hair mask (seriously the mask I linked does wonders!) and used sugar scrub.
I never have enough time to do these extra steps! Setting aside this time made my skin and hair feel so soft and new.
Mila, on the other hand, had a bubble bath beforehand. She spent her time doing her own makeup. I didn’t know this, but she definitely was feeling herself and all the glitter.
We kept it on until right before bed because she liked it. When you have a self care night, you have to feel like your best self.
I can’t blame her for wanting to be covered in glitter.
After my lotion dried, we put on our favorite jammies. Then, we got our self care essentials for the night:
As a busy mom, I don’t always get to read as much as I’d like. Just even being able to read a few pages felt so nice. It’s also amazing for Mila to see me reading and enjoying it! I hope so loves English and language as much as I do.
The book she picked out is adorable! She often asks me to read it to her before bed. Now she makes up the story when she looks at it herself.
Throughout watching movies and reading our books, we snacked on our cheese balls and jello.
Mila asked for water, without Mio. I’m so proud of her positive choices. I told her she could have anything to drink and that’s what she chose.
We ended the night taking selfies and I painted Mila’s nails. I love that we both have dark purple polish on now. Anytime we can match, I feel like we try to do it. Even when we stay in.
It wasn’t long after her nails dried until Mila fell asleep. We had wiped her makeup off and she was just relaxed.
I ended the night watching dance moms and maybe had a few more cheese balls too.
Our night was pretty perfect.
We love being together and doing the things we enjoy. I can’t express how much joy Mila brings me. Hopefully she’ll be able to see the importance of self care as she gets older.
We all deserve to love and cherish ourselves.
Have you ever had a self care night with just your or with your little? What was your favorite activity?
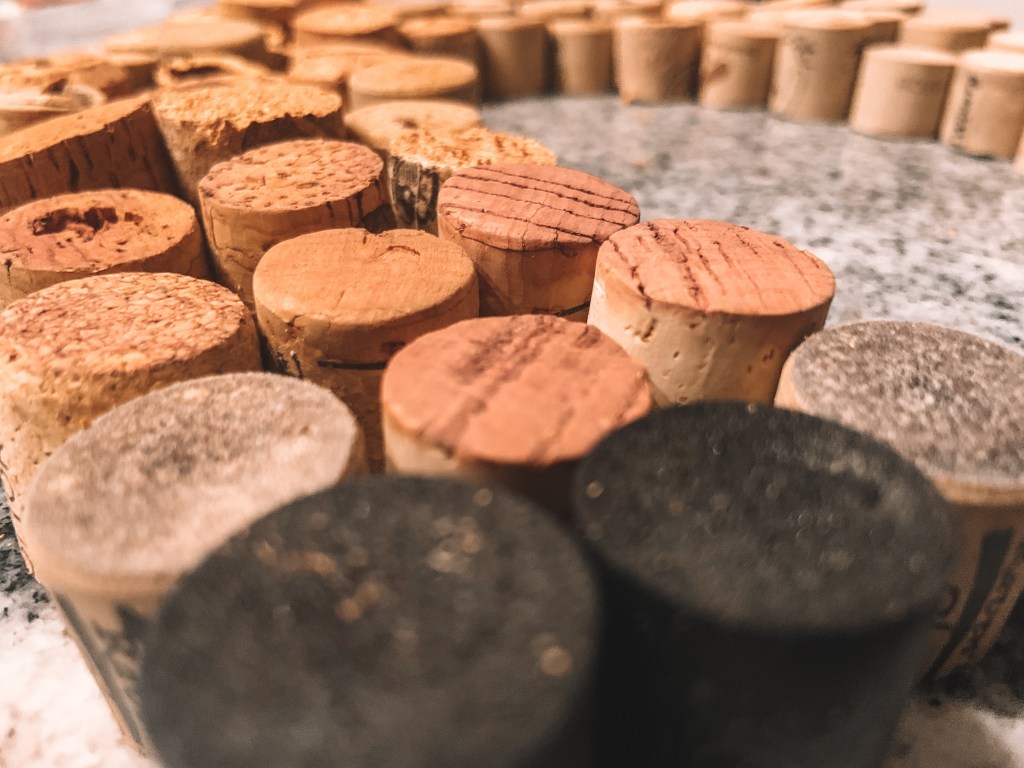
There’s nothing like a craft and sip night with your favorite bottle of wine. But what do to with all the corks?
Turn them into your craft!
This DIY Wine Cork Rainbow makes the perfect decoration in your house and the excuse to buy more wine.
I personally love different types of wine. My favorite is sweet reds though!
When I went to Italy during college, we had wine every night for dinner. I think that experience really helped me love wine even more. It brings back those fond memories.
Speaking of things I love, rainbows mean SO much to my family. They’re a signal of hope, Mila, and creativity. That’s why I had to create a rainbow with all these wine corks I have in my jar!
If you’re ready to do something with yours, here’s what you’ll need for this DIY:
Wine corks
Hot glue gun
Glue sticks
To cut down on the weight of the rainbow, I decided to cut the wine corks in half. This took a little bit, but there’s a ton of blogs and videos that cover the best ways to cut them in half.
I just grabbed a cutting board and knife to chop!
Before starting, I poured myself a glass of wine and started organizing them.
At first, I did it randomly. It still looked super cute, but I thought ombré-ing the colors from dark to light would look adorable. You could definitely paint your corks whatever colors too. I just personally like the natural shades of cork.
After you get it all laid out, it’s time to use your glue gun.
This obviously takes a little bit of time and patience. Just know that your rainbow probably won’t come out exactly how you set it up.
I hit glued the sides first. Then to help make it more sturdy, I hot glued the back where the creases were. Honestly, it probably didn’t need that extra step, but I’d rather just get it all done at once.
It’s been a little while since I’ve crafted just for me, but I think it turned out amazing!
I took down the big picture frame that held all my corks and replaced it with this. My kitchen now has a happy rainbow that blends in perfectly. I smile every time I glance at my wine cork rainbow.
For your next girls night, I hope you can try out this DIY Wine Cork Rainbow and enjoy a big glass of wine. Crafting is always so relaxing.
Before you go, let me know in the comments what your favorite type of wine is. If you don’t drink wine, have you ever crafted with wine corks before? Would you try?
Then, check out some of these wine recipes and crafts from creative, wine loving moms!
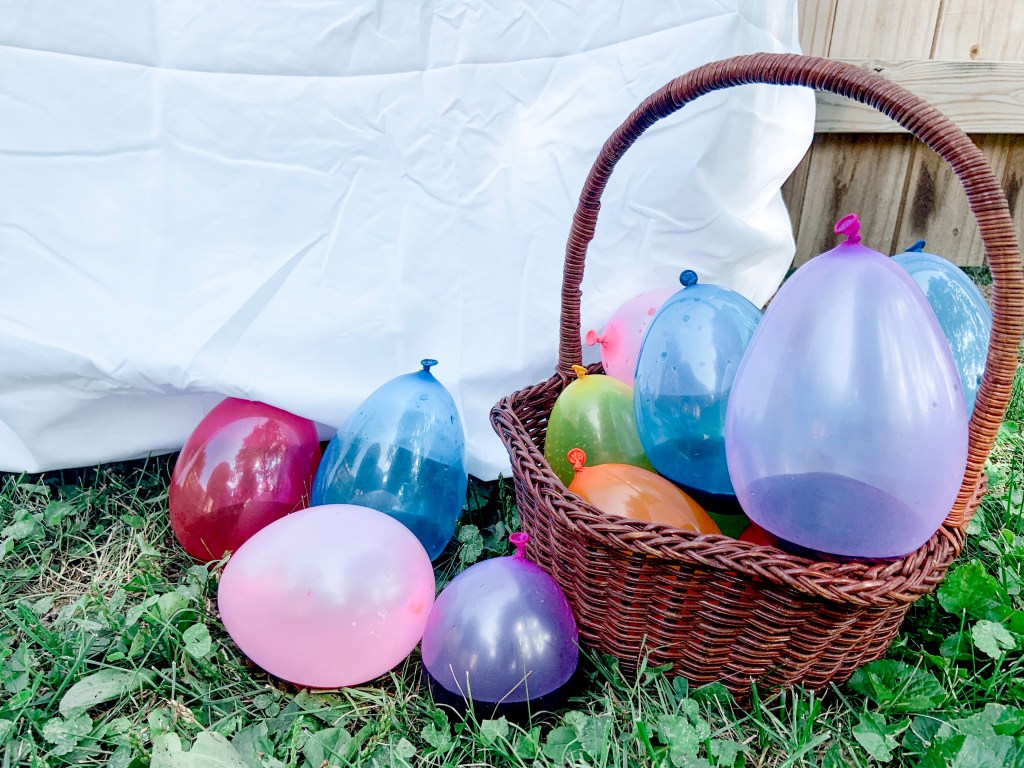
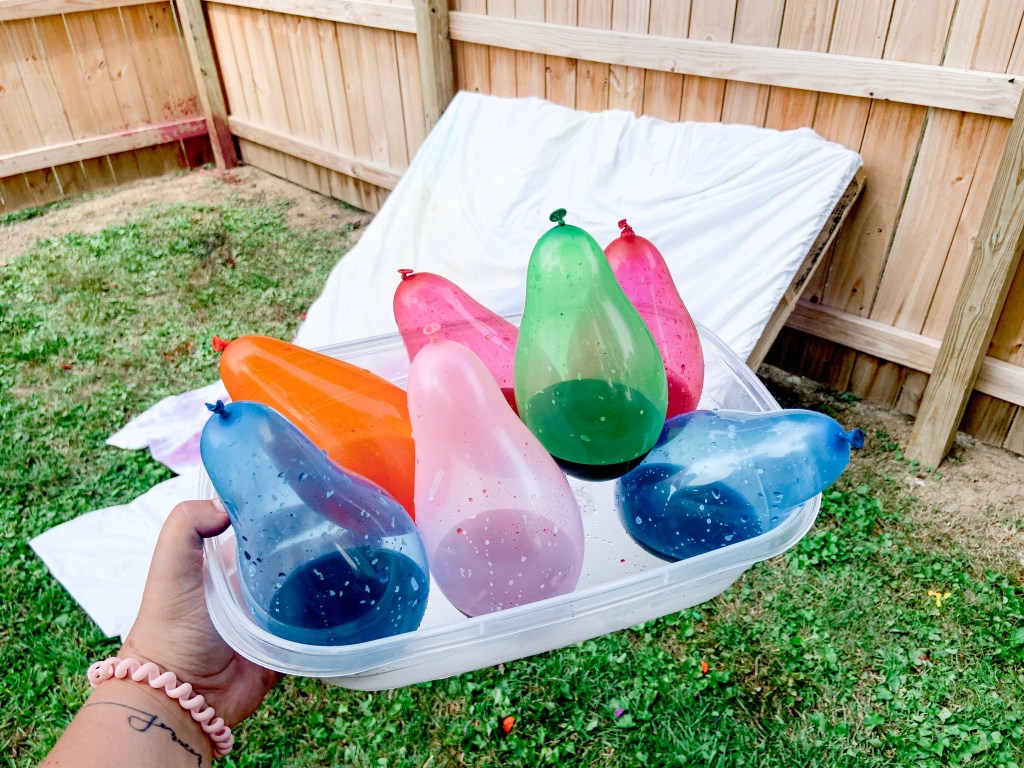
What’s more fun than water balloons? Throwing water balloons with tie dye in them at a perfectly white sheet.
Let’s just say, Mila custom made me Water Balloon Tie Dye Sheets to celebrate summer.
AND… I love them!
So, let me tell you this first. It was sort of a huge jump of faith to do this activity. Mila was introduced to water balloons this year and throwing them at other people… do you get where my brain went?
Unlike Mila, I didn’t wear a swimsuit for this activity. I hoped with all my might she wouldn’t just throw them at me.
She ended up not getting me with them, but if you do this activity, beware! Tie dye is so hard to get off other clothes if you can’t get to it right away. It also takes a few days to get off of skin too.
But it was totally worth it! This is my favorite art project of the summer that I get to use frequently!
When you brave it with your kids, here’s what you need:
There is some prep going into this activity. It’s a lot easier than the Balloon Pop Artwork we did for Mila’s birthday!
For some reason, Mila slept until 10 am one morning, which gave me a perfect amount of time to set up and prep for this. Usually I’m all for older kids helping with prep, but this one can get messy!
To start off, I mixed the tie dye together and let the solution saturate.
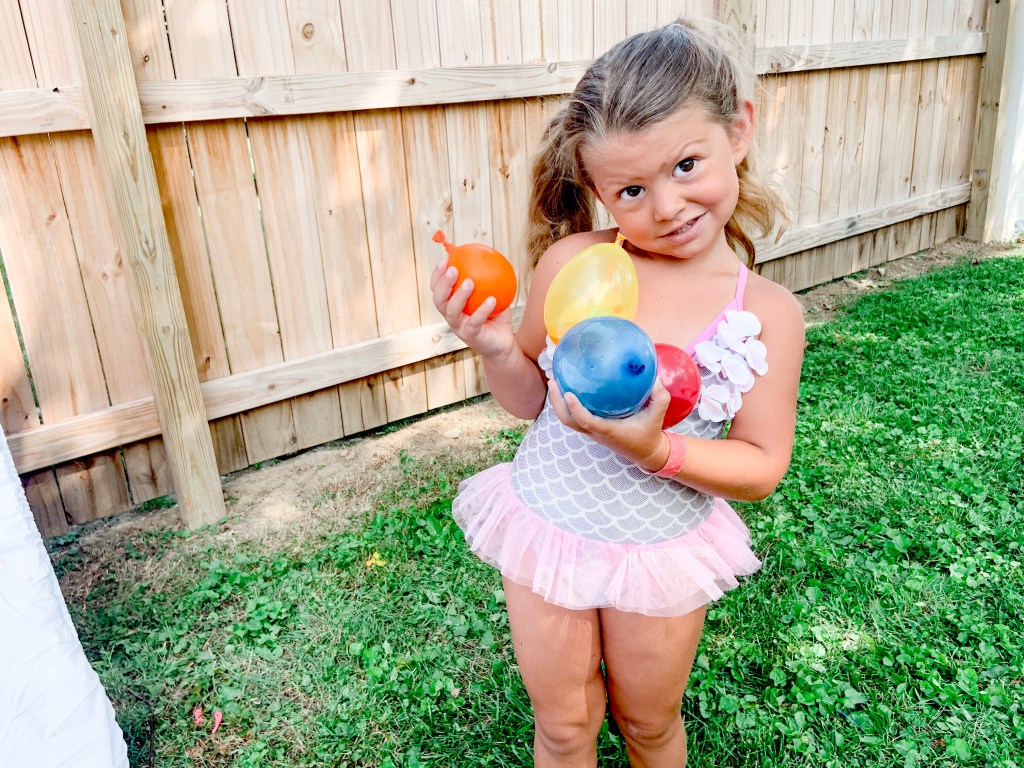
Then, I color coordinated the balloons to match the dye. This way Mila knew what to expect and could do more color recognition… because we’re always learning!
After I thought they were mixed enough, it was time to start.
I’m guessing there’s probably easier ways to do this, but this is how I did it. If you know of a better way, PLEASE let me know in the comments.
Anyways, I blew up the water balloon with air. Then, added the tie dye water to the balloon by sticking the tip of the bottle into the balloon. After, I added extra water into it.
See… messy.
I found it better to blow it up as much as it could and not fill it completely with water.
Not going to lie, this took a little while, but I had the time. If you’re planning to do this, just know they’ll want way more than you planned! We probably threw around 50 to 75. They all didn’t hit or pop on the sheet.
So, if you think you have enough, do ten more.
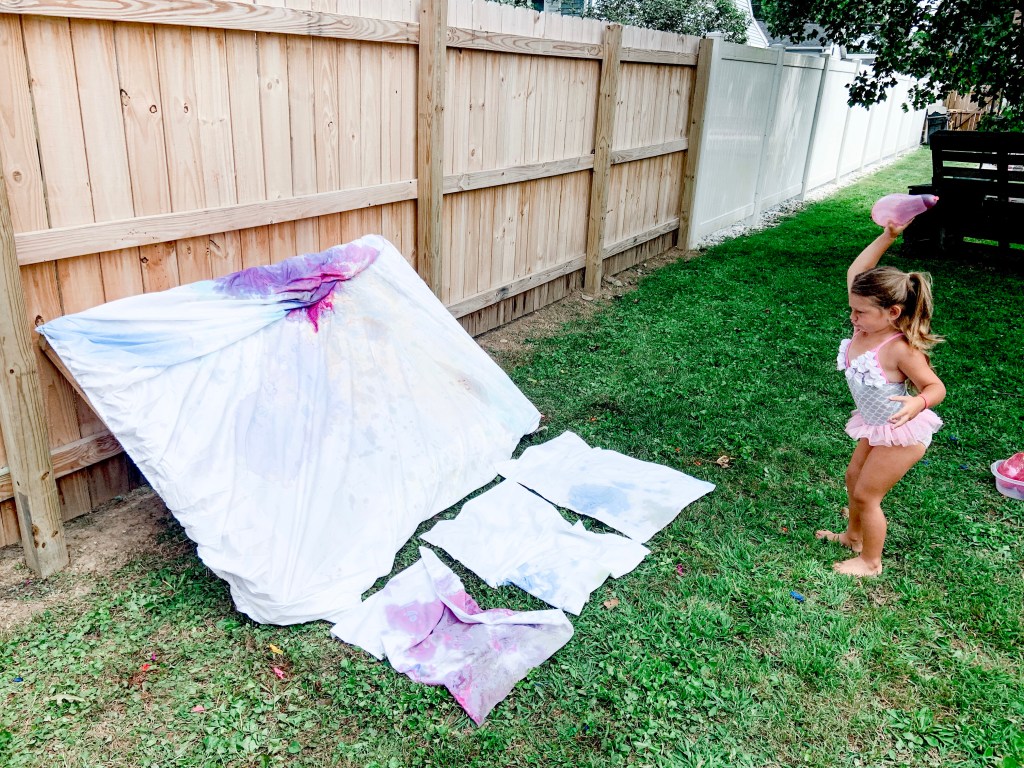
After the balloons were done, I set up the outside area. Since I have access to pallets, I used that to hold the big sheet. The pillow cases went to the ground to catch the splatter.
At first I had it more upright, but it worked better with a slant.
By the time Mila woke up, the area was ready to rock-n-roll. Let’s just say, she woke up pretty easy when she found out what we’d be doing!
All I told her to do was get her swimsuit on and meet me outside.
Then she saw the balloons and sheets.
I told her the plan for the day and she took right to it. Again, I’m thankful she didn’t hit me with any because I wore normal clothes. Which I would not recommend.
We found out that the balloons were harder to pop than we originally thought. I’m guessing because of the air in them.
She found her rhythm though!
Look at that lefty power.
It took a lot less time to throw all the balloons than it did to pop them.
I actually made more midway through.
We had fun talking about the different colors and making predictions about their pop. Like I said, it took a little bit to figure out how to pop them. I think the sheets softened the blow.
It was fun watching Mila’s strength and persistence while throwing them.
One tip I’ll give is to turn the sheets and pillow cases half way through. That way both sides can get optimal color!
I am super impressed with how these turned out.
To finish off the tie dye, I folded the sheet and pillow cases up, put them in a plastic bag, and popped them in the refrigerator overnight. Then, wash and dry them. They’ll be ready to go after that.
Once I put them on the bed, I’ll update this post and share on Instagram and Facebook.
We’ll definitely be tie dying again with this kit! I’ve made a few shirts with it, but this way by far the most fun we’ve had with it.
Have you ever tie dyed anything? What’s your favorite way to do it? Comment to let us know.
I think ours is with water balloons!
After you comment, check out how these moms incorporate water play with their kids!
These are just the different fruits we used. You can use any that you like best!
First, cut all of your fruit into smaller pieces. I sliced the strawberries and kiwi, halved grapes, used pineapple chunks, and whole blueberries for ours.
Then, cut your watermelon into slices. Then you can make different shapes if your toddler would like. We used star cookie cutters for Mila’s.
After you figure out the shape of your watermelon pizza, spread fruit dip all over it.
You could also use whipped cream too!
Next, take the fruit and cover your watermelon. We ordered ours like the rainbow on Mila’s star and an inverted rainbow on my watermelon slice.
I absolutely love how these turned out!
It was such a tasty snack, but I bet they’d be a huge hit at family get-togethers or parties. I can even see it being an interactive station.
A melon-ion possibilities.
Yes. I absolutely had to throw a watermelon pun in the post somewhere. All of you would be disappointed if I didn’t after the Shark Week post! Which was just JAWesome.
No matter what you make these for, you won’t be disappointed with how they taste. And your toddler will love helping out with their snacks.
Let me know in the comments if you’ve ever made watermelon pizza.
I’m completely shocked August is here. Summer is flying by, but there’s always time to focus on self care.
As parents, we sometimes forget to take care of our mental and physical health. It’s hard to fit it all in. Here are twenty-five self care activities that you can do all August long.
They can even be fun if you have littles with you too!
Studios are holding sign ups and preparing for another great year. If you’re wondering if you should sign your toddler up for dance or what it’s even like, you’ve found the right post.
Here’s why Mila and I LOVE dance class and why your toddler should join in too!
Friends and Socialization
One of the biggest reasons I signed Mila up for dance was for socialization.
Since she plays by herself most of the time, I knew she needed to make friends. Let me tell you, her socialization and friend group most definitely expanded.
One of her favorite parts of going to dance class was seeing her friends. She learned how to play better with other kids, take turns, and the basics of friendship. That’s a skill that she’ll always have to use.
Plus, as a dance mom, I got to meet so many different parents. I’m so glad to know them and their kids.
Learn About Body Movement
Toddlers are awkward.
They fall and stumble. Somehow they’re always getting back up and running again.
Dance helps toddlers and kids feel comfortable in their own body. It lets them understand how to move certain parts and their capabilities.
I think Mila’s coordination levels went up since starting dance. Plus, she learned how to move her body so fast! Her teachers did an amazing job helping her learn all the moves and to trust her body at such an early age.
Practice Listening to Other Adults
Since I’m almost a full time teacher, but a long time sub, I selfishly wanted Mila to learn how to listen to other adults.
When they go to dance class, they are made to listen and be instructed by someone that’s not their parent. It can be difficult for them, but it’s so rewarding in the long run.
I’m sure that Mila will listen and do so well in preschool because of her experience in dance class.
It might seem like a small skill, but it’s helped her be more independent and happy with other trusted adults. I’m excited to meet her new teacher this year and to have Mila listen and love another supportive adult.
Confidence
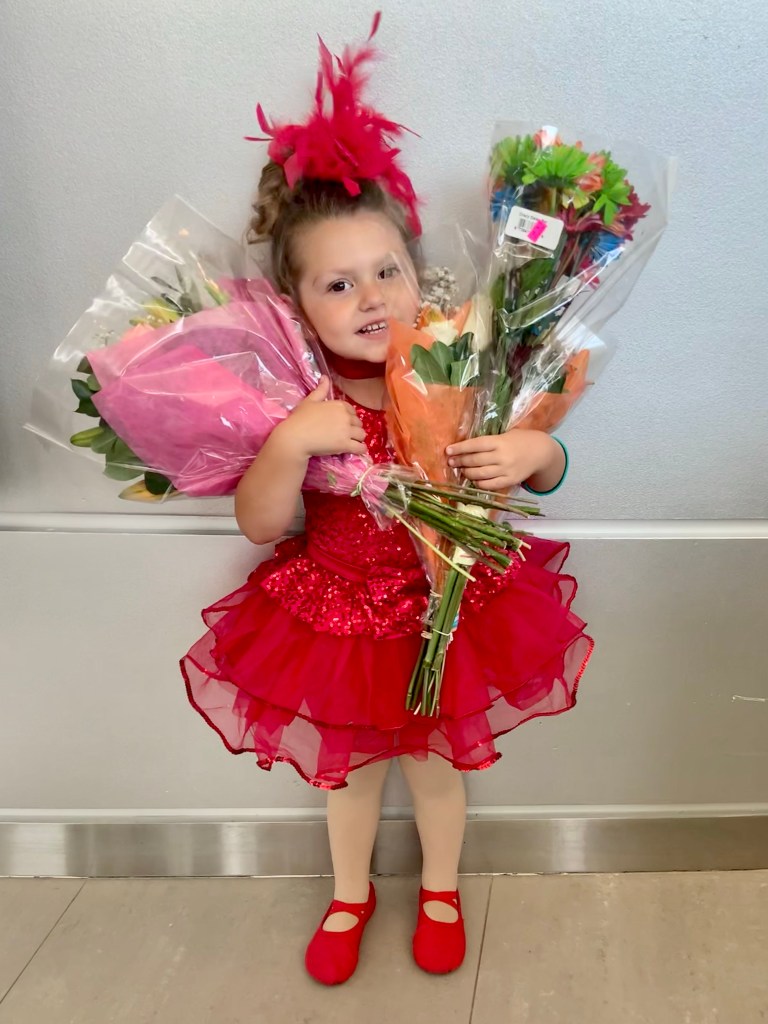
As an adult, I would never be able to get in stage and dance in front of a crowd. Yet, groups of toddlers, kids, and young adult dancers did at their recital last year.
It showed how confident they were in themselves.
Mila’s always been confident, but when she danced on stage, that confidence oozed out. It even helped her and her friends do their talent show.
As a mom of a little girl, I want her to project confidence through all aspects of her life. By being apart of dance, she gets to practice that at such a young age. That makes me a very proud dance mom.
They have FUN!
Photo by Teri Stein
The most important aspect of anything during the toddler stage is having fun.
Let me tell you, toddler dance classes are chaotic to watch. At the beginning they’re running around crazy, but they’re smiling and laughing. By the end of the year, they know what’s expected of them and are still having fun.
Maybe I’ll call it organized chaos.
BUT… when they’re having fun they want to come back and learn more. Mila and I have so many great memories from dance class and are excited for another year of them.
Dance welcomes boys, girls, and whoever wants to join. It’s such an inclusive space that I’d recommend to everyone.
Local friends, dance studios are opening up. We go to Legacy Dance Studio and have had nothing but positive experiences. Mila and I would love to see you there too!
Have you ever signed your toddler up for classes or sports? What did you love about them?