Mom Tip: Label All Your Kid’s Items

If your child is anything like mine, labeling their school, daycare, and after school activity items is a must. Not only are there so many benefits from doing this, I can show you the cutest labels from Name Bubbles.

Mila is the queen of losing her things; I think most four year olds could hold this title. We are constantly searching for shoes, coats, and water bottles. Miraculously, no items have been lost in public. but I have a little secret of how we’re preventing this further.

Honestly, I’m still working on helping Mila organize her things at home. She likes to get everything out and then stuff them in bags, THEN put them into her closet. It happens.

It’s a work in progress and I know it’ll get better eventually.

Since she is in preschool, dance, and other sports, we are constantly on the run. One way to keep track of her things is to label them. We have been using Name Bubbles.

They have a ton of different designs to choose from and you can be as detailed on them as you want. I love their clothing labels that irons on them; especially with dance costume and extra clothes at preschool. Believe me, this child love to trade her clothes and wear her friend’s clothes, so this just helps sort them out a little more.

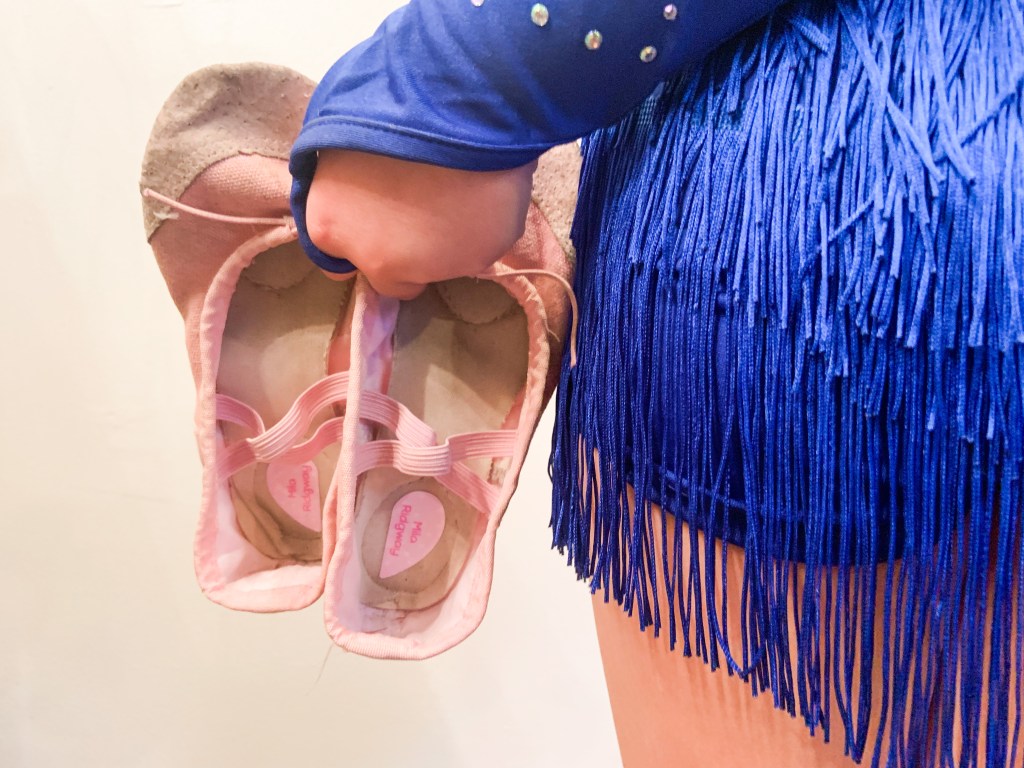
Their custom daycare and school label packs are a must. I put them on Mila’s shoes, water bottle, backpack, lunch box, and her bentgo box. The water bottle ones really come in handy, especially when all the kids have their bottles by each other. It helps the teachers and her remember exactly which bottle she took to school or practice that day. Also, I love that the daycare labels have fun and cute designs for littles and the school labels have more ‘grown up’ designs for older kids.

It also helps in the opposite way too. Sometimes Mila will accidentally pick up someone else’s coat or water bottle and I know it’s not right. Since she knows her heart label is on all her school and practice items, she can look and instantly see it’s not hers. It prevents fights between me and her, which lets the day run more smoothly.

Even though I’ve seen a big difference of Mila not losing things while we’re in public, I wanted to give you all a list of positives about using Name Bubbles labels too.

  • Teaches children about ownership and responsibility.
  • Helps child remember which items are theirs.
  • If an item gets lost, you can recover it easier.
  • Prevents fighting between kids.
  • Helps resolve sanitary issues.
  • Plus, they’re cute!

I can’t wait to pick some new labels out with Mila before she goes to kindergarten. Of course we’ll have to get new labels from Name Bubbles for her new adventure. This is just a start to our labeling addiction.

Do you label your child’s items when they go to school? Let me know in the comments… and some home organization tips for kids too (lol).


I did receive these labels from Name Bubbles as a gift, but would totally recommend them to all! Since I am a Name Bubbles Affiliate, if you do purchase labels from my links, I will get a small percentage of the sales.

Advertisement

Strawberry Handprint Pot

If you love strawberries and want a cute pot to grow them in, you’ll have to make this Strawberry Handprint Pot!

These pots are a great way to watch plants grow, but also perfect for kids to get involved too.

I’ve said it a ton before, but Mila and I are obsessed with plants. We probably have 200 houseplants. Then in the summer, we have fruits, veggies, and herbs. My front porch looks like a jungle.

Last year, strawberries were our favorite to grow. Mila would literally eat them from the plant. It was so fun to check every morning.

To make strawberry picking more fun this year, we made this Strawberry Handprint Pot.

Here’s what you’ll need to make yours:

  • Green Paint
  • Red Paint
  • Black Paint
  • Pot
  • Brush
  • Strawberry Plant
  • Potting Soil

This handprint art is actually pretty easy to do.

Just paint (or have your kiddo paint) the majority of their hand with red paint. Then the top part with green.

Press firmly on the pot. We were able to get two handprints per paint!

Once it’s dried, add the seeds on to the strawberries. I just made little hearts in black. I thought it looked cute!

When those are dry, plant your strawberry plant and you’re good to grow.

Like all our crafts, I think this turned out so cute. I know this pot will have strawberries in it for years to come!


Looking for more strawberry fun? Check out some of these recipes and crafts we’ve done in the past!

Let me know in the comments which one is your favorite! Or a recipe/craft we should try next.

DIY Bug Catcher

If you’re looking for a fun way to get your kids outside and interested in bugs, make this DIY Bug Catcher.

The best part, I reused everything to make this!

Mila is slowly getting interested in bugs. She can tell you all about the butterflies life cycle and can identify different bugs too! Mostly, she’s excited about catching lightening bugs this year.

Even though I know she can, I don’t think she’ll want to use her hands. Cue another light bulb parenting moment…

We decided to make a DIY Bug Catcher so we can see lightening bugs and whatever else she catches. Like I said before, we got to reuse items to make it too!

Here’s all that it took to make this:

  • Parmesan Cheese Bottle
  • Stickers
  • Pipe Cleaner
  • Googly Eyes
  • Hot Glue
  • Tulle

First, take the label off and clean the Parmesan cheese container. I don’t think the bugs would mind the cheesy smell, but it needed washed out.

After, I hot glued tulle on the smaller hole side. This way the bugs can get fresh air!

I then put stickers that said, “Mila’s Bug Catcher” on it. When I was done with that, I let her put whatever stickers on there.

While she was decorating her bug catcher, I made the bug face top. I just used the colored googly eyes Mila told me to use and a pipe cleaner for the antennas. All I did was use a little hot glue and it worked perfectly.

Once you’re finished, twist the lid on and your DIY Bug Catcher is complete!


I’ll make sure to update with our bug catching adventures. Which bugs did you like catching as a kid? Let me know in the comments.

Boozy Baja Blast Recipe

If you crave Mountain Dew Baja Blast, but like a little kick to your drink, you’ll love this Boozy Baja Blast Recipe! With only three ingredients, this will be another summer favorite!

Plus, you have to grab a cute cup from DIY With The Wears for all your drinks too.

Lately, all I’ve wanted to drink is Mountain Dew Baja Blast. It’s just so refreshing and tasty. I love to get it during the summer when I go to Taco Bell.

But, I wanted it without going to Taco Bell. I knew I had to find a way to make it at home.

With only two ingredients for the regular DIY Baja Blast, it was super easy. Since I do enjoy a boozy drink or two in the summer, I decided to add a third ingredient too.

Here’s all you’ll need:

  • Mountain Dew
  • Blue Powerade
  • Key Lime Vodka
  • Ice

First, fill your cup up with ice. I swear certain drinks just taste better ice cold.

When mixing the Mountain Dew and Blue Powerade together, try to make it 75% Mountain Dew and 25% Powerade. This is the most perfect mixture and tastes just like Baja Blast.

Then add a shot of your vodka to top it all off.

It’s an easy drink to make and tastes so good. I love that I get one of my favorite drive through drinks at home!


Let me know in the comments what your favorite summer drink is and make sure to check out some others below:

Explore Dundee Falls in Dundee, Ohio.

Ohio is a state full of hidden gems. Our favorite local one is Dundee Falls in Dundee, Ohio. With a short hike, you’ll find a beautiful waterfall and peaceful scene.

Besides the view, I love that Dundee Falls is perfect to explore for people of all ages.

For our first adventure of the season, Mila, Josh, and I all went to Dundee Falls. Mila and I have been there quite a few times, but it was Josh’s first. My family has taken Mila since she’s been one and she’s always loved it!

It’s only about a mile hike from the start to the falls. Then another mile back. It’s not long at all and it’s shaded by trees. That makes it so nice for a hot summer day.

Some things I would suggest people to bring when they come to Dundee Falls are a change of clothes, water bottle, and sunscreen.

Since it’s the first time Mila and I’ve went so early in the year, I did not expect it to be as muddy as it was. If you’re planning on visiting in the spring, prepare for the slippery mud! It’s sort of everywhere.

This time, we went a different path from normal. We crossed the stream before the falls and went the long way around.

It was fun seeing them from a different view and just getting to explore. I did fall like ten times, but it was still a blast. We also got to climb over the river rocks and just get completely immersed in nature.

If you go the regular way to get to the falls, you do have to climb down a little rock way. This is normally somewhat slippery, but it was even more muddy which made it a little difficult to get up. I can imagine it was tricky to get down too. BUT there were so many people able to get up and down of all ages and ability levels. Just know it’s not accessible for those in wheelchairs or other limiting abilities.

Mila’s favorite part is actually getting into the water at the falls. She just loves to play and jump in it. She always looking for fish, frogs, and whatever else she can find too. At this time of the year, the water felt nice. I fell in the deeper water under the falls and was soaked. It wasn’t too cold for me to get back.

Our trips to Dundee Falls are so informative and an amazing sensory experience for Mila too. We loved pointing out wildlife and talking about cleaning up our Earth.

Speaking of… the trail and park in all is really clean. People who visit are mindful of their trash if they bring a picnic. They’re also really nice too. I’ve always had positive experiences visiting Dundee Falls. Some people even bring their dogs, which is always so cute!

The three of us had an amazing time Exploring Dundee Falls. Mila and I might have ended the trail completely muddy and soaked with water, but the adventure was worth every second.


Once you’re done visiting Dundee Falls, I would suggest making a short drive to the World’s Largest Cuckoo Clock. We go every time we’re near Sugarcreek! It’s Mila’s favorite.

Another place you have to visit is The Wallhouse. They have such great ice cream. It ends the day perfectly.

If you’re from Ohio, let us know some trails or places we should visit next! Or let me know your favorite place to go to where you live. Maybe we’ll have to go too.

DIY Gardening Grow Kit

If you’re looking to surprise a gardener in your life with a little gift, this DIY Gardening Grow Kit will be a hit!

Mila and I LOVE to garden. We try to grow vegetables every year and eat what we produce. It’s always a fun way for her to learn about the growing cycle and show her how much work it takes to make our food. She’s always very into growing flowers and making arrangements.

Let’s just say, we always are surrounded by plants and gardening supplies!

Since this time of the year is so close to Mother’s Day and end of the year, this is a great gift to give and easy to assemble too. You can find all these items at any local store.

Here’s what we used:

I love being able to put all the items into the watering can. It makes for an easy gift bag. You could also add ribbon or a printable with it too.

Even though I added flower seed packets, you could easily do veggies or even DIY seed bombs in there too. If you’d rather skip seeds in general, putting a plant inside of the watering can would be a cute idea too!

For soil, I would suggest either buying a whole potting soil bag or putting enough for a pot in a ziplock bag. You can easily stuff in it the bottom of the watering can.

This DIY Gardening Grow Kit will be perfect for the mothers, teachers, or any gardeners in your life!


What’s your favorite outdoor plants to grow: flower or veggies?

DIY Earth Day Handprint Artwork

Small hands make a big different, especially when it comes to protecting our Earth.

This DIY Earth Day Handprint Artwork is perfect way to showcase your love for Earth while using recycled crafts supplies.

At a young age, I’ve taught Mila she needs to love our Earth. We’ve always talked about recycling and how we need to be mindful of our decisions. She always picks up trash off the ground and loves every part of the outside world.

It’s important to me that she knows her impact and ‘small’ hands can help our Earth heal.

This DIY Earth Day Handprint Artwork was a perfect way to showcase that. We reused supplies we already had and made it cute to show off. Hopefully signs like these will help inspire others to love Earth as deeply as we do.

Here’s all we used:

  • Wood sign
  • Paint
  • Paint brush
  • Yarn
  • Hot glue

To start off, I reused the back of an old summer sign. It was the perfect size and shape of what I had in mind. Plus, it gave it another purpose too!

Next, paint your child’s hands resembling the Earth. This was a bit tricky. I just added blue paint first then topped it off with green. Obviously it’s not going to look exactly right, but I think ours turned out pretty cute.

Then, press down on your child’s hand to get the paint to transfer to the wood sign. You have to work quick so it doesn’t completely dry on their hands.

Once the paint is dry, you can add whatever quote around the hand Earth. I was inspired by The Letter Vee’s Earth Day worksheet and used, “Small Hands Make A Big Difference.” You can write whatever speaks to you!

At this point, I could’ve been done, but I had to add a little extra.

I used scrap yarn as bows on the hanger. The color really popped and gave that earthy feel. Once I saw that, I knew this piece needed more texture than just the bows.

So, I added the fluffy white yarn around the outside of the sign. It really made it look special and stick out.

Since I wanted to spread our love for the earth, this sign is hanging on our porch. Hopefully it’ll inspire someone to make good choices. The future of our world and children are in our hands.

We can make a difference.


What ways do you celebrate our Earth? Check out these fun ways we have:

DIY Match the Egg Memory Game

Looking for a fun way to challenge your little this season? A DIY Match the Egg Memory Game is an egg-ellent option!

When I saw the egg match printable from The Letter Vee, I knew I had to utilize it. Mila loves playing memory games, especially when they’re seasonal.

With a little work, it became such a cute and fun way for her to settle and use her brain.

This DIY Match the Egg Memory Game takes a little bit to make and set up. After the hard work though, it looks beautiful and my little loved it! She spent about 30 consecutive minutes playing with it.

Here’s what you’ll need:

Not going to lie… this DIY took a little work.

First, you need to print out the sheet from The Letter Vee. Then cut each of the egg pieces out.

Next, use modge podge to glue the paper on to pieces of cardboard. I only used a thin layer between the paper and cardboard. It seemed to have stuck perfectly fine.

Once the glue is dry, cut the cardboard into the right sized pieces too.

You could easily be done with your Match the Egg Memory Game, but we wanted to make it extra cute. This is totally optional, but I think it made it extra special.

We reused pink tinsel to trim out the pieces. To do this, I just cut the tinsel to size and hot glued around the cardboard. Then you just stick the tinsel around the outside and let it cool. I decided to leave the tinsel off of the side where the eggs come together too.

You can use these pieces as a traditional memory game or make it a little more special by hiding them in eggs around the house. Either way, it’s full of Easter fun!


What Easter games do you play with your kiddos? Let me know in the comments.

Strawberry Cheesecake Stuffed French Toast

If you’re looking for a new breakfast recipe for this Easter, you have to try this Strawberry Cheesecake Stuffed French Toast. You can easily make it in regular squares or spice it up for Easter morning.

On Easter morning, we have the same routine. Wake up, find our Easter basket and eggs, and then eat a big breakfast before all the festivities of the day! It’s important on holidays to make sure to get food before everyone gets together and plays. That’s why I’m always on the hunt for recipes that Mila will love.

Since I love french toast and Mila’s into strawberries (I mean, me too if you remember last summer), this seemed like a perfect one to try! It combined all of our favorite flavors in one bite! Who wouldn’t love that?

I had most of the ingredients on hand, but if you’re wanting to try this recipe out, here’s what you’ll need:

For this Strawberry Cheesecake Stuffed French Toast recipe, it’s made similarly to regular french toast… besides the stuffed part!

The strawberry cheesecake stuffing consists of mixing cream cheese, vanilla, a pinch of sugar, and strawberries in a bowl. I mashed the strawberries a little bit to get the flavor consistent throughout the cream cheese. Then spread the mixture on one of the slices of bread. Next, put another piece of bread on top.

If you’re making your french toast with cut outs, this is the time to do it. We used different Easter shapes! No matter if you’re making it fun or traditional, make sure to press the sides down so it doesn’t all escape!

Now it’s time to dip them. Make a mixture consisting of one egg, milk, cinnamon, vanilla, and a pinch of sugar. Dip your bread in the mix. I make sure to add extra cinnamon every time.

After it’s coated, place on a hot pan that’s coated with butter to cook.The Strawberry Cheesecake Stuffed French Toast is done when both sides are brown and toasty.

Once it’s done, I’ll add maple syrup and sprinkles to top it off. Sprinkles make everything better.

Then enjoy!

We loved this tasty breakfast and I can tell we’ll be trying different flavors to stuff our french toast with. I think using the Easter cut outs made it even more fun and festive.


What’s your favorite breakfast food for Easter morning?

Farm Clean Up Sensory Play

What’s Mila’s favorite part about spring, minus the flowers and nice weather? All the baby animals! This Farm Clean Up Sensory Play idea is a perfect way to talk about new baby animals AND have fun being messy too.

This interactive play was easy to set up and let her play for a long time. The best part… it’s completely edible too.

First, I want to say a HUGE thank you to Terra by Battat for gifting Mila these animals to play with. They have these big Bucket Sets full of different types of animals that are amazing. Terra by Battat sent us farm animals, marine animals, and a few other goodies that we love.

Their toys are super realistic and come in their own world. Mila has spent hours with both the buckets. The marine animals have became her favorite bath tub toys. I’ll be posting different ways we’re playing with them. You should still totally check Terra by Battat out though. Would make perfect Easter presents!

Anyways…

When I saw the country world bucket, I instantly thought of this fun sensory play. To further create this world, here’s what you’ll need:

The hardest part of this sensory play is the set up. It just takes a little time, but it’s worth it.

To set the scene, all you need to do is spread chocolate pudding in one part of your sensory tray. I also added some crushed kix cereal to make it look more realistic.

I also made sure to make the animals ‘muddy’ too. Honestly, I didn’t know if Mila would want to do that so it just made it a little more fun for me.

Then, I set up the cleaning area. This just consisted of a wash cloth, cleaning brush, and soapy water. It was nice doing the water in a bowl because Mila instantly thought it was a bathtub! Which works for me.

The next little area was where the animals dried off. I just used shredded paper and tissue paper.

After it was all ready for her, I just let her do whatever. When we do sensory set ups like this, I try not to give her too much direction. She immediately started cleaning off the animals.

It was so cute to listen to her too. She pretended she was a zookeeper and it was cleaning day.

After the first clean up was done, she made the animals muddy again and kept the process going. I loved watching how creative she was through it all.

I think this activity would have been even better outside with more space, but it worked well inside too.

The clean up for this activity was really easy too. All I did was recycle the paper. Then I just used water to clean everything else off. It was quick and simple!

I have a feeling we’ll definitely be doing this set up again in the near future. Until then, I can’t wait to show you the other fun activities we have planned with the marine world bucket. It was another hit with Mila.

Make sure to check out Terra by Battat and order realistic play animals that your kids will love.


What edible sensory play do you do with your kids? I would love to hear ideas.