If your child is interested in flowers and putting them together, they’ll love this Kids Floral Arrangement Activity.
With a few supplies, kids will make different arrangements for a long time!
Mila is obsessed with flowers. When she sees them at the store, we have to buy a bouquet… or two. I’m usually fine with it. We smell them and love bringing life into our home.
One day, Mila told me she couldn’t wait until our flowers were done growing so she could make her own bouquet.
Cue the light bulb moment!
I thought about all the fake flowers we had recently bought and that she could do just that. Over and over again.
Here’s all Mila used to make her Kids Floral Arrangement.
Fake flowers
Colander
Vase
Wire cutters
To start off, I only had the flowers to prep! Since they’re usually bundled all together, I wanted to cut them. There’s wires underneath fake flowers, so I just snipped them all with wire cutters.
Then I put them on a plate for Mila to choose what she wanted.
I did ask her to plan and put the flowers in a colander. This way she could work on her motor function skills. It was fun to watch her plan and be creative with the flowers. She especially loved the fake butterflies!
After she had it all planned, I told her to put them in the vase. She again, fluffed them and put them exactly how she wanted.
In the vase, I added crinkle filler paper so the flowers stayed upright.
Now we have a bouquet of flowers that will never die on our kitchen table. She is so proud of what she made and I love that we can do this activity again and again.
Here’s to all my seasonal floral arrangements being made by Mila!
Do you like getting fresh flowers or are you more into plants?
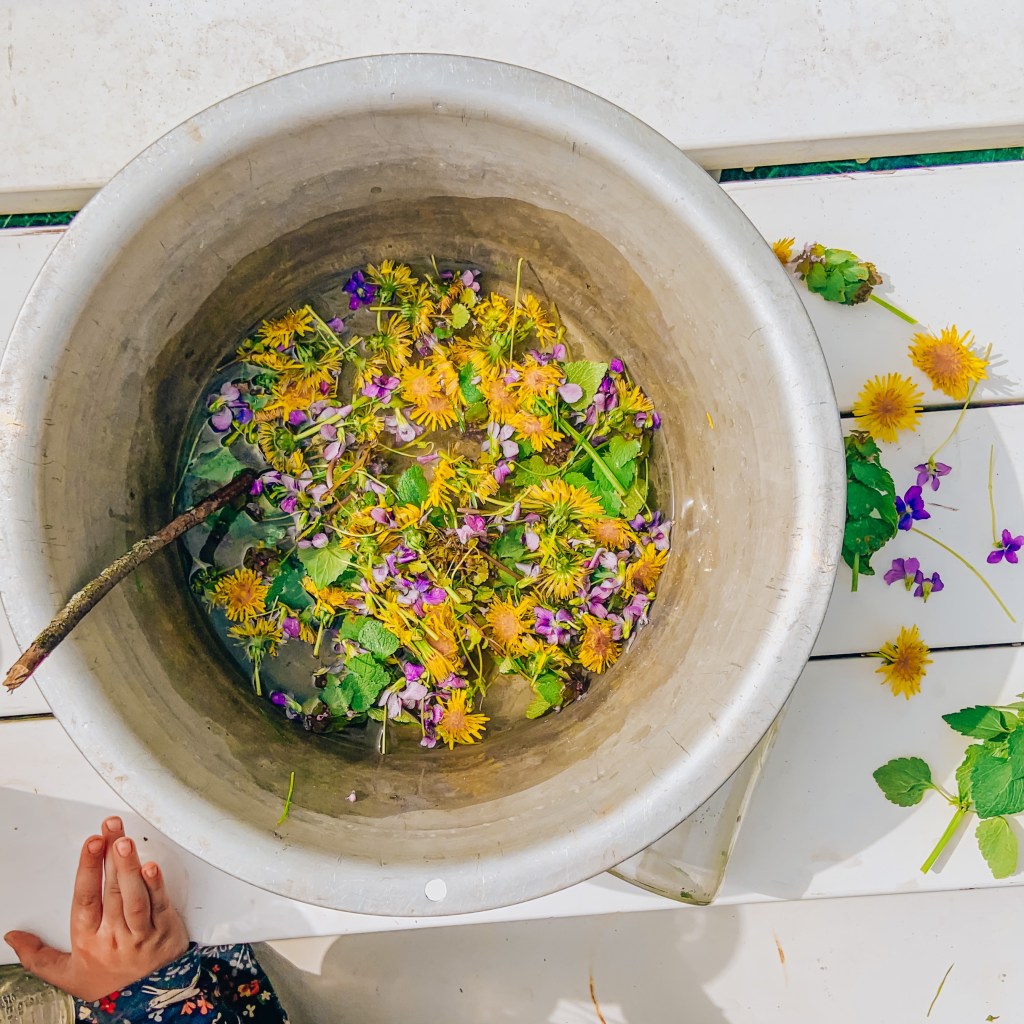
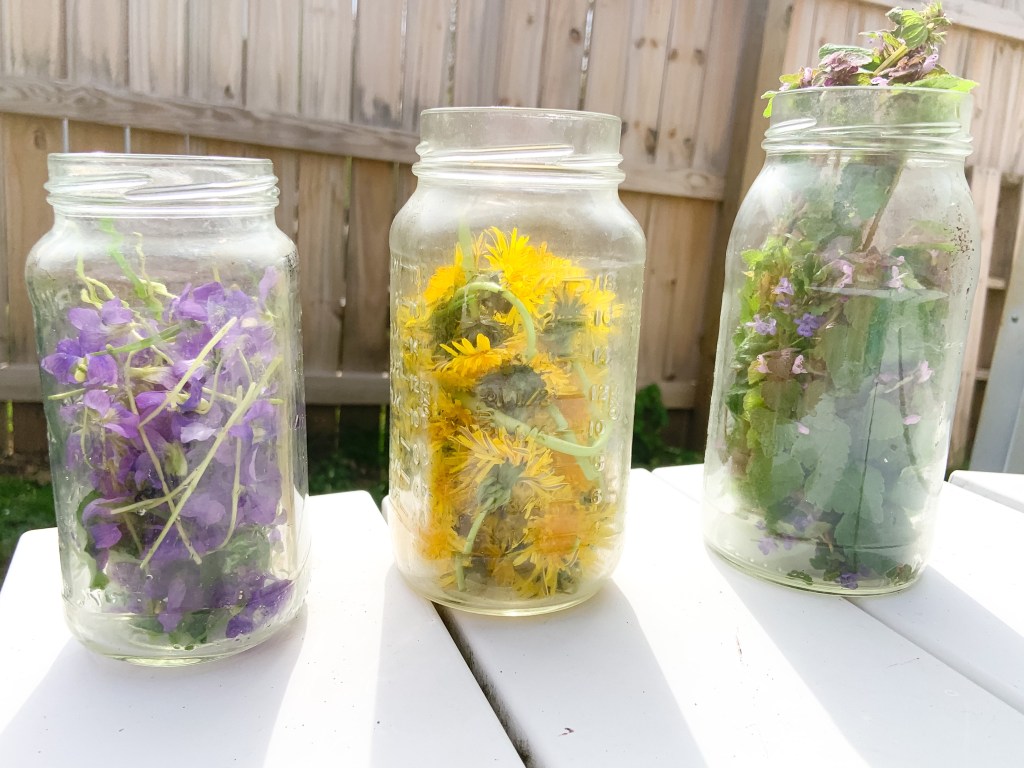
Looking for a fun sensory activity your child can do outside? Try this Flower Potion/Soup.
Not only does it get your kid independently playing outside, it’s a fun sensory experience for them too.
Flowers are Mila and my favorite part of spring! All the pretty flowers make me smile and she loves to pick them. We try to incorporate them in a lot of play activities.
Another element Mila is obsessed with is water! I learned early on in parenting that water calmed Mila down. No matter if it was a lot or just a little.
This kid activity is a perfect mix of the two!
Everything you need is either in your backyard or your kitchen:
Flowers
Jars
Water
Big Bowl
Sticks
Water Dispenser
This activity is really child led. I did ask Mila to collect different flowers that were in our yard. Then I set up the potion/soup station.
I let her know that was her mixing bowl and she could add whatever in there.
She really took over after that!
Mila pretended she was a witch making potions the entire time. She let us know what the potions would do and who they were for. As always, I love hearing from her creative mind.
What’s your favorite spring kid’s activity? Let me know in the comments.
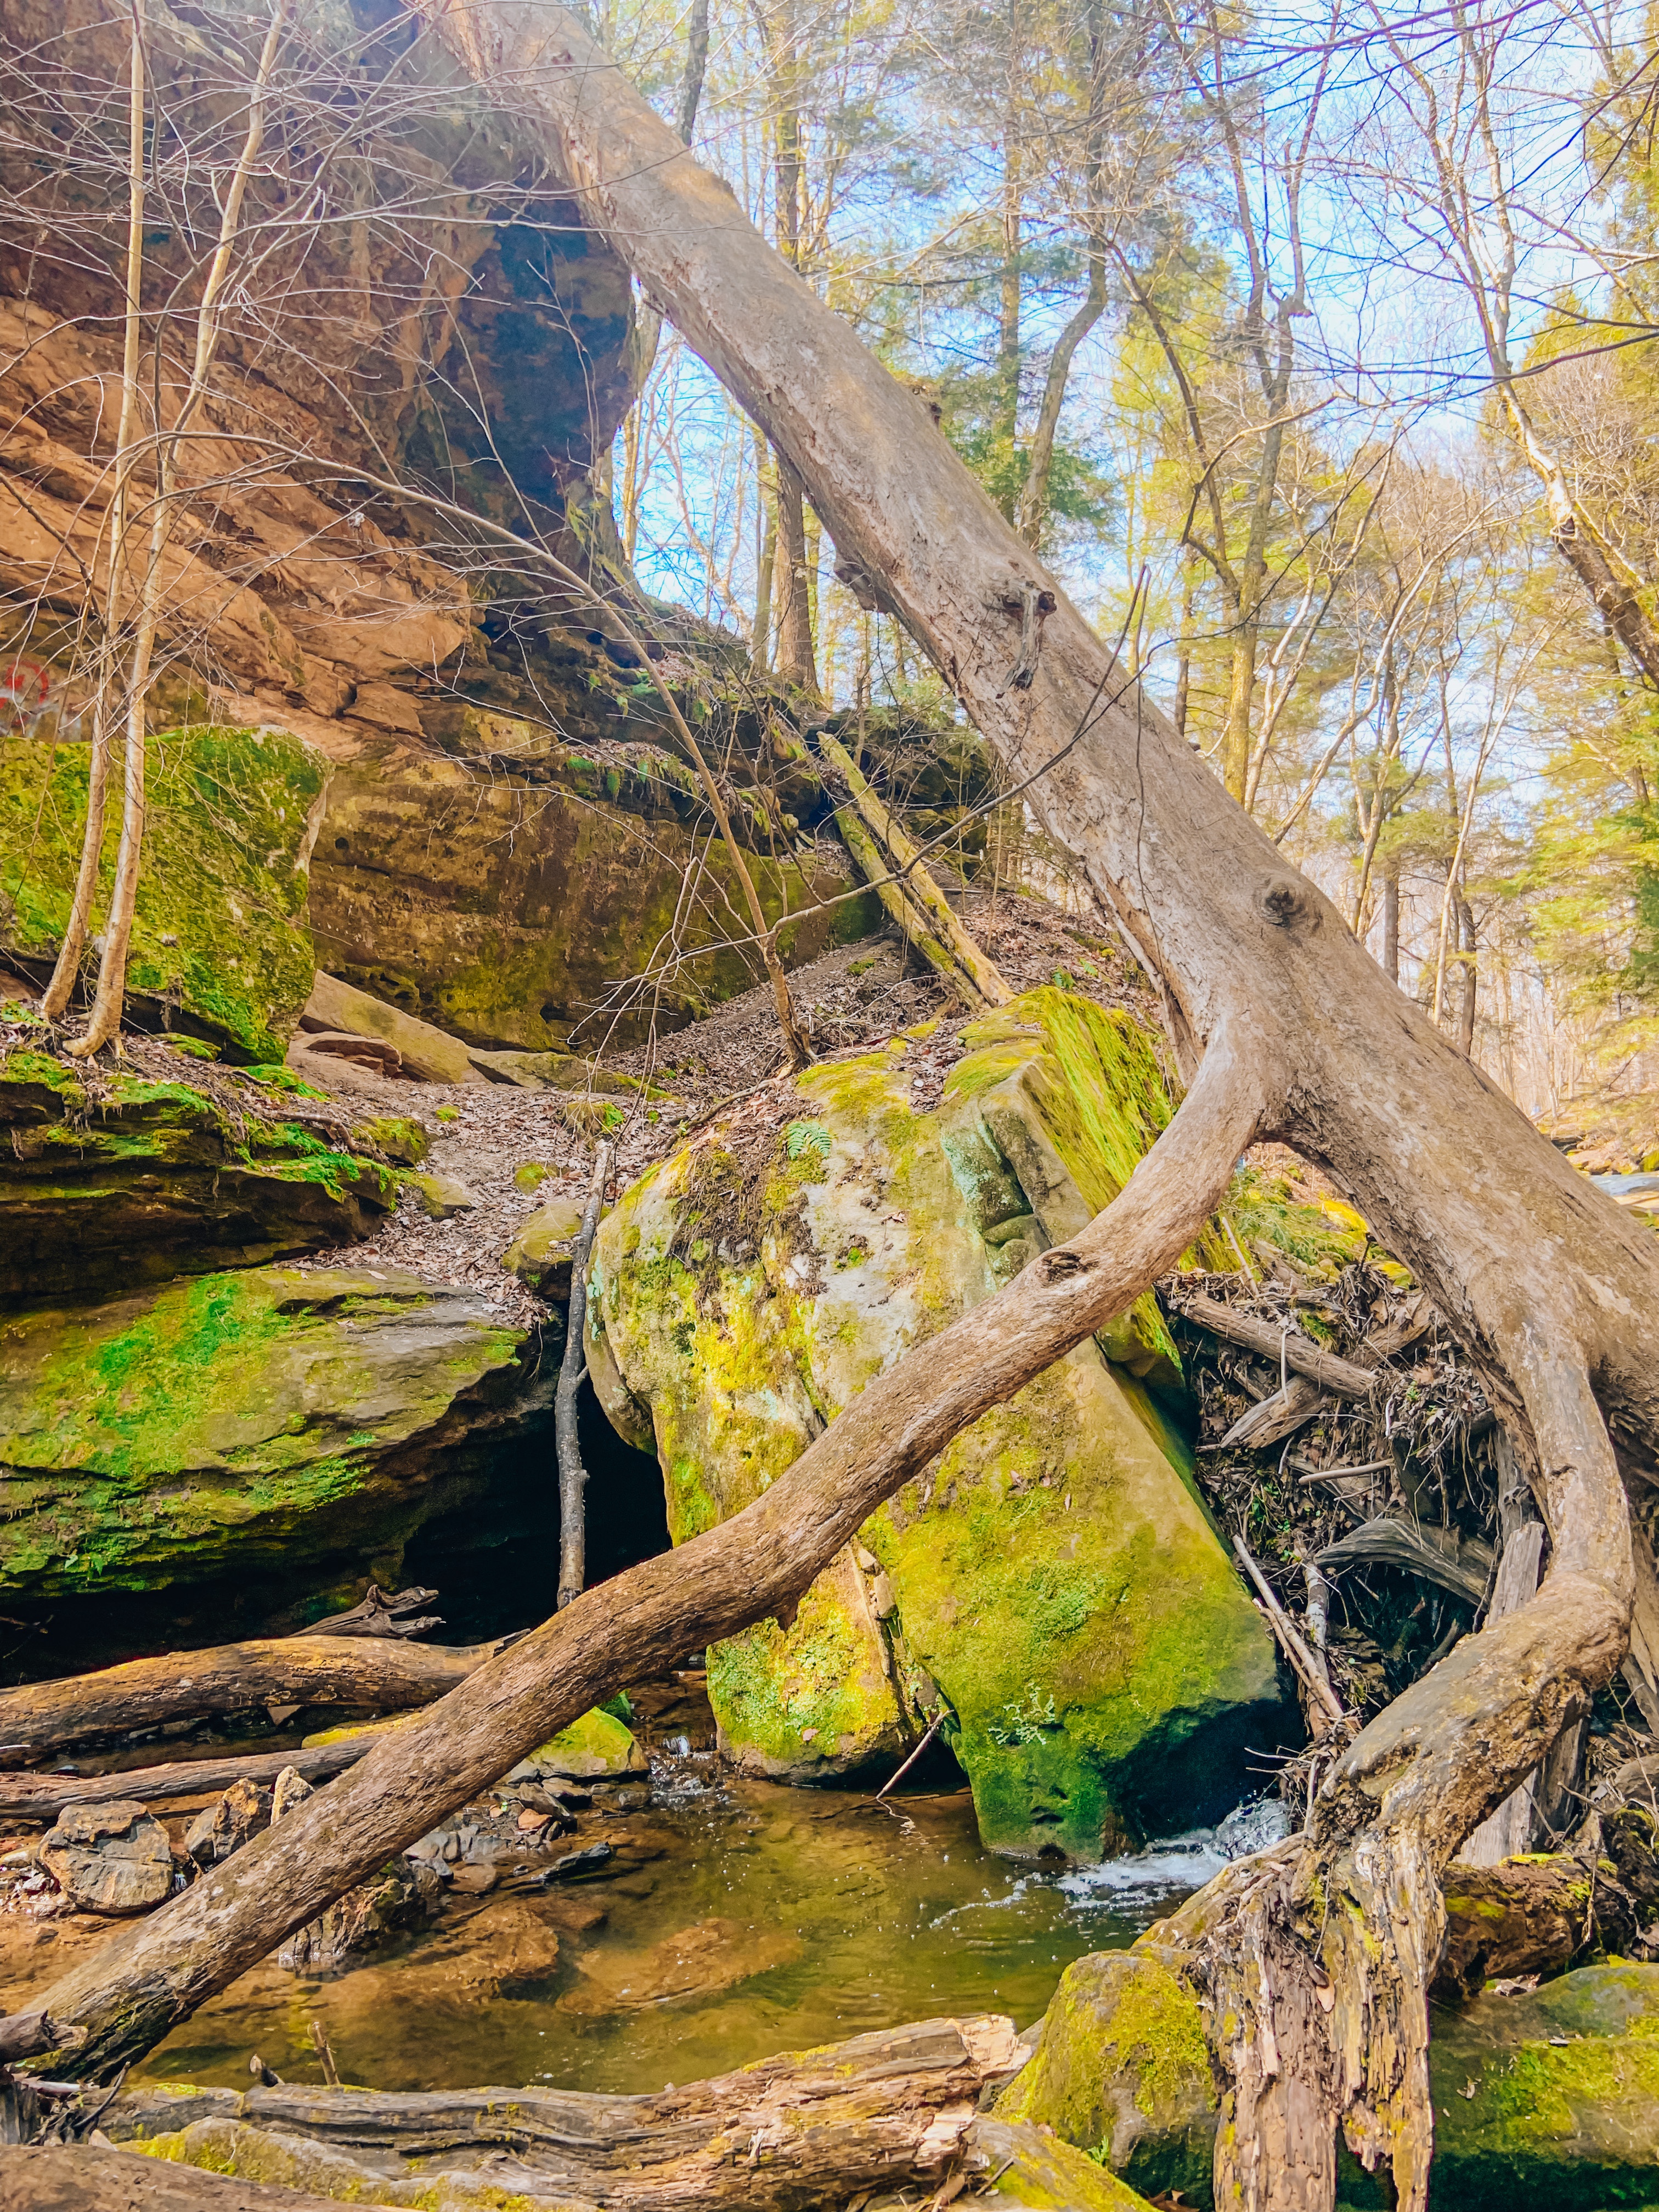
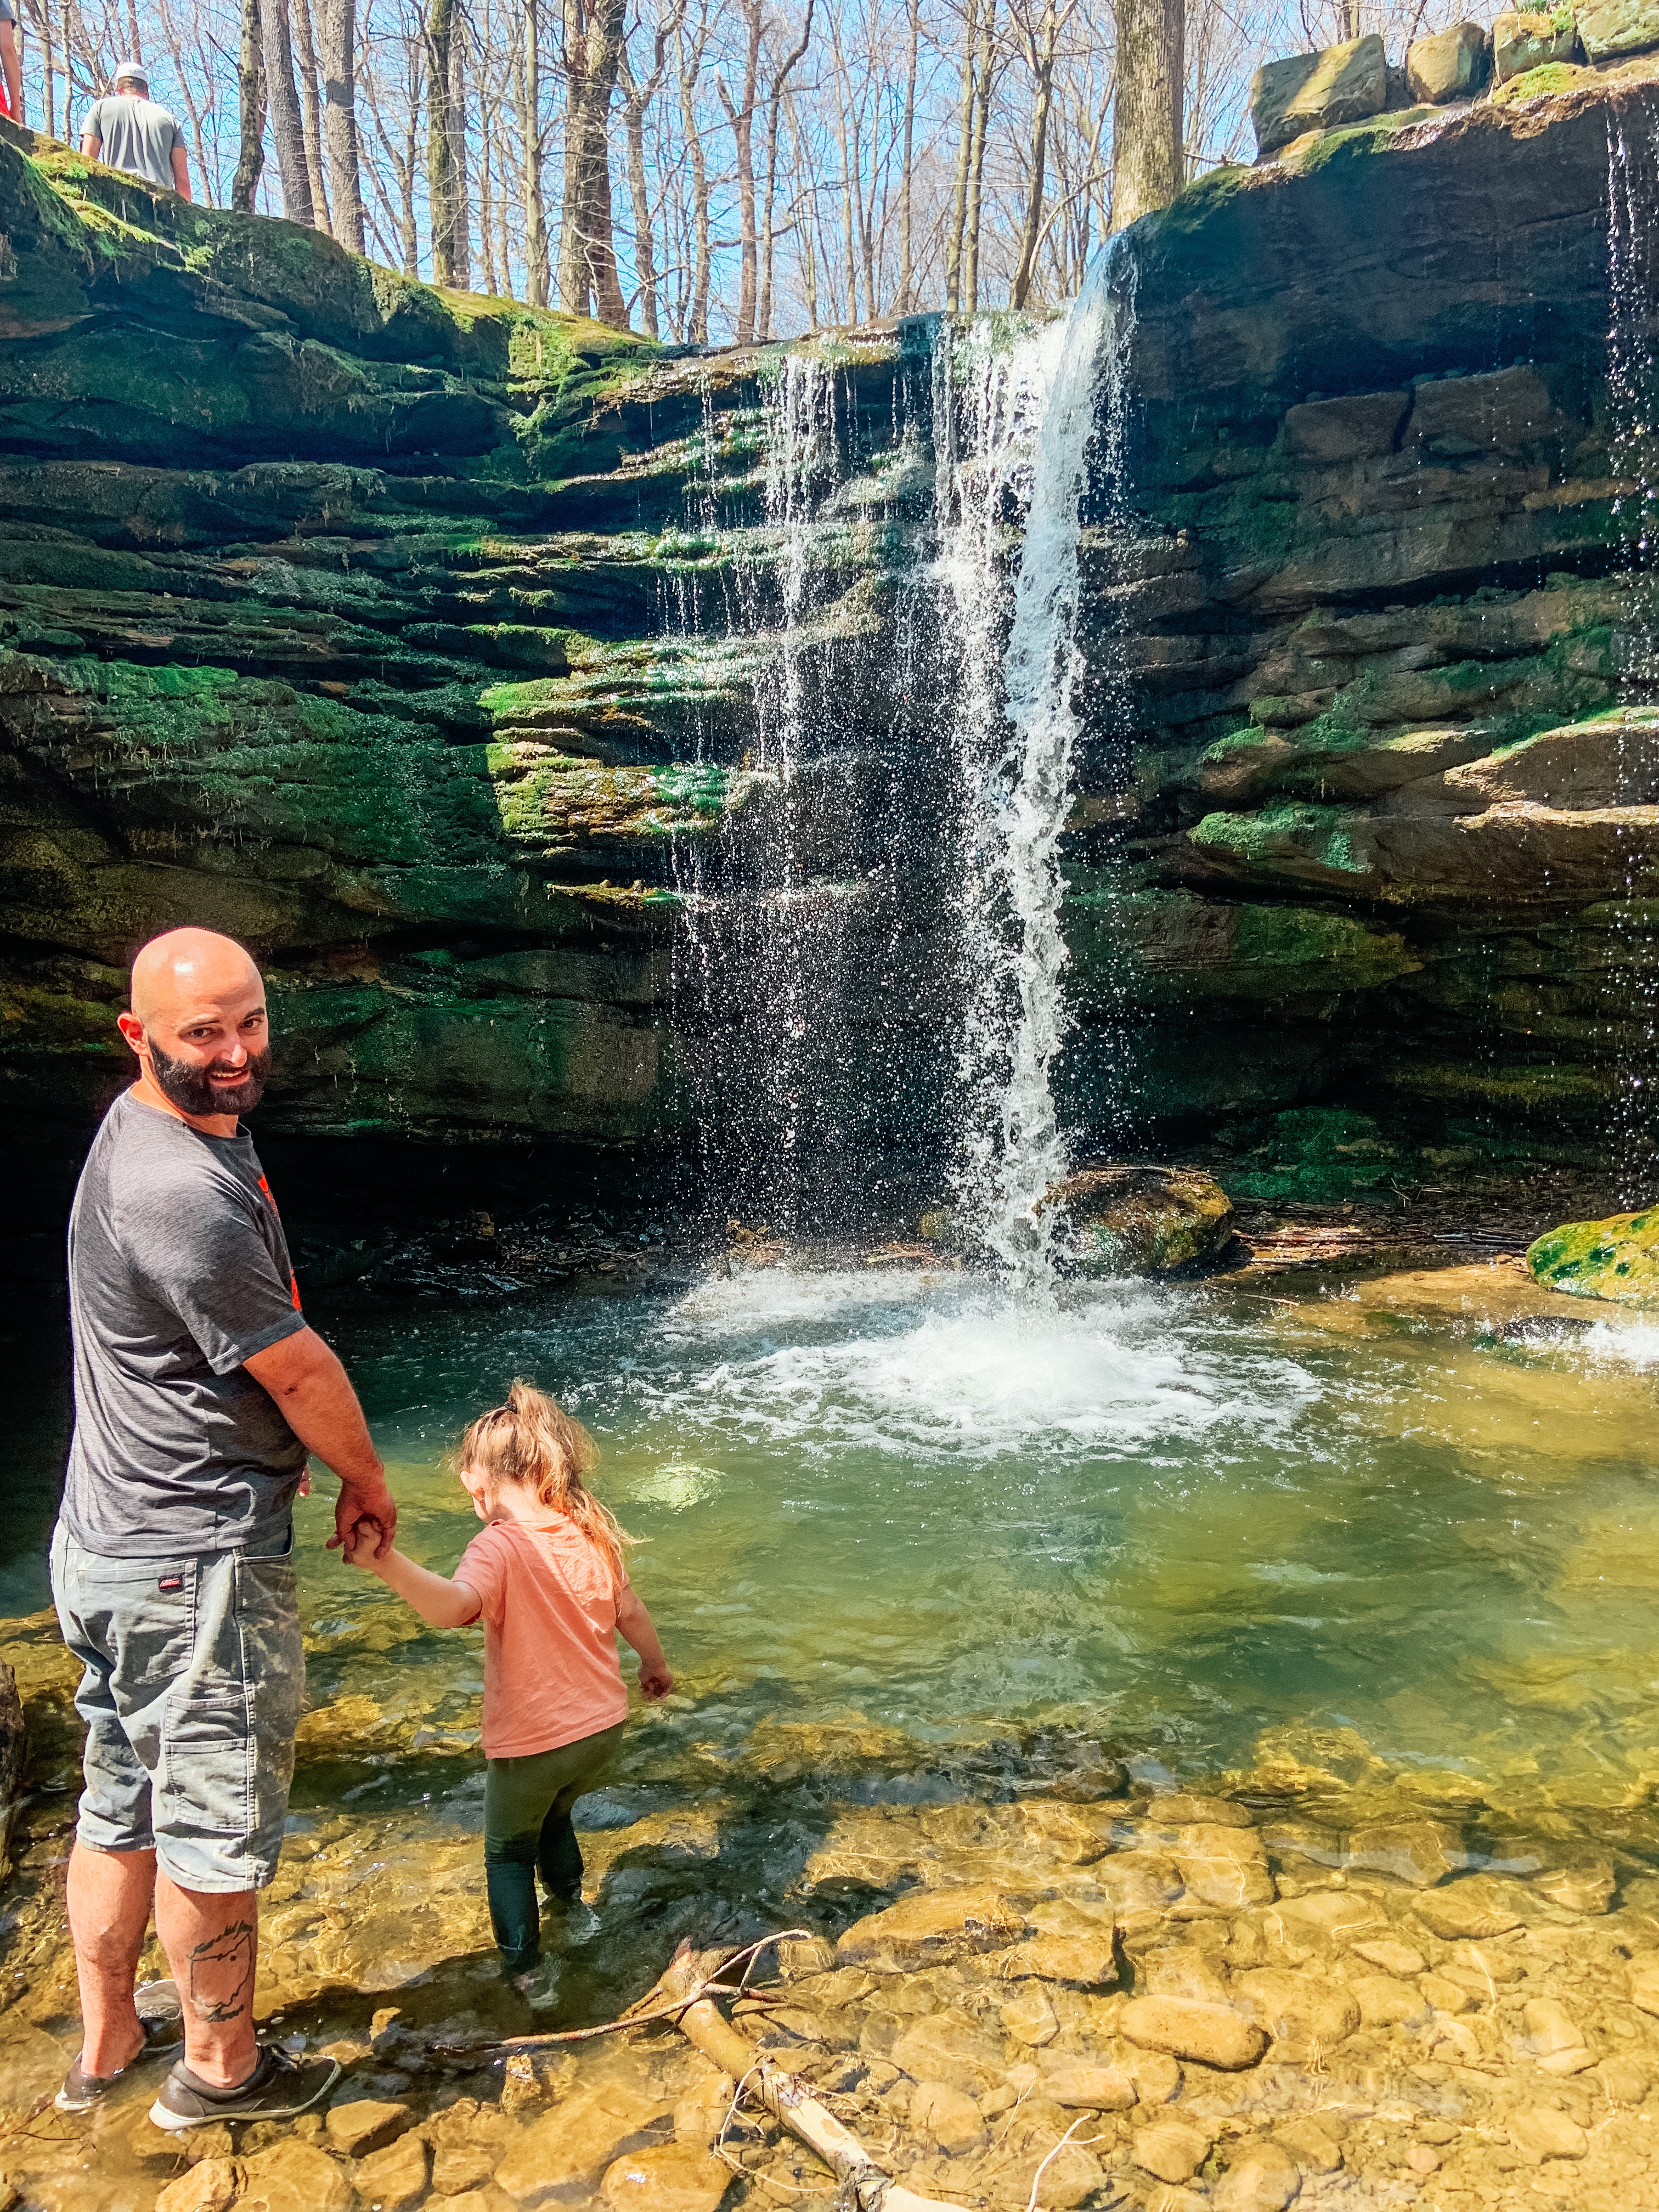
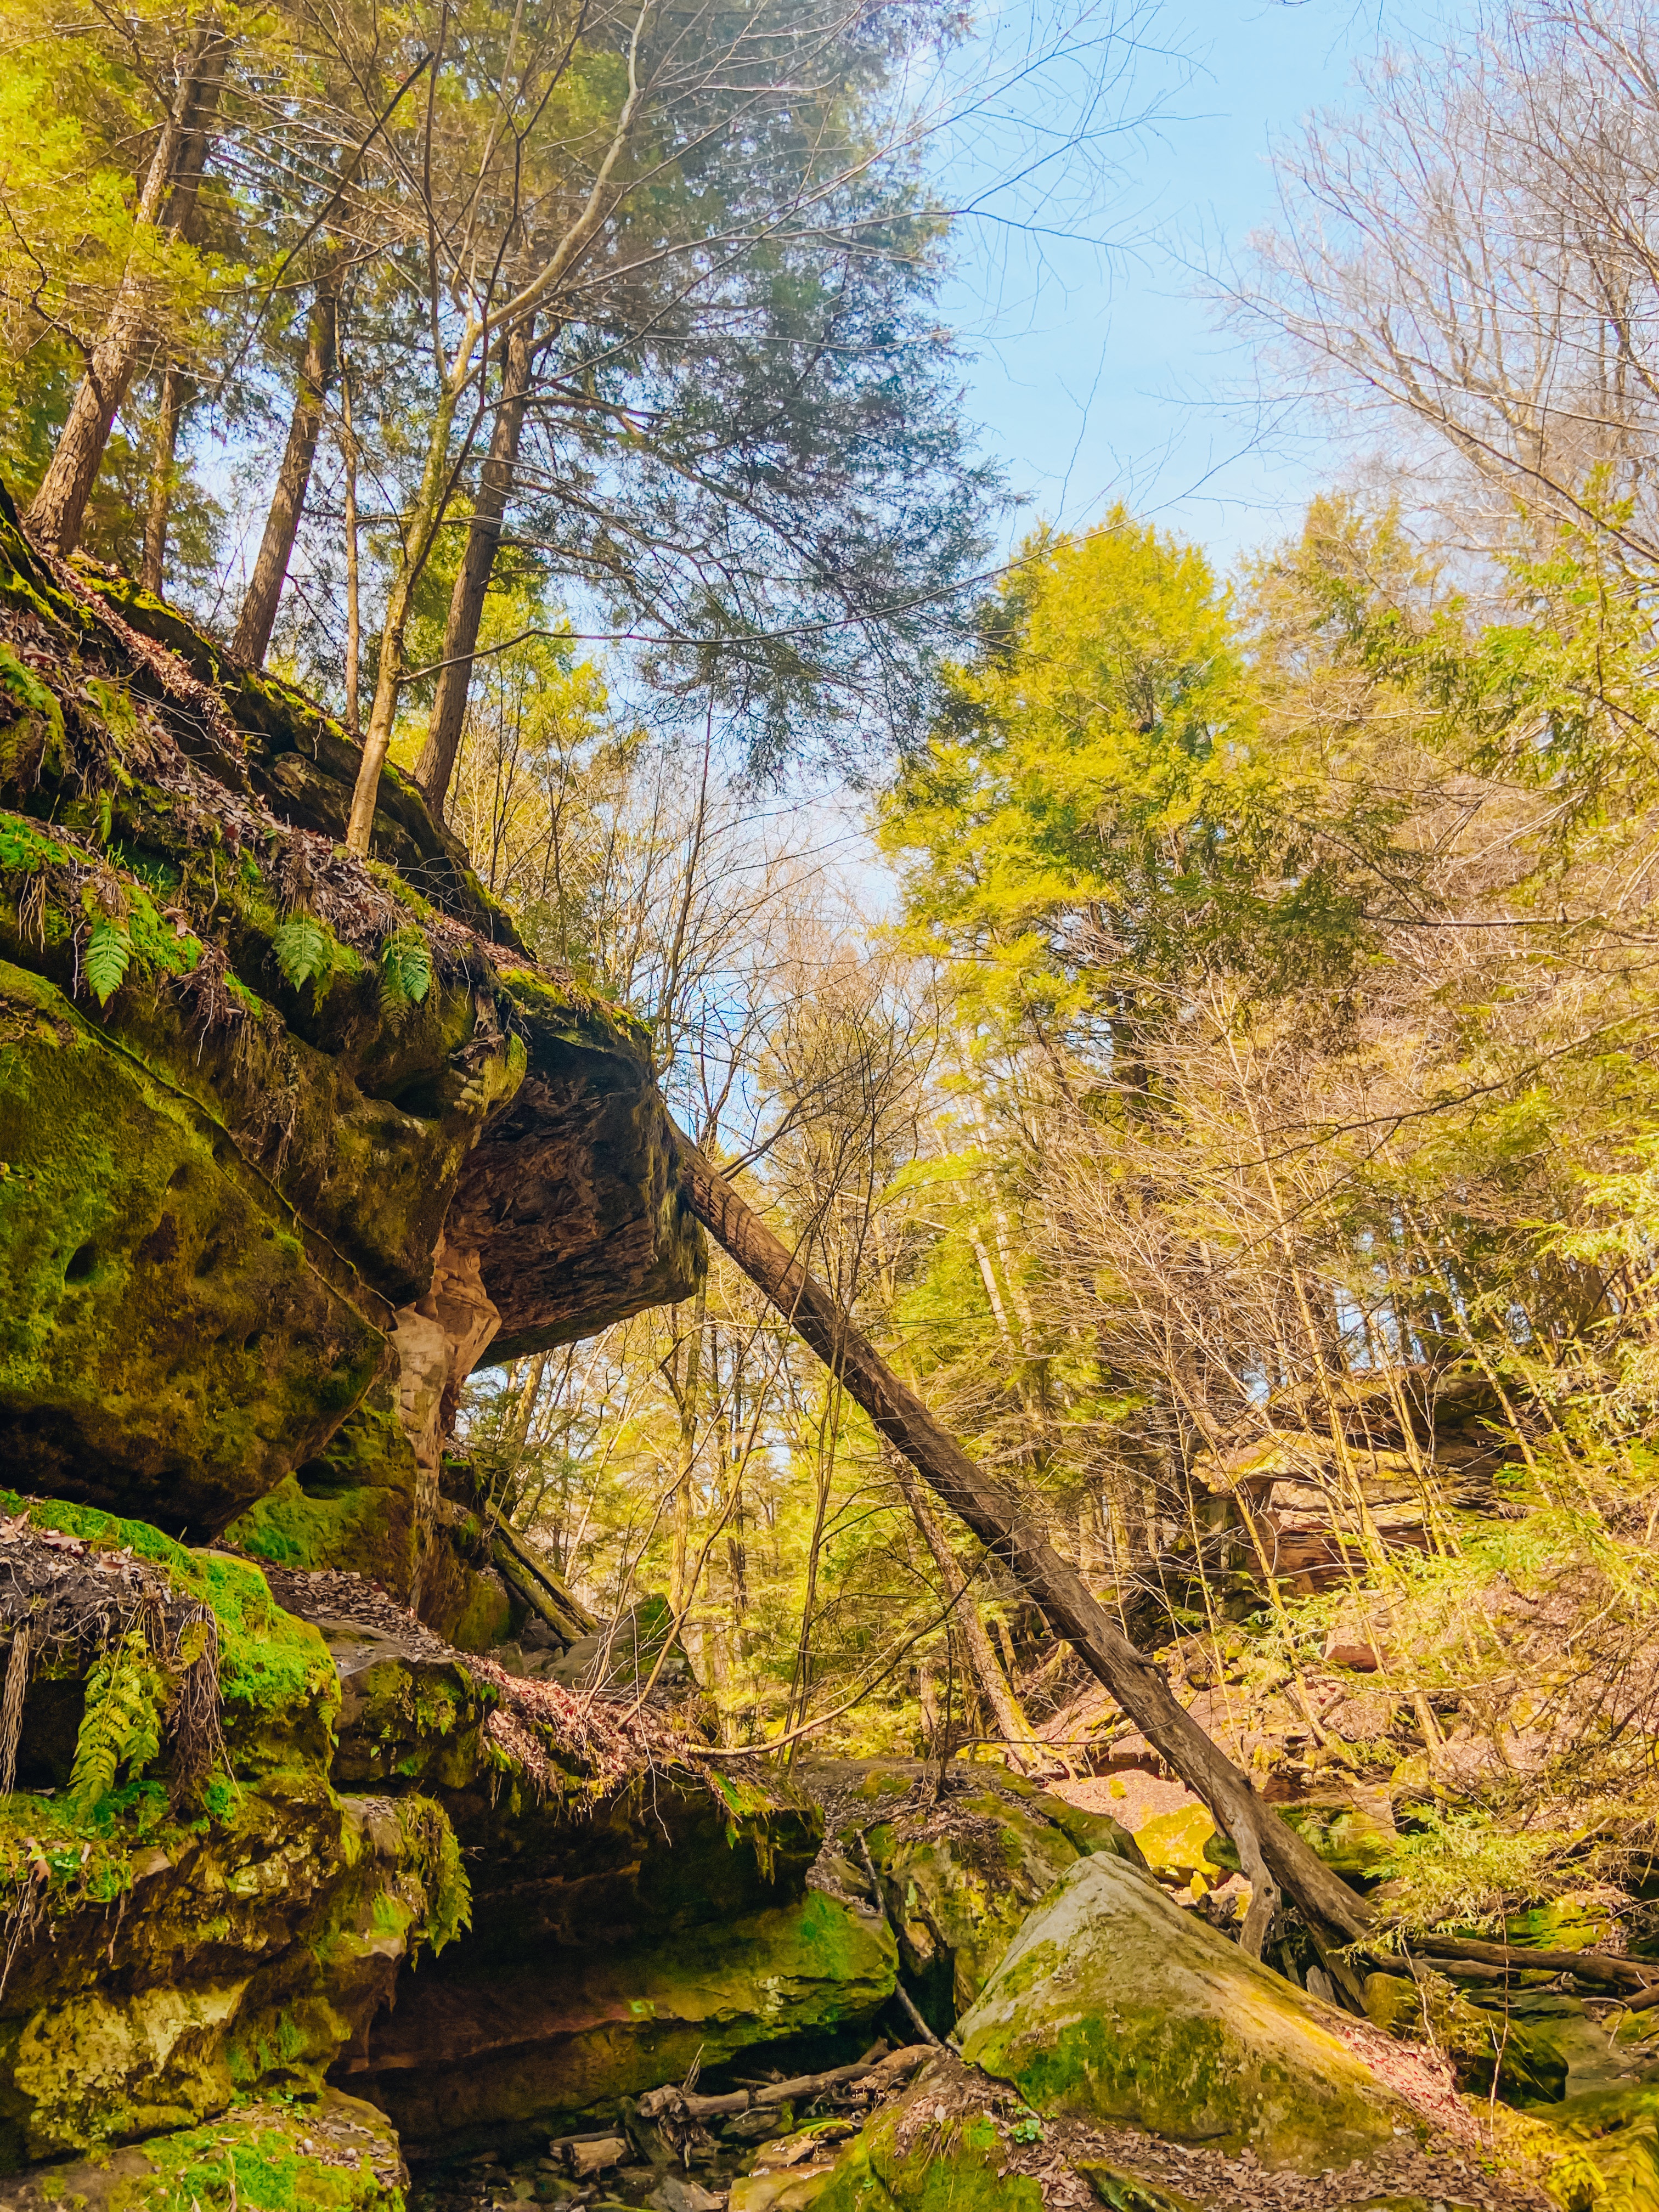
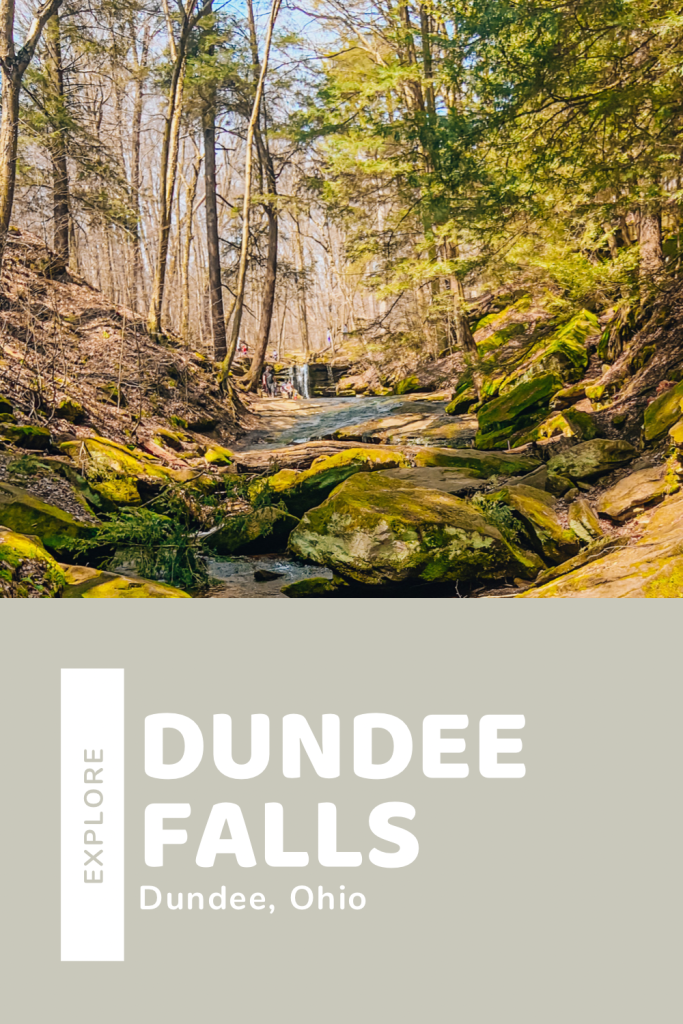
Ohio is a state full of hidden gems. Our favorite local one is Dundee Falls in Dundee, Ohio. With a short hike, you’ll find a beautiful waterfall and peaceful scene.
Besides the view, I love that Dundee Falls is perfect to explore for people of all ages.
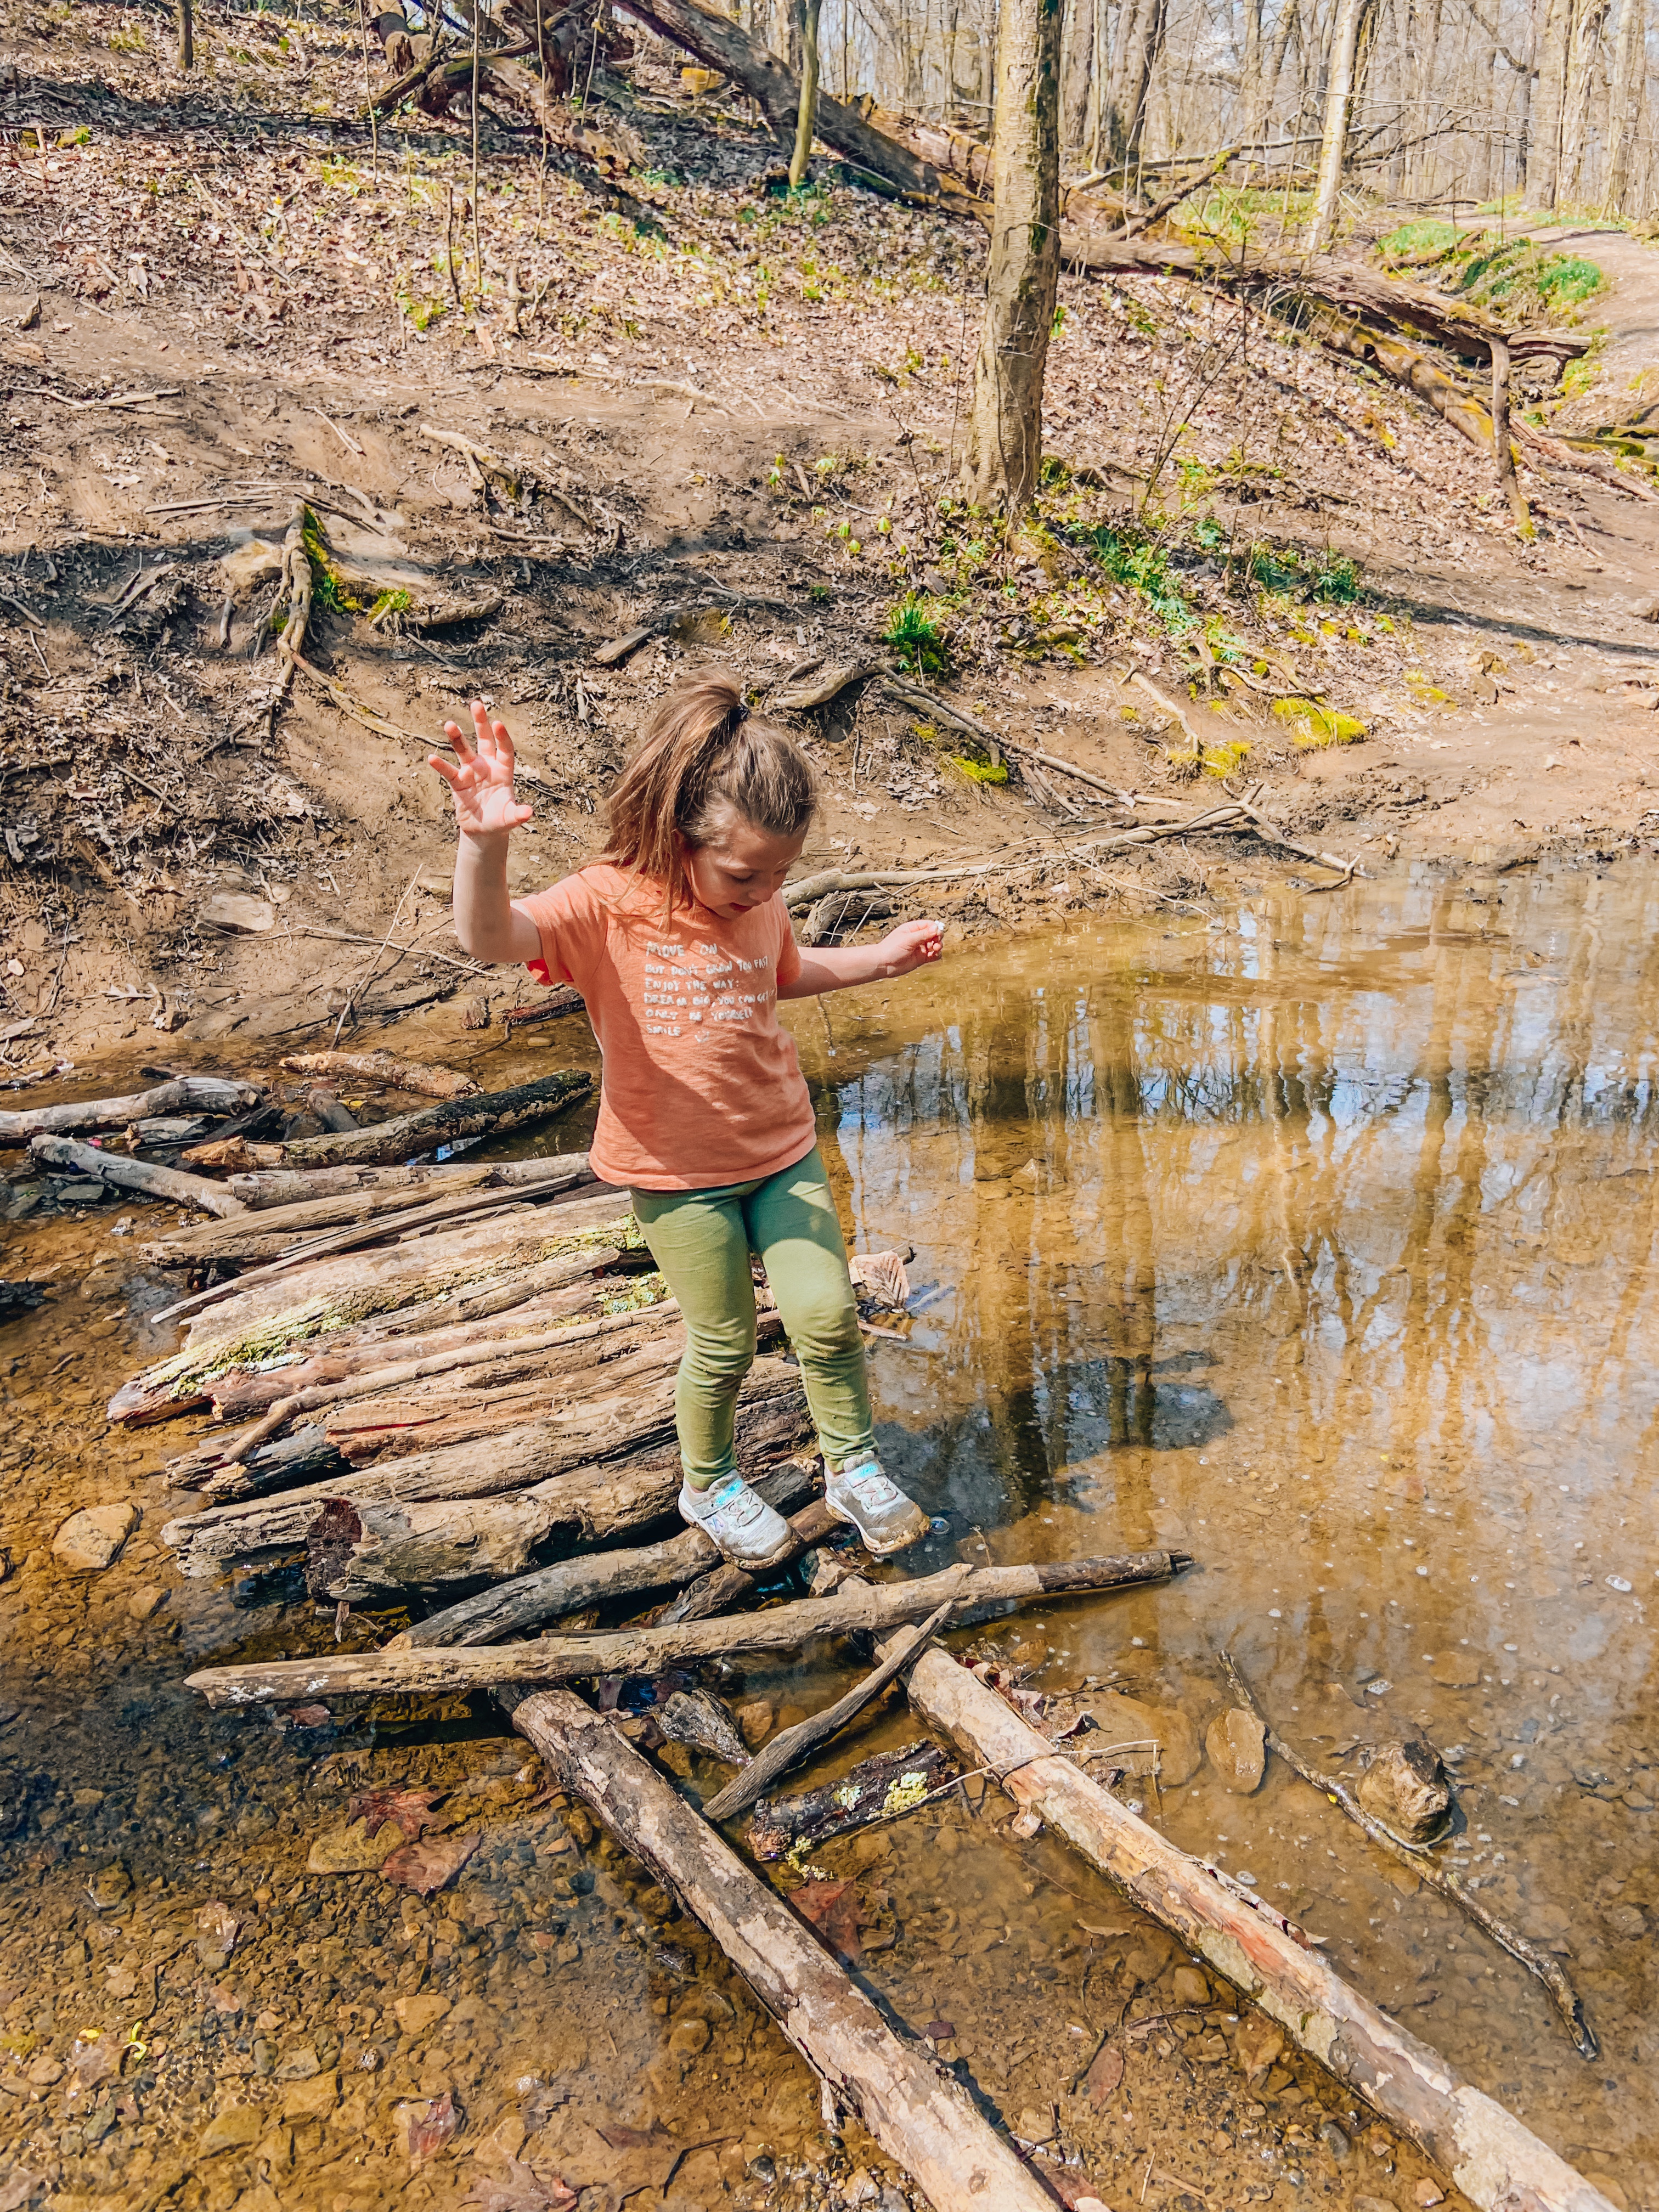
For our first adventure of the season, Mila, Josh, and I all went to Dundee Falls. Mila and I have been there quite a few times, but it was Josh’s first. My family has taken Mila since she’s been one and she’s always loved it!
It’s only about a mile hike from the start to the falls. Then another mile back. It’s not long at all and it’s shaded by trees. That makes it so nice for a hot summer day.
Some things I would suggest people to bring when they come to Dundee Falls are a change of clothes, water bottle, and sunscreen.
Since it’s the first time Mila and I’ve went so early in the year, I did not expect it to be as muddy as it was. If you’re planning on visiting in the spring, prepare for the slippery mud! It’s sort of everywhere.
This time, we went a different path from normal. We crossed the stream before the falls and went the long way around.
It was fun seeing them from a different view and just getting to explore. I did fall like ten times, but it was still a blast. We also got to climb over the river rocks and just get completely immersed in nature.
If you go the regular way to get to the falls, you do have to climb down a little rock way. This is normally somewhat slippery, but it was even more muddy which made it a little difficult to get up. I can imagine it was tricky to get down too. BUT there were so many people able to get up and down of all ages and ability levels. Just know it’s not accessible for those in wheelchairs or other limiting abilities.
Mila’s favorite part is actually getting into the water at the falls. She just loves to play and jump in it. She always looking for fish, frogs, and whatever else she can find too. At this time of the year, the water felt nice. I fell in the deeper water under the falls and was soaked. It wasn’t too cold for me to get back.
Our trips to Dundee Falls are so informative and an amazing sensory experience for Mila too. We loved pointing out wildlife and talking about cleaning up our Earth.
Speaking of… the trail and park in all is really clean. People who visit are mindful of their trash if they bring a picnic. They’re also really nice too. I’ve always had positive experiences visiting Dundee Falls. Some people even bring their dogs, which is always so cute!
The three of us had an amazing time Exploring Dundee Falls. Mila and I might have ended the trail completely muddy and soaked with water, but the adventure was worth every second.
Once you’re done visiting Dundee Falls, I would suggest making a short drive to the World’s Largest Cuckoo Clock. We go every time we’re near Sugarcreek! It’s Mila’s favorite.
Another place you have to visit is The Wallhouse. They have such great ice cream. It ends the day perfectly.
If you’re from Ohio, let us know some trails or places we should visit next! Or let me know your favorite place to go to where you live. Maybe we’ll have to go too.
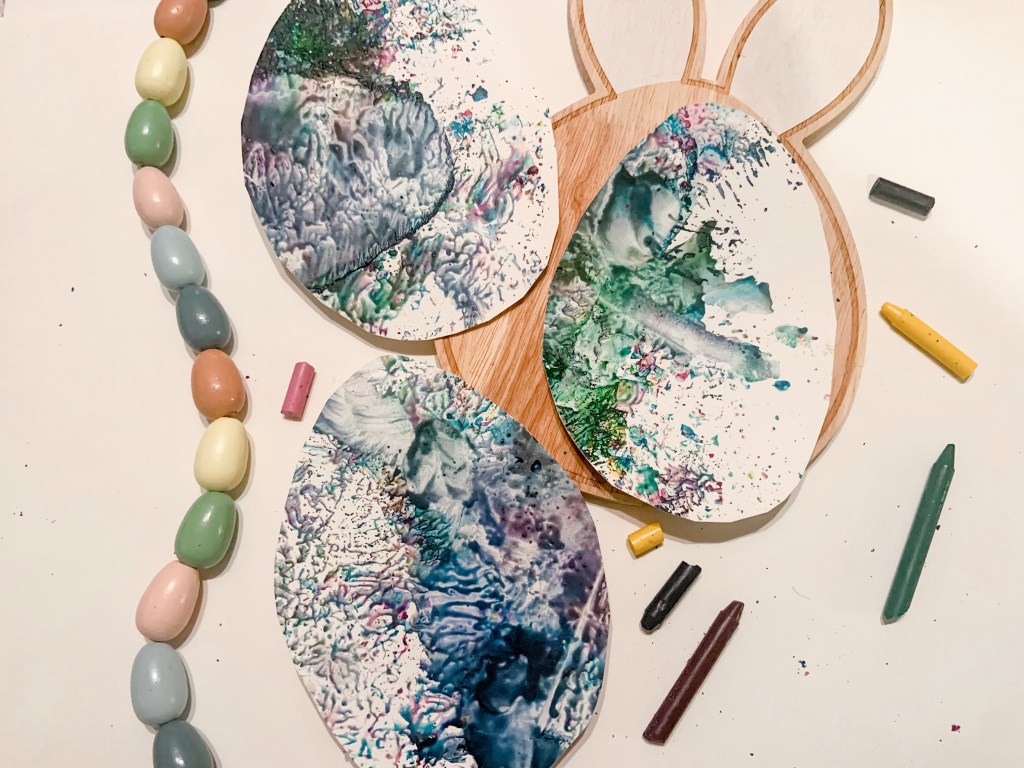
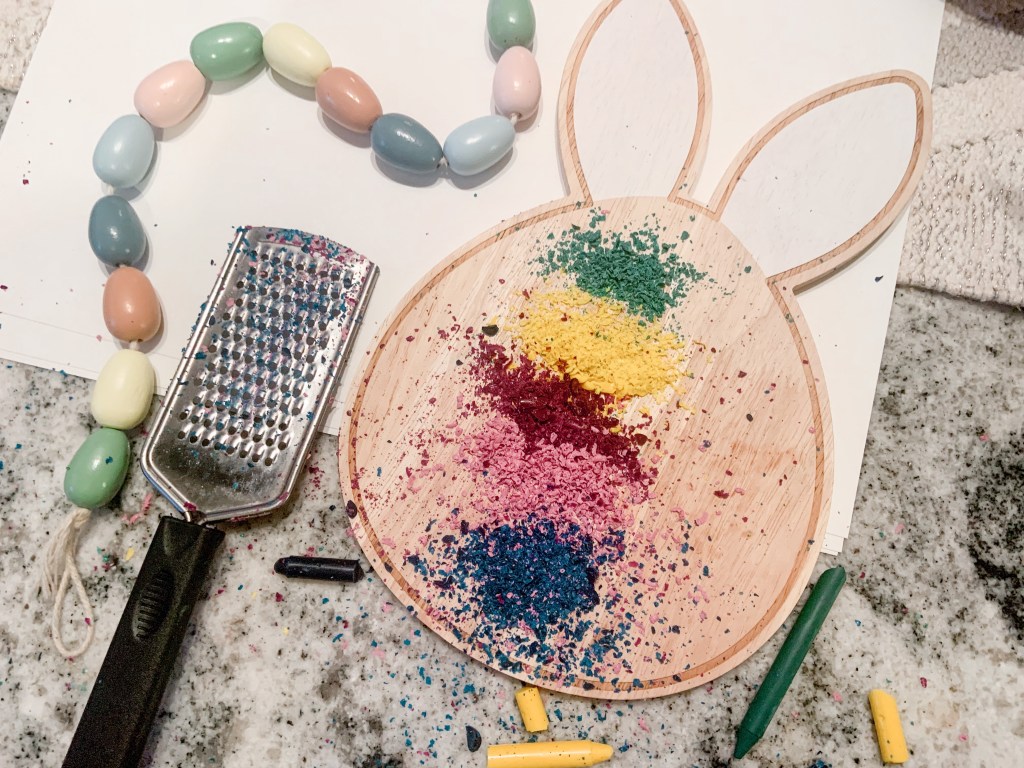
Happy National Crayon Day, friends! To celebrate the day, Mila and I made these adorable DIY Melted Crayon Artwork eggs.
This was a fun and different way to utilize our broken crayons.
Mila and I like to color a lot and sometimes we can left with small ones that can’t color anymore. We’ve melted them to make other crayons, but we wanted to be more creative this time.
I’ve been so inspired by all the Easter content lately that I thought it’d be adorable to make Easter eggs.
Here’s what you’ll need to make yours…
Crayons
Grater
Iron
Wax Paper
Thick Paper
This activity is really simple, but there’s definitely a decent amount of prep and clean up for parents.
First, collect your broken crayons that are not useable. Then it’s time to start grating them.
Mila picked out a ton of different colors. Beware of this! They can all mix and melt together. She didn’t seem to mind so it all worked out for us!
Once everything’s grated, it’s time to design your Easter eggs. I’m sure older kids would be able to create different designs. You could even use washi tape to keep everything separated.
Mila had a fun time putting the crayon shreds on the paper and had even more fun watching the next part.
When the design is complete, lay wax paper over it. Then with a heated iron, lightly press on it to melt the crayons. Mila was not expecting it to melt so we got to talk about why and about color mixing too!
After it melted, we let the crayon melting dry and then cut out the eggs shape.
We will make these eggs into a cute garland with different textures of yarn… and maybe some glitter too. Glitter is always the answer in our house!
This is an inexpensive way to decorate for Easter while doing a fun craft and science experiment with littles.
Check out other ways Mila and I have utilized and upcycled old crayons:
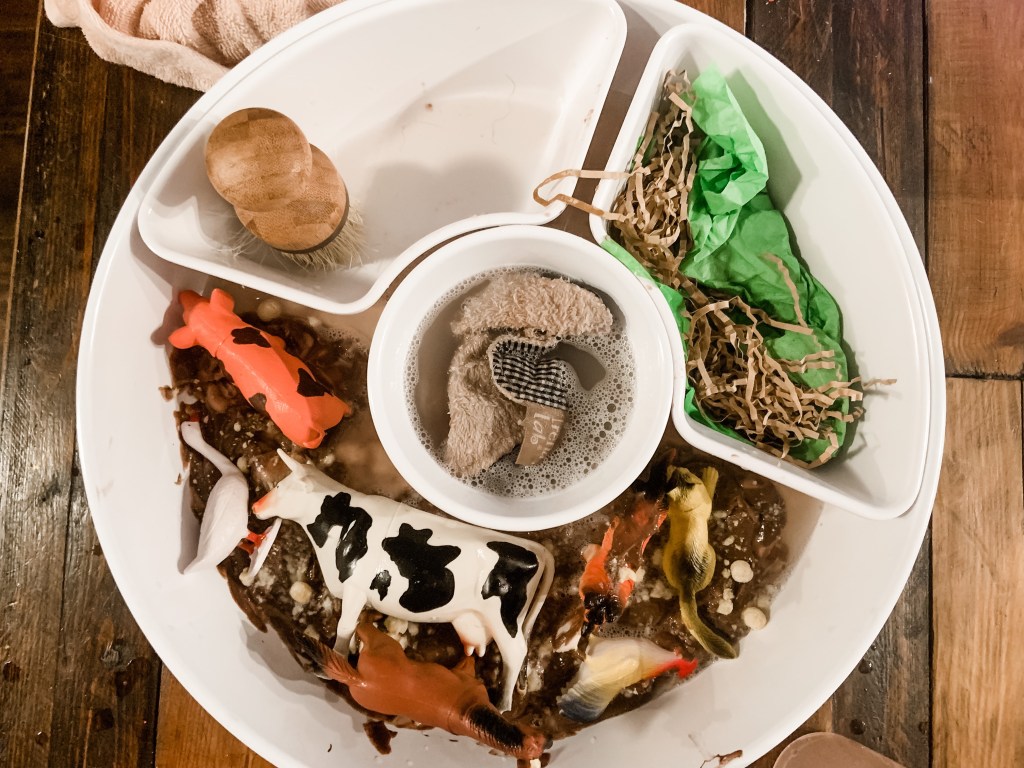
What’s Mila’s favorite part about spring, minus the flowers and nice weather? All the baby animals! This Farm Clean Up Sensory Play idea is a perfect way to talk about new baby animals AND have fun being messy too.
This interactive play was easy to set up and let her play for a long time. The best part… it’s completely edible too.
First, I want to say a HUGE thank you to Terra by Battat for gifting Mila these animals to play with. They have these big Bucket Sets full of different types of animals that are amazing. Terra by Battat sent us farm animals, marine animals, and a few other goodies that we love.
Their toys are super realistic and come in their own world. Mila has spent hours with both the buckets. The marine animals have became her favorite bath tub toys. I’ll be posting different ways we’re playing with them. You should still totally check Terra by Battat out though. Would make perfect Easter presents!
Anyways…
When I saw the country world bucket, I instantly thought of this fun sensory play. To further create this world, here’s what you’ll need:
The hardest part of this sensory play is the set up. It just takes a little time, but it’s worth it.
To set the scene, all you need to do is spread chocolate pudding in one part of your sensory tray. I also added some crushed kix cereal to make it look more realistic.
I also made sure to make the animals ‘muddy’ too. Honestly, I didn’t know if Mila would want to do that so it just made it a little more fun for me.
Then, I set up the cleaning area. This just consisted of a wash cloth, cleaning brush, and soapy water. It was nice doing the water in a bowl because Mila instantly thought it was a bathtub! Which works for me.
The next little area was where the animals dried off. I just used shredded paper and tissue paper.
After it was all ready for her, I just let her do whatever. When we do sensory set ups like this, I try not to give her too much direction. She immediately started cleaning off the animals.
It was so cute to listen to her too. She pretended she was a zookeeper and it was cleaning day.
After the first clean up was done, she made the animals muddy again and kept the process going. I loved watching how creative she was through it all.
I think this activity would have been even better outside with more space, but it worked well inside too.
The clean up for this activity was really easy too. All I did was recycle the paper. Then I just used water to clean everything else off. It was quick and simple!
I have a feeling we’ll definitely be doing this set up again in the near future. Until then, I can’t wait to show you the other fun activities we have planned with the marine world bucket. It was another hit with Mila.
Make sure to check out Terra by Battat and order realistic play animals that your kids will love.
What edible sensory play do you do with your kids? I would love to hear ideas.
Are you looking for a little luck until next St. Patricks’s Day? Then it’s time to make a DIY Leprechaun Trap.
This fun trap was made out of items around the house and printables from Whimsically Wonderful. It also was fun to creatively collaborate with Mila and keep the magic of St. Patrick’s Day going.
If there was a classified ad for this DIY Leprechaun Trap, I think it would read something like this…
If you’re a weary leprechaun looking for a comfy place to rest for the night… or next year…You have to stay at The Rainbow Hotel!
Filled with a comfy bed, free gold, and magical decor, you’ll love your stay. You won’t miss The Rainbow Hotel because all you have to do is follow the rainbow exterior and the shamrock on the door.
Plus, it’ll only cost you a little luck.
Honestly, I’d want to stay in The Rainbow Hotel too. I just don’t have too much luck to give.
Anyways, here’s what we used for our DIY Leprechaun Trap:
Recycled Box and smiley face from Moravian Trail Co (seriously the best candles)
Putting this together was really easy, but took some time.
It was a lot of cutting, gluing, and making sure everything looked cute in the right place.
It took us about an hour to cut and glue everything on, but it looked so cute. The best part of making leprechaun traps is everyone’s is going to look different and unique. I think this one celebrates how Mila and I are and view life.
Now it’s time to catch our leprechaun. You can only catch them on St. Patrick’s Day, so make sure you have yours ready!
Do you ever make leprechaun traps? If you do let me know how you made the next day special in the comments.
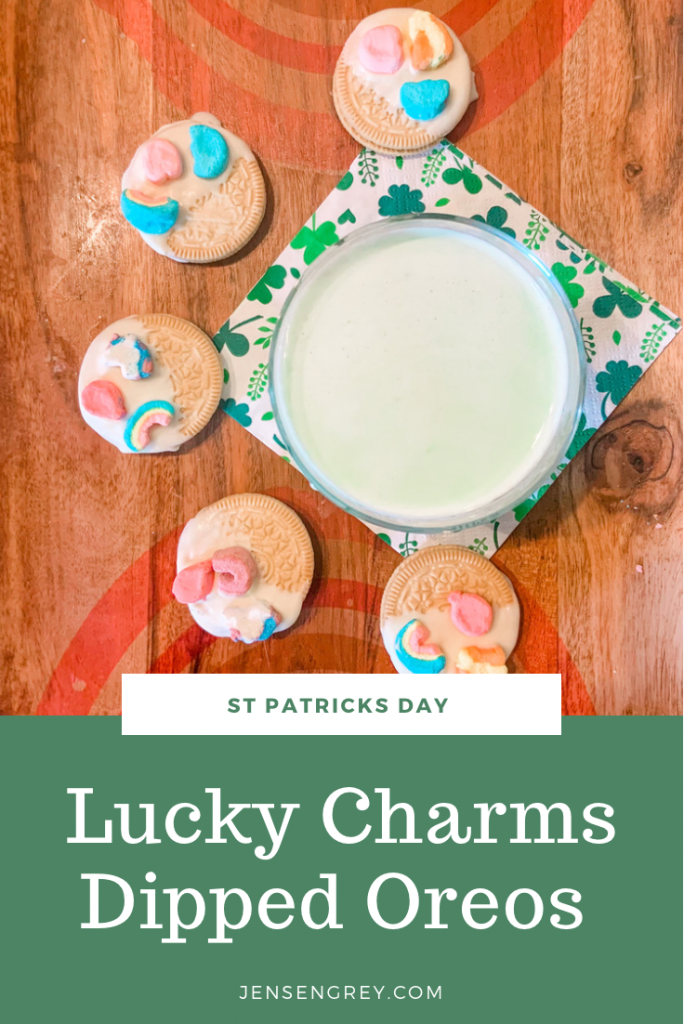
What’s better than regular gold? Gold you can eat and you’ll love the taste of these Lucky Charms Dipped Oreos.
This simple recipe can easily be done for an after school snack or whenever you have a quick five minutes to make some magic. You can even enjoy it with yummy leprechaun milk, which your kids will love even more.
Mila and I have still not saw the leprechaun playing tricks in our house. Our Pete the Cat book told us the only day you can catch one is on St. Patrick’s Day so we’re getting all our leprechaun bait ready.
We’re working on our leprechaun trap to set out the night before St. Patrick’s Day too! Hopefully that’ll do the trick.
This little recipe here was supposed to be leprechaun bait, but Mila decided it would be better suited for little girls. So, she just ate them instead. I can’t say I blame her!
For another magically delicious treat, you’ll need:
Golden Oreos
Lucky Charms
White Chocolate
The first thing you need to do is melt your white chocolate. I used the microwaveable kind because it’s way easier and quicker for us. Just make sure you microwave in small increments and stir frequently.
After it’s all melted, dip your Golden Oreos in the white chocolate and set them on wax paper.
Before the chocolate is cooled, place Lucky Charms on them. I did it randomly and in between coating the Oreos. The chocolate seemed to cool off pretty quickly!
While you wait, you can make some leprechaun milk to enjoy with your Lucky Charms Dipped Oreos.
All you need to do is add some green food coloring to milk and enjoy!
Mila was very pleased with these and did not seem to want to share with the leprechaun in our house. It was a fun little snack that only took a few minutes to make.
What has been your favorite St. Patrick’s Day recipe I’ve shared so far?
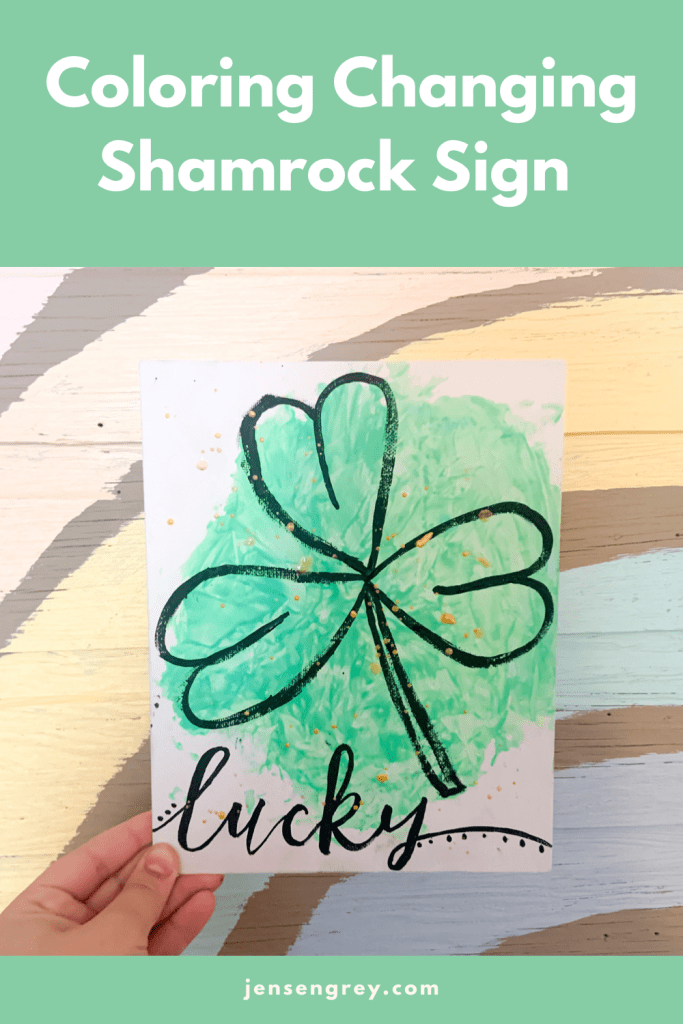
The magic of St. Patrick’s Day keeps flowing, especially with this DIY Coloring Changing Shamrock Sign.
Littles will be amazed watching blue and yellow make green! You can also use this sign to help trap those pesky leprechauns. They’ll be attracted to the magic.
Mila has been super curious in two different things: leprechauns and how to make colors.
To be able to give her both in one day, we did a magical craft that we’ll use to bait leprechauns. It’s really been fun to hear all her ideas of how to catch a leprechaun. She had fun making magic like them!
Plus, we love an activity with a simple set up! This one gives you just that with some leprechaun magic too! Here’s what you’ll need:
Blue Paint
Yellow Paint
Black Paint
Gold Paint
Canvas
Plastic Wrap
All you need to do is pour some blue and yellow paint on a blank canvas. I actually had the canvas in a sensory bin to keep the mess at bay.
Then, I had Mila place plastic wrap on top and told her to mix all the colors.
For that part, I really had to tell her it was okay to get messy. She was really moving the plastic wrap around which mixed it up quicker. At first I think she was afraid of the messy paint!
Once it’s combined, take the plastic wrap off and let it dry.
To add a little more magic, I painted on a shamrock, ‘lucky,’ and splattered gold paint. I think it turned out as magical as a leprechaun would like.
What’s your favorite St. Patrick’s Day saying to put on signs?
If your child (or you) love to paint and want to try a cool new way to do so, try this DIY Ice Cube Painting.
Mila paints all the time. Usually with acrylic paints on canvas, but a switch was needed. With a little prep, this ice cube painting activity was a morning full of fun and creativity.
Prepping for this activity was really easy. All I did was pick out a few of her go to colors. Then I painted them inside the resin mold.
I tried my best to get a lot in there. It’s be easier if it was squeezable paint bottle.
Before you put water in the mold, set on a baking sheet to freeze. It is near impossible to move a mold full of water without spilling it. This won’t be an issue if you’re using and ice cube tray.
When all the letters are painted, pour water in each of them. I would suggest using something that isn’t going to overflow the mold easy and mix colors. Honestly, I reused an old Starbucks iced coffee glass to pour.
Then, when they’re all filled, place it in the freezer.
When they’re done, you can place them in a tray for your child to paint. We personally used thick stock paper for this painting.
To warm up the ice, Mila dipped her brush in salt. Not only is this activity creative, she learned a little science as well. I just explained to her that salt melts ice and she thought it was so much fun.
The best part of this activity was it was easy to clean up.
I just threw the left over letters back in the tray. Then I put them in the freezer so we can use as after school activities this week! That means I only had to prep once for days of fun!
Using frozen letter cubes is a fun way to introduce more learning too. I used ‘lucky one’ since St. Patrick’s Day is coming. BUT you can spell out whatever to help them learn.
I’ll use the letters in her name to give her some more practice seeing and writing it.
This activity would be perfect in the summer too. You can battle the heat and see if the sun or your child ends up getting done with the ice first.
Either way, this Ice Cube Painting activity is a cool way to create.
What are some fun spring activities your child likes to do? Let me know in the comments.
It’s Random Acts of Kindness Week! There are so many ways to spread kindness and make others smiles. This has been something special to me since I had Jensen.
Now I get to pass it to Mila!
I believe by letting her know it’s important to share happiness, she’ll continue it in the future. Always striving to make her a great human.
Wondering where to start? Here are 10 Random Acts of Kindness you can do with your child and toddler.
Share a gift of love.
This year, Mila and I made these cute little notes for her dance friends. I found them on Sierra L Miller’s Blog and added a scrunchie. They turned out to be a cute little gift and helpful for a little dancer’s hair.
Last year, we made Lollipop Flowers that were a complete hit.
Write a thank you note.
I’m ALL about a classic thank you note. Writing a small note to someone you care about can mean the world. Anytime I send cards or notes now, I have Mila write a little something and sign her name.
It was a fun way to make someone smile and share my Jensen too.
Send a nice video.
Mila LOVES making videos and sending them to our friends and family. One way to make someone smile is to do just this.
You and your child can tell someone how much you love them. It’s guaranteed to be a random act of kindness that they’ll love to receive. The best part, you don’t have to leave your home!
Leave a gift card as a surprise.
This goes along along with the flowers… but leaving random gift cards is a cute way to surprise someone.
Mila and I have left them in books at book stores or just sent them to others when we’re out to eat. You could even leave them at gas station pumps to help someone out.
Paint a rock.
Rock painting was so big and so many people still do it. Mila loves to paint rocks or just find them to give to her grandpa. Painting kind words on a rock and giving them to someone could be a small way to brighten their day.
Tip nicely.
I know a lot of people pay it forward, but it can cause some chaos. Instead of doing this, why not tip your barista or waitress nicely.
Mila loves tipping and this is a fun way to pretend she’s paying!
Make a craft.
Just like getting a thank you card, I love receiving crafts. When I’m making different things, I try to make three extra to give to family and friends. They always smile when seeing Mila’s artwork or something special we made together.
It’s a fun way to share the love when you’re already creating!
Cook someone a meal.
There are so many families that could use the extra help with meals. One friend of ours ordered us pizza one night and it made the whole night (and week) go a lot more smoothly with having it done for us already.
If you usually have leftovers, it would be a beautiful idea to share. I know this has been my favorite on the receiving end.
Kids love cooking and baking too! A perfect way to get them involved as well.
Smile.
The smallest thing you can do with a BIG impact is smile. You never know… it could be their first smile they have seen all day.
I hope you can find something on this list to do with your child for someone you love. Let me know in the comments some acts of kindness you’ve performed.