Strawberry Handprint Pot

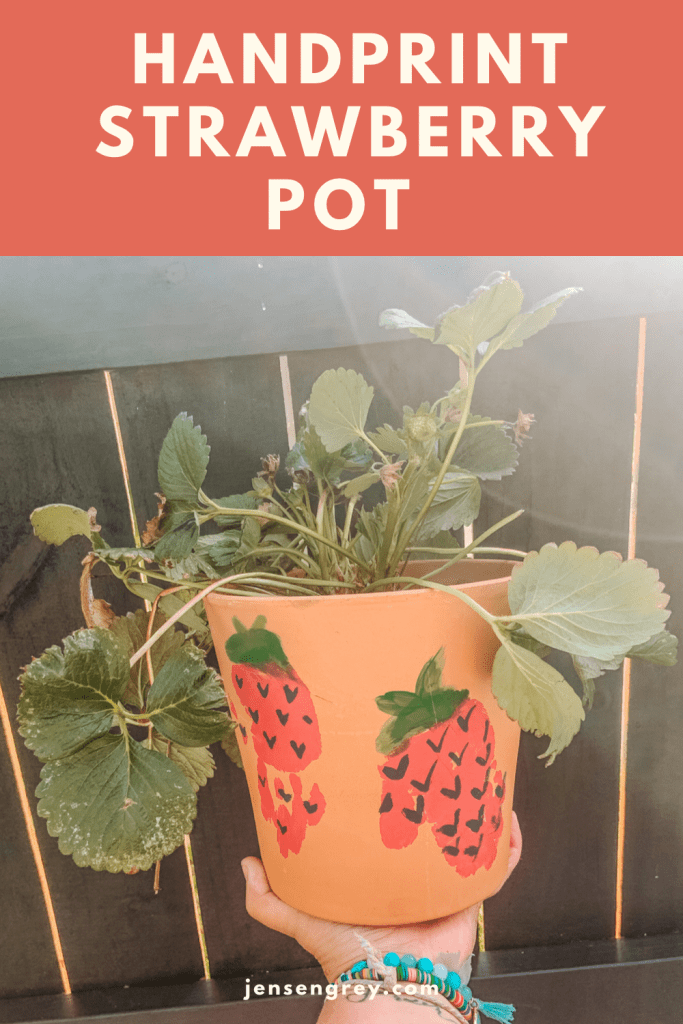
If you love strawberries and want a cute pot to grow them in, you’ll have to make this Strawberry Handprint Pot!

These pots are a great way to watch plants grow, but also perfect for kids to get involved too.

I’ve said it a ton before, but Mila and I are obsessed with plants. We probably have 200 houseplants. Then in the summer, we have fruits, veggies, and herbs. My front porch looks like a jungle.

Last year, strawberries were our favorite to grow. Mila would literally eat them from the plant. It was so fun to check every morning.

To make strawberry picking more fun this year, we made this Strawberry Handprint Pot.

Here’s what you’ll need to make yours:

  • Green Paint
  • Red Paint
  • Black Paint
  • Pot
  • Brush
  • Strawberry Plant
  • Potting Soil

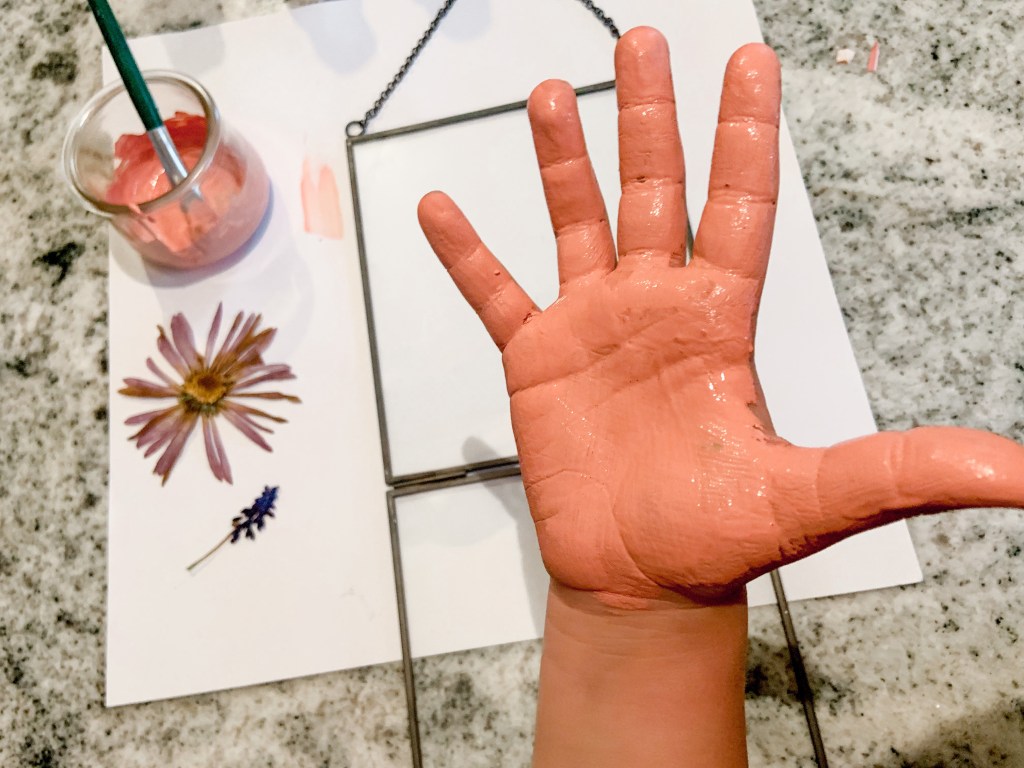
This handprint art is actually pretty easy to do.

Just paint (or have your kiddo paint) the majority of their hand with red paint. Then the top part with green.

Press firmly on the pot. We were able to get two handprints per paint!

Once it’s dried, add the seeds on to the strawberries. I just made little hearts in black. I thought it looked cute!

When those are dry, plant your strawberry plant and you’re good to grow.

Like all our crafts, I think this turned out so cute. I know this pot will have strawberries in it for years to come!


Looking for more strawberry fun? Check out some of these recipes and crafts we’ve done in the past!

Let me know in the comments which one is your favorite! Or a recipe/craft we should try next.

DIY Bug Catcher

If you’re looking for a fun way to get your kids outside and interested in bugs, make this DIY Bug Catcher.

The best part, I reused everything to make this!

Mila is slowly getting interested in bugs. She can tell you all about the butterflies life cycle and can identify different bugs too! Mostly, she’s excited about catching lightening bugs this year.

Even though I know she can, I don’t think she’ll want to use her hands. Cue another light bulb parenting moment…

We decided to make a DIY Bug Catcher so we can see lightening bugs and whatever else she catches. Like I said before, we got to reuse items to make it too!

Here’s all that it took to make this:

  • Parmesan Cheese Bottle
  • Stickers
  • Pipe Cleaner
  • Googly Eyes
  • Hot Glue
  • Tulle

First, take the label off and clean the Parmesan cheese container. I don’t think the bugs would mind the cheesy smell, but it needed washed out.

After, I hot glued tulle on the smaller hole side. This way the bugs can get fresh air!

I then put stickers that said, “Mila’s Bug Catcher” on it. When I was done with that, I let her put whatever stickers on there.

While she was decorating her bug catcher, I made the bug face top. I just used the colored googly eyes Mila told me to use and a pipe cleaner for the antennas. All I did was use a little hot glue and it worked perfectly.

Once you’re finished, twist the lid on and your DIY Bug Catcher is complete!


I’ll make sure to update with our bug catching adventures. Which bugs did you like catching as a kid? Let me know in the comments.

DIY Flower Book

With spring flowers here, we’re ready to learn about as many of them as we can! To do that, we created a DIY Flower Book.

Although we only started off with one flower, I’ll make sure to update our other flower pages.

Since Mila picks flowers all the time, we had to press and keep them for a while. I thought it’d be cool to see everything in a book for us to review and go over at the end of summer.

All we had to do is start with a base. Here’s the supplies we used:

  • Cardboard
  • Scrapbook
  • Modge Podge
  • Pipe cleaner
  • Paper
  • Stickers
  • Flowers

For the actual book, I ended up using cardboard from a brownie box. It was easy to cut and I liked how it was thin cardboard too. Then, I used modge podge to paste scrapbook paper on to the cardboard pieces.

After it was dried, I used stickers to write “Mila’s Flower Book.” Then I hole punched the top corner to connect the book with a pipe cleaner.

For the inside flower pages, I just used computer paper. You could definitely do thick card stock paper or other scrapbook paper too. I’ll probably use others with some of the other flowers.

I figured we’d start with tulips since the ones we picked are starting to die.

All we did was dry the flowers, have her draw them, me draw them, and we went over the letters in tulip. It was a fun learning experience for her!

We can’t wait to get started on the other flowers. I think dandelions will be next and some of my Mother’s Day flowers too.


What’s your favorite flower that we should study? Let me know in the comments.

DIY Fingerprint Flower Jar

Mother’s Day is almost here and we’re busy making DIY’s for all the special moms in our lives. If you’re looking for an easy one, this DIY Fingerprint Flower Jar is just right for you.

We love making presents for our loved ones. It makes gift giving more personal and shows how hard we worked on it too. Mila is always so proud when she sees something she made up in someone’s house. She’ll get a huge smile.

Since she loves to pick flowers and put them in vases, I thought this would be a perfect gift for the loved ones in our family!

There’s not a bunch of supplies you need for this DIY gift. We had everything already at home and were able to reuse an old olive jar!

  • Jar
  • Paint
  • Modge podge

All you need to do is get an area prepped for paint. Then I showed Mila what I meant by finger painting flowers on a jar. I just did it on the brown paper that I prepped the area in. This way she could see she was allowed to use her fingers as a paint brush.

Then I let her go!

She did a few alone, but then she felt better when I held it up and twisted it for her. I don’t think she wanted to smudge the flowers she already had done!

Once they’re finished making flowers, coat the jar in modge podge. I just did a thin layer so the flowers don’t go off in the future. This step isn’t required, but if you want that added protection, I’d suggest it!

To finish it up, you could add letter beads like I did or a yarn bow too.

We filled ours up with flowers, but you could add your loved ones favorite candy or even a tea light candle too. Either way, this jar is something special and easy a mom in your life will really love!


If you’re looking for more Mother’s Day DIY’s, check out these ones Mila and I have done. Let me know which one is your favorite in the comments.

DIY Frida Flower Crown

Happy Cinco de Mayo! If you’re looking for a crafty way to celebrate the day and one of their most favorite painters, try this DIY Frida Flower Crown.

Not only will you learn a little more about Mexico, it’s a lot of fun to pretend play!

Mila and I LOVE Frida Kahlo. I even have a tattoo of her on my arm. She’s a feminist icon who went through so much during her life. Her beauty and pain shine through her work. She has inspired Mila and me in so many ways.

On Cinco de Mayo, we like to honor Mexican culture and our favorite girl with fun crafts.

Last year’s is still hanging up!

Since we’re in a pretend play kick, I made Mila a Frida inspired flower crown and gave her a unibrow. Here’s all we used to make this iconic crown.

  • Scrapbook Paper
  • Paper Flowers
  • Staples
  • Hot Glue

First, I cut the base of the crown out of green, floral scrapbook paper. I had to staple to pieces together to fit Mila’s head.

Then, I used paper flowers that was in a floral garland from Mila’s birthday party. I then attached them to the crown with hot glue and fluffed them up. You could make your own paper flowers or use fake flowers too!

After it was all connected, I used eyeliner to thicken her eyebrows and bring them together.

It was such an easy DIY! I showed Mila pictures of Frida and had her do different poses. Then, she drew a self portrait of herself.

Not only was it fun to do, it was a great way for Mila to learn more about a Mexican icon.


How do you celebrate Cinco de Mayo? Let me know in the comments.

Then check out last year’s Frida craft we did.

DIY Floral Handprint Art

If you’re looking for a memorable and easy craft for Mother’s Day, you’ll love this DIY Floral Handprint Art.

Not only was it simple to make, my four year old helped me through it all.

If you haven’t noticed by my last few posts on social media, we’re in a hand art phase. I think it’s a mix of wanting to preserve how little she is and they’re easy to do!

I’ve had this floating frame in my house for about a year. In my head I pictured it with pressed flowers all around. Then, the past few days I thought it’d be a perfect Mother’s Day gift to myself.

So, with Mila’s help and flowers from Josh, we created something beautiful.

For this DIY Floral Handprint Art, you’ll need:

*You can find this frame here.*

First, clean off your frame. I like to do this so I don’t noticed smudges after everything is finished. Plus, it’s nice to work with a clear area.

Then, paint your child’s hand. Mila picked pink, of course and I thought it looked beautiful. When it’s painted, firmly press your child’s hand on the inside pane of glass. If there’s a few missing space, you can repaint their hand and redo the process!

Next, let your child put the pressed flowers where they’d like.

When they have their final spot, clasp the second glass pane to keep the handprint and flowers safe.

On the outside, I decided to paint the word love and the year on the corner. “Love” was purely decorative, but the date is something I do on all of our projects!

Then you’re all finished.

I truly think this DIY Floral Handprint Art would be a lovely piece for moms, grandmas, and every other mother figure in your child’s life.


What’s your tips on pressing or drying flowers? I’d love to hear different ways… especially with Mila’s love of flower picking.

DIY Hand Shaped Flower Bouquet

If you’re looking for a fun Mother’s Day DIY, this Hand Shaped Flower Bouquet is easy to make and will last a lifetime. The moms in your life will love them!

Plus, I was able to reuse products around the house to make it Earth friendly too!

I love when Mila makes me things. Maybe a little too much. I don’t think I’ve ever thrown any artwork or drawing she’s made me. She’s so proud of herself for it too.

For Mother’s Day, it’s always fun to see what kids come up with. Mila loves gifting flowers. When I saw this on Pinterest, I knew I had to recreate it with Mila! She loved how they turned out and it’ll be perfect to add to the bouquet as she grows.

As I stated above, I reused everything for this. Here’s all I used:

  • Scrapbook Paper
  • Stapler
  • Paper Straws
  • Hot Glue

These were super simple to make.

I traced Mila’s hand on thick paper to make a stencil. Then cut it out to trace it on scrapbook paper. Although I only traced four for the picture, we’ll be making more for different family members.

You can make how many you’d like and with different types of scrapbook paper.

Then, cut the hands out. Next, I stapled the two sides together with the print side facing out.

When they’re cut and stapled, spiral the hands so they flutter out. You can make them as curly as you want!

After the flower was made, I hot the paper straws inside to make it look like a stem.

To display, I put them in a glass jar. They look really beautiful. I love that I’ll have a little piece of her at four forever. It’s a lovely Mother’s Day gift I’ll always love.


What is your favorite DIY Mother’s Day gift you’ve ever made or received?

DIY Earth Day Handprint Artwork

Small hands make a big different, especially when it comes to protecting our Earth.

This DIY Earth Day Handprint Artwork is perfect way to showcase your love for Earth while using recycled crafts supplies.

At a young age, I’ve taught Mila she needs to love our Earth. We’ve always talked about recycling and how we need to be mindful of our decisions. She always picks up trash off the ground and loves every part of the outside world.

It’s important to me that she knows her impact and ‘small’ hands can help our Earth heal.

This DIY Earth Day Handprint Artwork was a perfect way to showcase that. We reused supplies we already had and made it cute to show off. Hopefully signs like these will help inspire others to love Earth as deeply as we do.

Here’s all we used:

  • Wood sign
  • Paint
  • Paint brush
  • Yarn
  • Hot glue

To start off, I reused the back of an old summer sign. It was the perfect size and shape of what I had in mind. Plus, it gave it another purpose too!

Next, paint your child’s hands resembling the Earth. This was a bit tricky. I just added blue paint first then topped it off with green. Obviously it’s not going to look exactly right, but I think ours turned out pretty cute.

Then, press down on your child’s hand to get the paint to transfer to the wood sign. You have to work quick so it doesn’t completely dry on their hands.

Once the paint is dry, you can add whatever quote around the hand Earth. I was inspired by The Letter Vee’s Earth Day worksheet and used, “Small Hands Make A Big Difference.” You can write whatever speaks to you!

At this point, I could’ve been done, but I had to add a little extra.

I used scrap yarn as bows on the hanger. The color really popped and gave that earthy feel. Once I saw that, I knew this piece needed more texture than just the bows.

So, I added the fluffy white yarn around the outside of the sign. It really made it look special and stick out.

Since I wanted to spread our love for the earth, this sign is hanging on our porch. Hopefully it’ll inspire someone to make good choices. The future of our world and children are in our hands.

We can make a difference.


What ways do you celebrate our Earth? Check out these fun ways we have:

Rain Process Art

Happy Earth Week, friends! If you’re looking for a fun way to explore the rainy April season, this Rain Process Art is perfect for kiddos

It’s a great way for kids to show how they think of rain and to see their creativity too!

To celebrate and honor our planet this week, all our DIYs will be made with recycled products. We usually try to reuse items as much as we can, but this week it will be a priority that I’ll showcase.

Even though Mila and I aren’t particularly fond of rain, we can appreciate its beauty. Blue is a special color to us and we love that rain helps water our plants. It’s important that we celebrate our earth and all its weather.

For this process art, I just found some items that reminded me of rain…

  • Shades of blue paint
  • Bubble wrap
  • Paint brushes
  • Stuffing
  • Cardboard
  • Pipe cleaner
  • Glue

For all of this, I let Mila decide what she wanted to do. That’s the best part about process art.

She started off painting bubble wrap dark blue. This makes such a cool effect on the cardboard that we love. Then she used the dark blue bingo dauber to make more blue dots.

After we experimented a little.

I added water in the lighter blues. She tried squirting some on the cardboard. Then she used a straw to make the paint look like water dripping on the window.

When she was done panting, I added left over stuffing to the top to make it look like a cloud. Then a pipe cleaner to hang it.

Like all of Mila’s artwork, I think it’s perfect. It looks like the most beautiful storm.

Keep checking in this week to see more ways we celebrate our earth. If you can’t wait until then, check out these fun Earth Day activities we’ve done in the past:


What’s your favorite type of weather? Mila and I love sunshine!

PEEPS Bunny Painting

If you need a way to get rid of all the Easter Bunny’s PEEPs he left, try this cute PEEPS Bunny Painting. It’ll be a hit with kids and a cute piece of artwork to treasure for years to come!

You all know how I love when Mila makes art, especially when it is a fun sensory experience. It’s not even the first time she’s gotten to play with her food either!

Honestly though, we got a lot of PEEPs this year for different recipes and what the Easter Bunny is still bringing. We’ve seen all the PEEPs smores and cocktail garnishes, but we wanted to do something we could keep for years. That’s where this artwork comes in.

Another amazing part… you only need three items:

  • PEEPS Bunny
  • Canvas/Paper
  • Paint – we used washable!

This activity is a simple set up. All you need to do it put paint on a plate. Then let your kiddo know to use the PEEP bunny as a paint brush.

Once they have one color done, give the paint time to dry. You can literally give it time or just use a hair dryer to speed up the process. Either way, you’ll want to do this so the paint doesn’t mash together and just become a ton of brown bunnies.

Repeat with how many colors you’d like to do.

You can even make it more organized than Mila’s by having your child line up the bunnies. I love the chaos of all of Mila’s artwork.

One thing that I haven’t added yet is some sort of saying on there. I’ll try to think of some bunny, spring, or Easter pun to go along with it. If you have any ideas, let me know. I’ll make sure to either update this post or post a finalized picture in my Instagram stories.

No matter what though, this activity was so much fun for Mila to do. I know kids love playing with their food and giving them this option makes it even better.


What’s your favorite Easter artwork you or you child has made? Let me know in the comments.