We’re getting ready to celebrate so many things next month. Just is packed full of goodies like Father’s Day and PRIDE Month. Want to see a fun DIY to make for PRIDE Month? Your little will love to play with this wand being an ally at parades or just around the house too.
Ever since Mila has been little, I’ve wanted her to be around all types of different people. I’ve always told her that love and acceptance is one of the most important things we can have and share with others. PRIDE Month is no different. We love our LGBTQ+ friends and want them to know we support them through everything.
Love is just so special.
One thing I want to do is take Mila to a PRIDE parade! I figured we’d need to bring some accessories for that and thought a wand with bells on it would be perfect! Any noise maker is a hit for Mila.
All we needed for this DIY was:
Dowel/Stick
Yarn/Ribbon
Bell/Disco Ball
Hot Glue
Mila helped me tie the yarn on to the dowel. We’ve been practicing knots and tying shoes, so this was fun for her to do. I always try to add ways she can help me in any DIY.
I didn’t hot glue the bells down. They were super stable with just tying them on. Since I’m obsessed with disco balls right now, I added one to the top.
Honestly, I think it turned out so cute and I love that it helps celebrate PRIDE and something that Mila can use over and over again.
What types of activities do you do to celebrate PRIDE? I’m also always am looking for book recommendations and would love to share the ones I have here too.
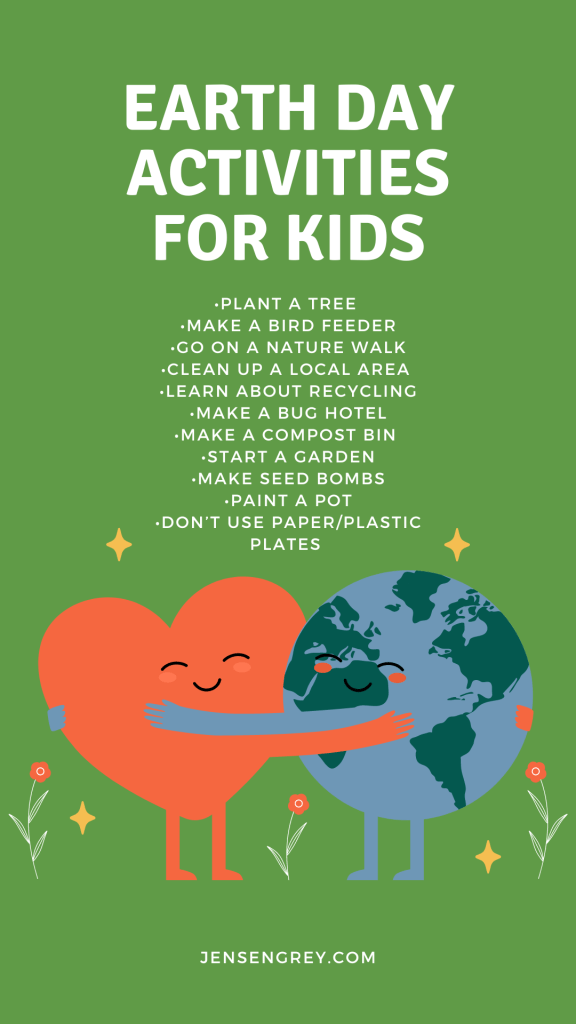
Although we believe Earth Day should be every day, here’s a few ways you can show your love for our earth with your child. There’s a mix of no cost, no prep ideas with more prep and some cost ideas. But they’re all ways to show some love to Mother Earth.
Plant a tree.
Make a bird feeder. Birds are important pollinators, and they can also help to control pests. Making bird feeders can be really easy too! We’ve DIY’d a few bird feeders the last few years. Every time it’s so fun to make with Mila. Check them out here: Rainbow Heart Bird Feeder, Toilet Paper Roll Bird Feeder, Birdhouse Motel.
Go on a nature walk. If there’s one thing I’ve learned, my little absolutely loves getting outside and exploring. Going on a nature walk and having her find different things while walking is always a hit! You can have littles do a Nature Scavenger Hunt or look for something specific depending on their interests. Either way, getting outside is always a great idea.
Help to clean up a local park or beach. This is a great way to teach kids about the importance of keeping our environment clean. I swear Mila constantly asks if we can pick up the trash on the side of the road every time we’re in the car. Maybe one day, but we just focus on our walking paths for now.
Learn about recycling. There are so many fun ways to teach kids about recycling. This water activity let Mila see the impact of what our trash does to our oceans.
Make a bug hotel. Get a cardboard box, paint it, fill it with leaves/twigs/flowers/rocks, and set outside. Bugs will love the space and you can learn about them while they’re exploring their new hotel.
Make a compost bin. Composting is a great way to reduce the amount of food waste that goes to landfills. We have not started one at our house yet, but it is a huge goal of mine to finally do it. One day soon and I’ll make sure I share with you guys too.
Start a garden. Growing your own food is a great way to teach kids about where their food comes from and how to eat healthy. We absolutely love making a garden every year. Some years we start off with seeds and others we get starts. Either way, it’s a great way to celebrate Earth Day!
Paint a pot. We have a lot of plants in our house, but seemingly never enough pots. A fun way to either get a plant for your home or replant a new one is for your little to paint a pot. When Mila does this, she knows she’s in charge of watering and checking in on that plant. It helps teach her responsibility and broaden her love for our Earth.
Don’t use paper or plastic plates. This is a huge one! We normally don’t use paper plates or any cutlery that you can throw away. It helps reduce waste and we get to buy really cute plates too.
I’d like to end this post by saying, it’s okay if you don’t do any of these things. Being a parent/guardian is hard work and you’re doing your absolute best!
Here are some other Earth Day projects if you’re feeling inspired:
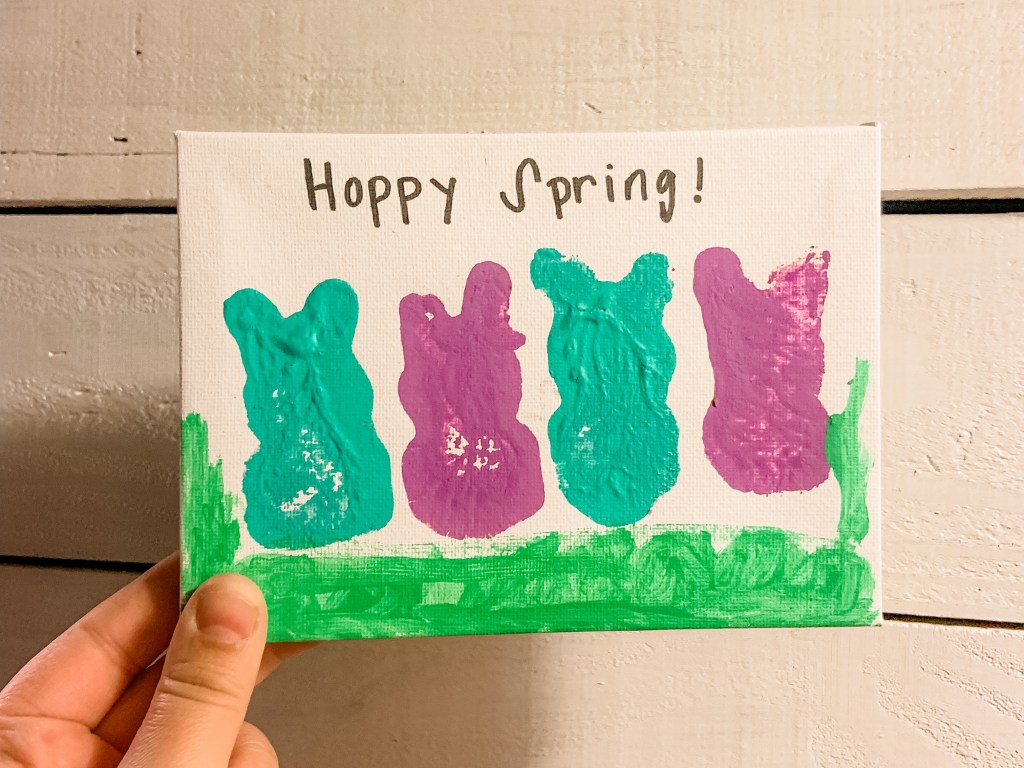
It’s the first day of spring! To celebrate, we created a piece to showcase all season long. The best part is that kids of any ages can join in on this fun.
For the last year, I’ve been decorating Mila’s room to match the current season or holiday. Instead of buying new things all the time, we’ve been making decor! It makes it so much more personalized and Mila is always super proud of her work.
Although we used canvas, you could definitely use paper or cardboard too. We use cardboard for so many crafts and activities. It’s a great way to reuse from leftover boxes.
To set up, lay something down you wouldn’t mind getting paint on. Then lay your canvas on top of that. Again, we use cardboard to catch all the left over paint. If you keep reusing the same cardboard, it looks so cool at the end of a season or year.
The most perfect size paint tray for these Peeps Bunnies are the tops of butter containers. They bunnies fit just right. Pick a color with your little for the bunnies. We decided to do just two colors: purple and blue. The purple represent the girls in our family and the blue the boys. You could also do the person’s favorite color per bunny or whatever colors are in your spring decor.
Next, have them use the Peeps Bunnies as a stamp. These aren’t too hard for little to grasp and use. I would definitely keep a wipe nearby in case they do get paint on their hand.
Although we didn’t add details to our bunnies, you could add faces which would make them even more cute. We did add grass though at the bottom and ‘Hoppy Spring’ at the top. Here are a few other sayings your sign could have too:
Every bunny is welcome here.
Hoppy Easter
Hanging with my Peeps
Some bunny loves you.
Don’t worry, be hoppy!
I love how are Hoppy Spring sign turned out and can’t wait to share all our crafts and activities we have planned all season long.
If you end up making this sign, please tag me on socials (Facebook, Instagram, Tik Tok) or comment a picture in the comments. I love seeing everyone’s interpretations. It makes me so happy seeing that we could help inspire you!
Most of all, make sure to treasure all those memories you get to make with your family. That’s the best thing we can do.
Here’s some other fun Easter activities to try with your kiddo this year:
Let’s celebrate this month with some fun cardboard crafts that every one can make with their kids at home. By repurposing cardboard and using supplies at home, you can have Christmas fun without breaking the bank.
But first, it’s been forever since I’ve posted on here. I’ve been busy growing my other socials and I’ve neglected actually writing our activities and adventures. My goal is to get back into writing and sharing on here as I did before. If you’ve been missing out or want to see more of our every day things, make sure to follow me on Facebook, Instagram, Pinterest, and YouTube — we’re on all the things now, lol.
Anyways, let’s get back to the DIY Cardboard Christmas Tree.
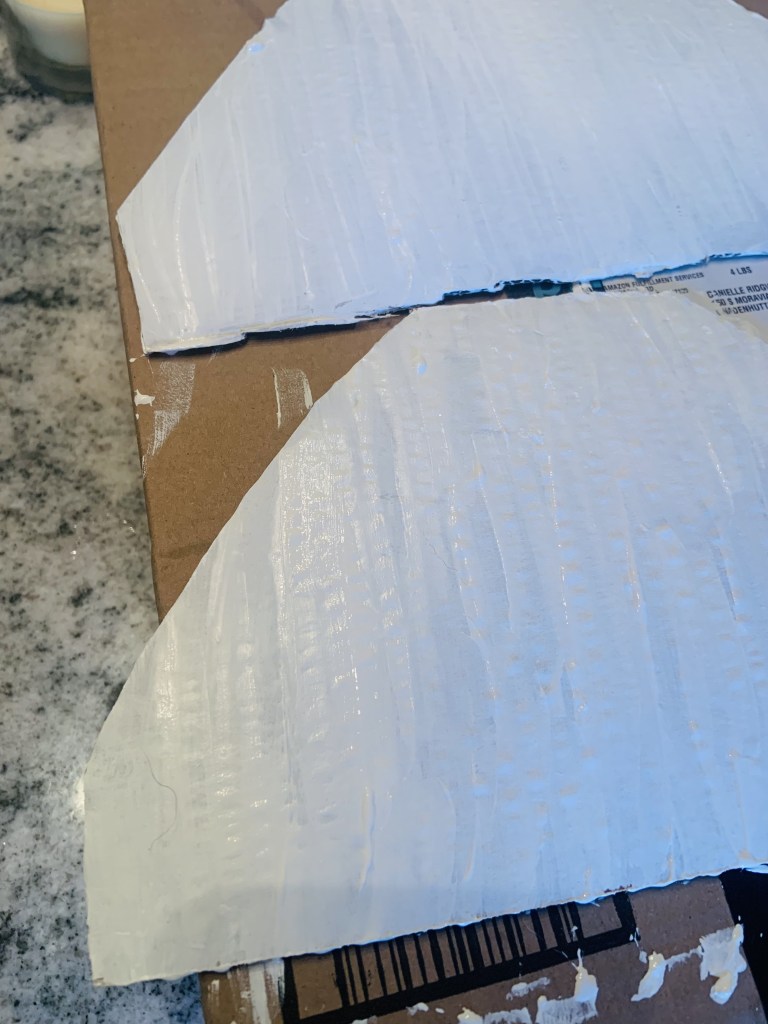
This was really easy to make and took minimal prep. It made for a cute and easy decoration that Mila loved to make. Here’s what you need for this activity:
To prep for this activity, all i did was cut my cardboard in the pieces I needed. I did three triangular pieces for the actual tree, a star for the topper, and a rectangle for the trunk. Then, I just painted the tree white and the star golden. You could easily not paint it or paint it whatever color. Do what’s best for you!
Once you have all the pieces cut and the paint is dried, just hot glue the pieces together to make it look like a tree.
Then, have your child use Dauber Dawgs, markers, or stickers to decorate the tree.
I absolutely love the rainbow look Mila made. Her room is decorated for Christmas this year in a rainbow themed; so this craftivity fits right in.
For a closer look in how we made this, check out this video.
Even though this activity is simple, Mila loved being able to create this cardboard tree. She loves to decorate so it made it fun watching her figure out what colors to use and the pattern they were in. Not only was it fun, she got to work on so many skills too!
I think we’ll definitely do this craftivity again in the future and see how her style changes as she gets older. I love making these types of memories and preserving them too.
I’m so thankful for Cameron Frank Products. They gifted Mila and me the Dauber Dawgs which are perfect for crafts and educational activities. It would make a perfect Christmas gift for kids who love to craft. Their boxes even come with activity sheets, which was a huge hit with Mila. You can find the one we had through this link OR others too.
What fun crafts and activities are you doing this holiday season? Let me know in the comments.
We’re starting off the month with a fun little DIY that littles can help with too.
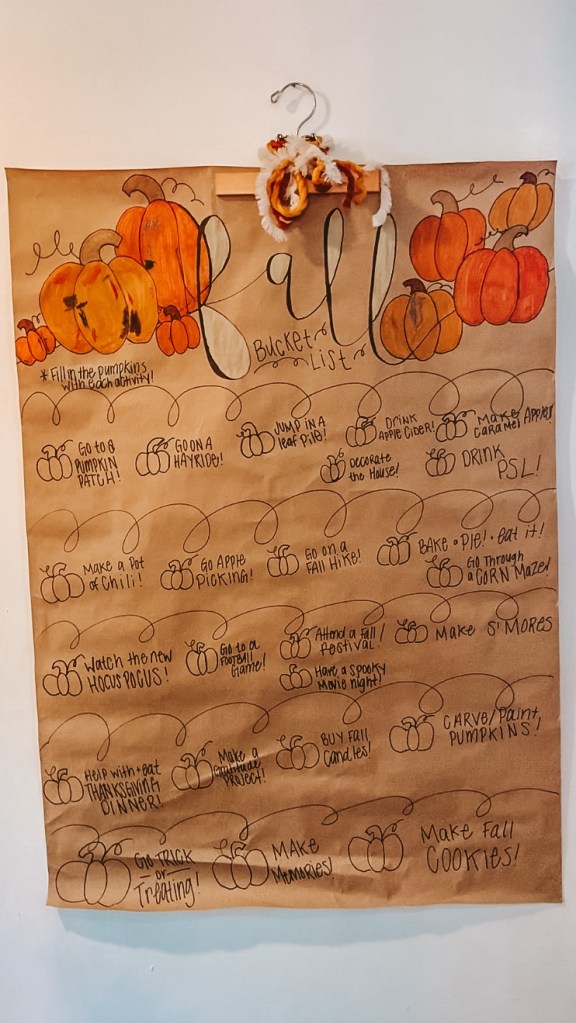
Ever since Mila was little, I’ve loved making bucket lists. It’s fun to brainstorm all the fun things you’d like to do for a certain time of year or theme. Since we’re in the “ber” months, I figured we should just start fresh with a fall bucket list. Mila helped come up with different things to add on the list and colored in some of the pumpkins too!
All I did was letter “fall bucket list” and free draw some pumpkins. It didn’t take too long and it was fun to watch Mila create too.
Since she enjoyed coloring in the pumpkins, I thought it’d be fun to color in each pumpkin when we do the activity! This was we can watch our pumpkin patch come to life while we make all the fall memories.
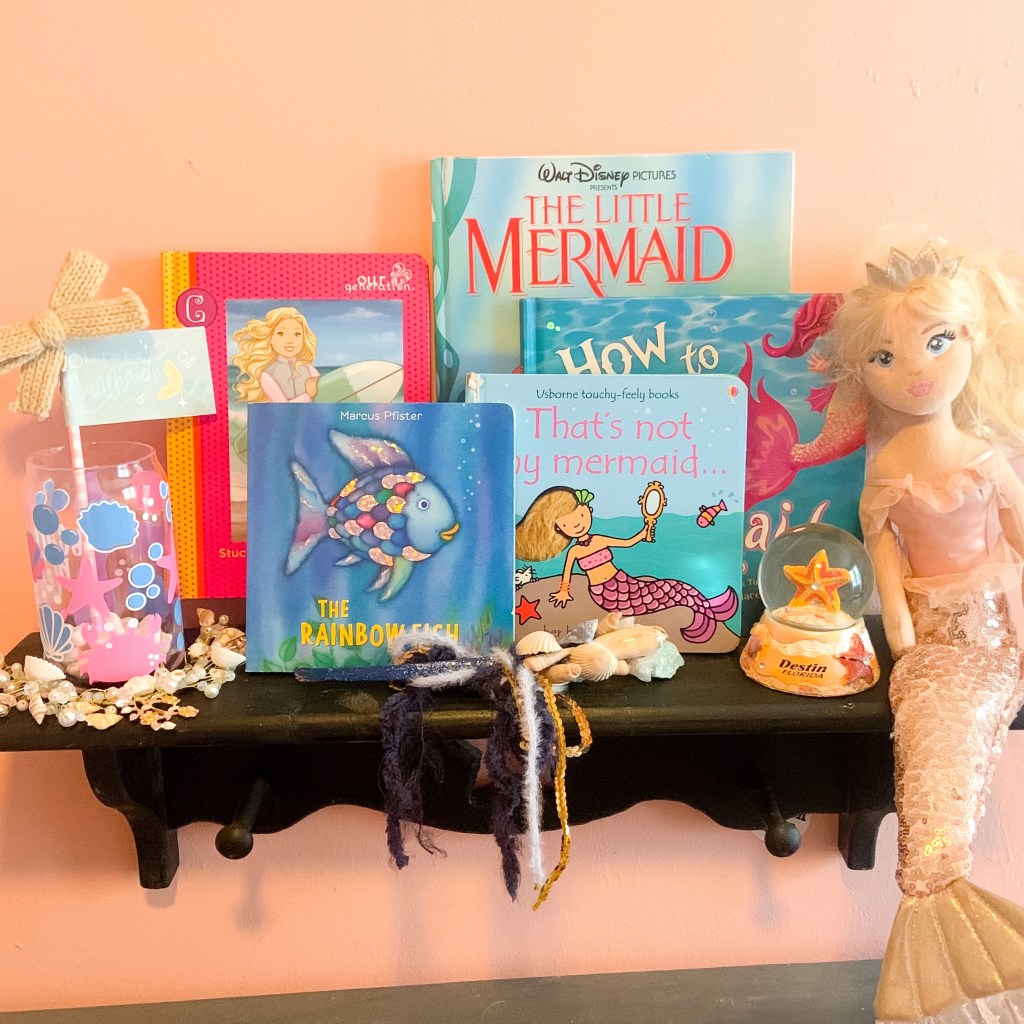
If you’re looking for some books to read this summer, these 5 Summer Reading Picks are a great start.
Each book was picked by a mermaid-loving four year old!
With school out, it’s important to keep kids reading and learning. Switching up books and ‘shelfies’ can help keep them interested and excited to read!
Mila has accumulated a TON of books in her four years. She has a few favorite picks — but it can get redundant reading them 1000 times. To help keep things fresh, I love to show her themed books and have her pick out her top picks.
I laid out ‘summer’ books that included zoos, weather, and other ocean animals. Of course, she was instantly drawn to the mermaid ones!
Here’s all of Mila’s picks:
The Little Mermaid
This was my book when I was a kid, but Mila is in love with it!
It’s the classic tale with beautiful images. Since Mila knows the story, she likes to pretend to ‘read’ to me. I love seeing what letters and words she is beginning to recognize too. If your kiddo loves “The Littler Mermaid” the movie, you’ll love the book too.
This is one of Mila’s favorite series! She loves the story and trying to figure out how the characters are going to catch the mermaid next. I love the rhyming and how it gets her brain thinking. Mila always finds new things in the pictures too. The last time she read it, she pointed out a big fish I had never saw!
This series has how to catch a unicorn, leprechaun, and the Easter Bunny too! It’s a series I’ll always recommend for any occasion you need.
If you’re interested in this book or series, check them out!
That’s Not My Mermaid
The “That’s Not My” series has been a staple in our home since Mila was a baby. They let kids feel different textures and understand what the words mean. Plus, there’s a hiding mouse that kids love to seek too.
Mila absolutely loves the mermaid one in the series. It’s one she has by her bed all summer long. She loves reading this one to me and showing me she remembers all the words.
Last year, “The Rainbow Fish” was Mill’s favorite summer book. It’s a great story about sharing and being mindful of others. We made the cutest paper craft (pictured above) and Mila recognizes thee cover image any where she sees it.
The bright colors are so perfect and I love this classic tale. This will be one boo I always have on hand.
Mila got this book earlier this year when Our Generation Dolls gifted us a few dolls and accessories. She saw the book and we’ve been reading it in chunks since! It’s a fun story of Coral and her passion for surfing.
The doll that came with this book is adorable too. Mila is constantly playing with her and her friends. I’d totally recommend them to anyone looking for a good doll!
Reading is such an important way to learn and imagine. It makes me so proud Mila can pick out her favorites and enjoy our time reading together. We’ll never get this time back, so we’re making every second count!
We can’t wait to show you more summer activities and fun that we’ll be having this year! Stay tuned.
What are some summer inspired books you’d recommend? We’d love to read them.
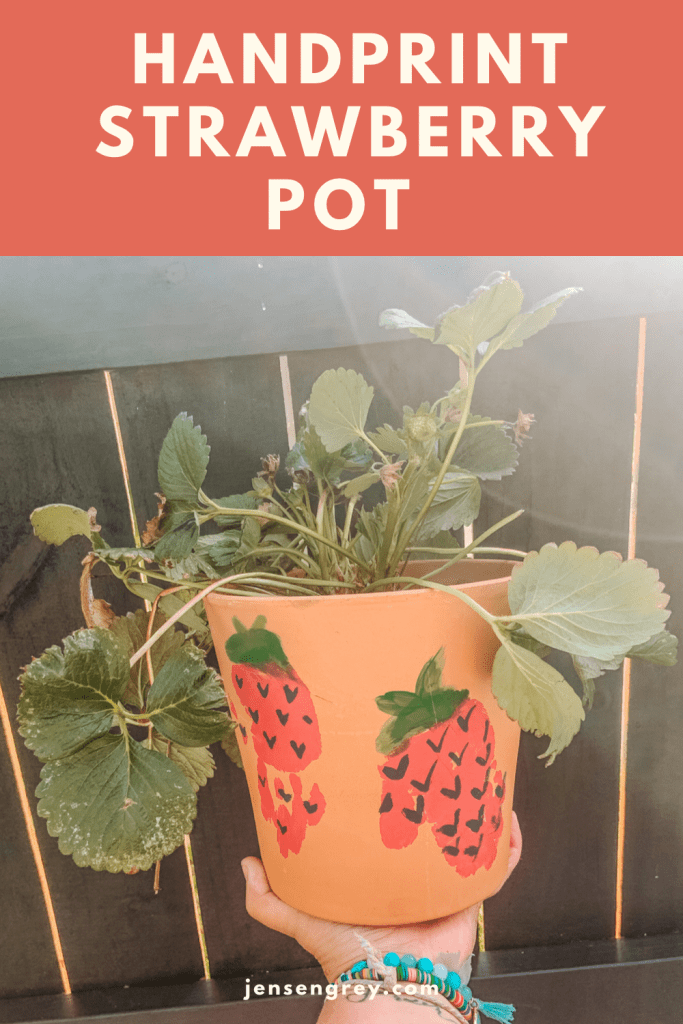
If you love strawberries and want a cute pot to grow them in, you’ll have to make this Strawberry Handprint Pot!
These pots are a great way to watch plants grow, but also perfect for kids to get involved too.
I’ve said it a ton before, but Mila and I are obsessed with plants. We probably have 200 houseplants. Then in the summer, we have fruits, veggies, and herbs. My front porch looks like a jungle.
Last year, strawberries were our favorite to grow. Mila would literally eat them from the plant. It was so fun to check every morning.
To make strawberry picking more fun this year, we made this Strawberry Handprint Pot.
Here’s what you’ll need to make yours:
Green Paint
Red Paint
Black Paint
Pot
Brush
Strawberry Plant
Potting Soil
This handprint art is actually pretty easy to do.
Just paint (or have your kiddo paint) the majority of their hand with red paint. Then the top part with green.
Press firmly on the pot. We were able to get two handprints per paint!
Once it’s dried, add the seeds on to the strawberries. I just made little hearts in black. I thought it looked cute!
When those are dry, plant your strawberry plant and you’re good to grow.
Like all our crafts, I think this turned out so cute. I know this pot will have strawberries in it for years to come!
Looking for more strawberry fun? Check out some of these recipes and crafts we’ve done in the past!
If you’re looking for a fun way to get your kids outside and interested in bugs, make this DIY Bug Catcher.
The best part, I reused everything to make this!
Mila is slowly getting interested in bugs. She can tell you all about the butterflies life cycle and can identify different bugs too! Mostly, she’s excited about catching lightening bugs this year.
Even though I know she can, I don’t think she’ll want to use her hands. Cue another light bulb parenting moment…
We decided to make a DIY Bug Catcher so we can see lightening bugs and whatever else she catches. Like I said before, we got to reuse items to make it too!
Here’s all that it took to make this:
Parmesan Cheese Bottle
Stickers
Pipe Cleaner
Googly Eyes
Hot Glue
Tulle
First, take the label off and clean the Parmesan cheese container. I don’t think the bugs would mind the cheesy smell, but it needed washed out.
After, I hot glued tulle on the smaller hole side. This way the bugs can get fresh air!
I then put stickers that said, “Mila’s Bug Catcher” on it. When I was done with that, I let her put whatever stickers on there.
While she was decorating her bug catcher, I made the bug face top. I just used the colored googly eyes Mila told me to use and a pipe cleaner for the antennas. All I did was use a little hot glue and it worked perfectly.
Once you’re finished, twist the lid on and your DIY Bug Catcher is complete!
I’ll make sure to update with our bug catching adventures. Which bugs did you like catching as a kid? Let me know in the comments.
If your child is interested in flowers and putting them together, they’ll love this Kids Floral Arrangement Activity.
With a few supplies, kids will make different arrangements for a long time!
Mila is obsessed with flowers. When she sees them at the store, we have to buy a bouquet… or two. I’m usually fine with it. We smell them and love bringing life into our home.
One day, Mila told me she couldn’t wait until our flowers were done growing so she could make her own bouquet.
Cue the light bulb moment!
I thought about all the fake flowers we had recently bought and that she could do just that. Over and over again.
Here’s all Mila used to make her Kids Floral Arrangement.
Fake flowers
Colander
Vase
Wire cutters
To start off, I only had the flowers to prep! Since they’re usually bundled all together, I wanted to cut them. There’s wires underneath fake flowers, so I just snipped them all with wire cutters.
Then I put them on a plate for Mila to choose what she wanted.
I did ask her to plan and put the flowers in a colander. This way she could work on her motor function skills. It was fun to watch her plan and be creative with the flowers. She especially loved the fake butterflies!
After she had it all planned, I told her to put them in the vase. She again, fluffed them and put them exactly how she wanted.
In the vase, I added crinkle filler paper so the flowers stayed upright.
Now we have a bouquet of flowers that will never die on our kitchen table. She is so proud of what she made and I love that we can do this activity again and again.
Here’s to all my seasonal floral arrangements being made by Mila!
Do you like getting fresh flowers or are you more into plants?
With spring flowers here, we’re ready to learn about as many of them as we can! To do that, we created a DIY Flower Book.
Although we only started off with one flower, I’ll make sure to update our other flower pages.
Since Mila picks flowers all the time, we had to press and keep them for a while. I thought it’d be cool to see everything in a book for us to review and go over at the end of summer.
All we had to do is start with a base. Here’s the supplies we used:
Cardboard
Scrapbook
Modge Podge
Pipe cleaner
Paper
Stickers
Flowers
For the actual book, I ended up using cardboard from a brownie box. It was easy to cut and I liked how it was thin cardboard too. Then, I used modge podge to paste scrapbook paper on to the cardboard pieces.
After it was dried, I used stickers to write “Mila’s Flower Book.” Then I hole punched the top corner to connect the book with a pipe cleaner.
For the inside flower pages, I just used computer paper. You could definitely do thick card stock paper or other scrapbook paper too. I’ll probably use others with some of the other flowers.
I figured we’d start with tulips since the ones we picked are starting to die.
All we did was dry the flowers, have her draw them, me draw them, and we went over the letters in tulip. It was a fun learning experience for her!
We can’t wait to get started on the other flowers. I think dandelions will be next and some of my Mother’s Day flowers too.
What’s your favorite flower that we should study? Let me know in the comments.