DIY Outdoor Art Display

Mila and I spend a lot of time outside. We tend to our plants, play with our cats, and eat out there too. Since our outdoor areas are so important, we decided to do a DIY Outdoor Art Display to make it even more homey.

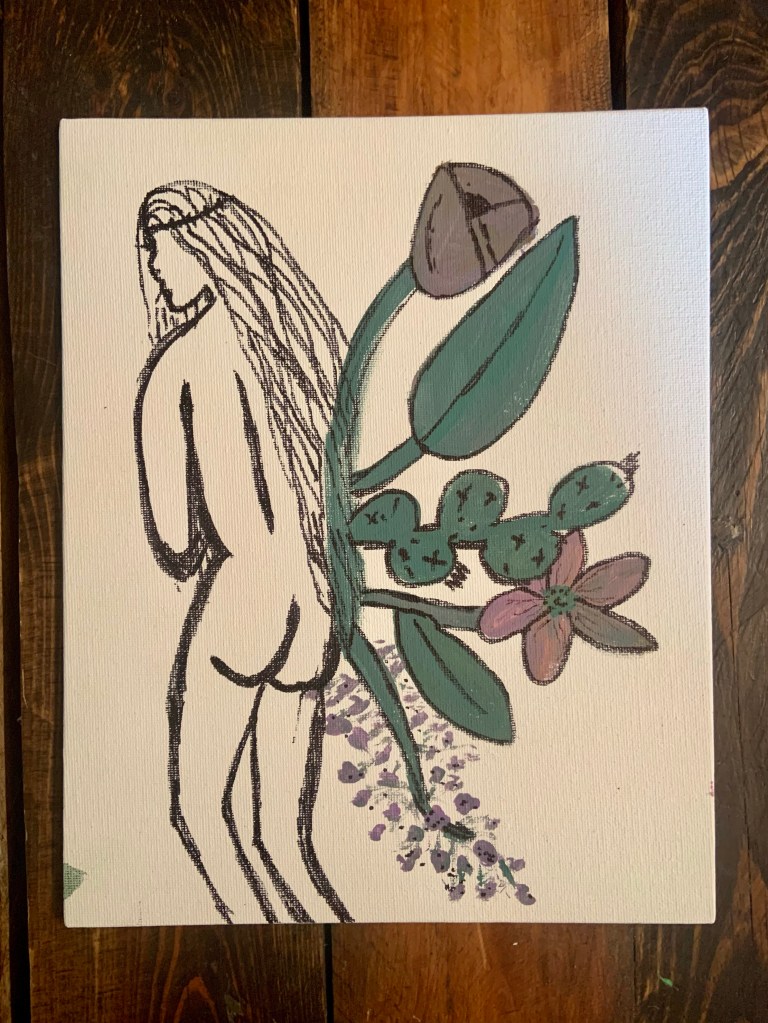
Mila makes a lot of artwork. Most of it gets showcased on here. She is so proud to show it off and it makes me smile every time I see it.

Why wouldn’t we take it outside?

Plus, outdoor living doesn’t have to be boring. You can add colors and pops of personality. Just make sure it’s covered from the elements and you’re good. There’s also a ton of weatherproofed items you can purchase.

Here’s what we used for this outdoor art display:

  • Two pallet boards
  • Screwdriver
  • Screws
  • Hammer
  • Nails

The biggest project was the shelf. All we did was screw the boards together. We could have painted it, but I like the natural look. Then, we screwed the shelf in the siding and put nails where the canvas went.

After that hard part was done, it’s decorating time.

I loved how all the elements came together. Mila’s artwork was the star of the show, but there’s other elements that we love Thats inside our house.

The plants we chose love humidity and are covered from the sun harsh rays. It’s also a great way to propagate them and add glass pieces. The rest of our porch is covered in plants too!

Of course, we had to add Jensen’s block. It’s our way of having him close to us no matter where we are around the house.

I also loved the picture of Mila and the eagle rock too. All things that make our space ours.

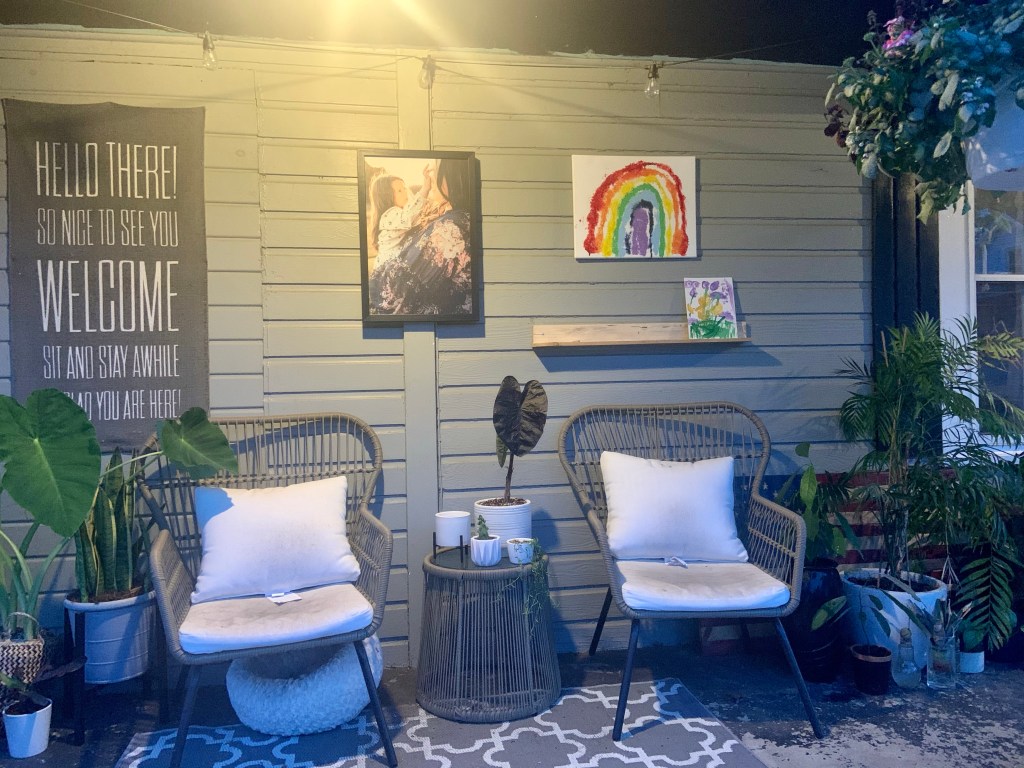
With a few nails, screws, and pieces of pallet wood we created our perfect art display. It truly was a simple process that had a big impact.

Since I have wood siding, I think it made this project a little easier. If you have vinyl siding, all you would need is different screws. It isn’t too much different!

At the end of the day, I’m so happy for this little DIY. It’s helped me center on self care and taking a moment in the morning and evenings.

I can’t wait to see what Mila creates for it next.

What outdoor DIYs have you done lately?

Strawberry Mint Sun Tea

One of my favorite summer drinks is sun tea. It’s so easy to make and even more refreshing. Since I’m still battling the mint take over, I thought I could combine my favorite flavors. Out of it came Strawberry Mint Sun Tea.

When I first got my house, my grandpa gave my my grandma’s sun tea container. It felt like such an honor. I usually put iced tea in there when I make it. Now it feels like when I make sun tea, I can connect with her.

Even though I used a different container for this batch (thanks toddler and dog!), it was magical seeing the transformation. Mila loved it too.

Here’s what we used for our Strawberry Mint Sun Tea:

  • Big glass jar with a tight lid
  • Tea bags
  • Strawberries
  • Mint
  • Water
  • A sunny day

Obviously I didn’t put specific amounts for the ingredients. There’s a reason why (there’s always a reason).

The size of your jar or container determines what you’ll need. I personally used six tea bags and then just eyeballed the strawberries and mint. Maybe around seven strawberries and a handful or two of mint!

It’s all about preference! But, I made a l it take cheat sheet in case you’d like some guidance.

The first thing you need for sun tea is a sunny day! With summer coming up, you’ll have no issues with that.

Honestly, all you have to do is fill up your container. Then, put all the ingredients in. We mixed it around to activate the mint leaves, but it’s not needed!

Once every thing is in there, shut the lid and stick it outside.

It’s truly that simple.

We let it stay outside for around seven hours. I could tell it was time to take it in by the color of the water. Again, this is all about preference and what you like in a tea.

To serve, I strained the strawberries, but let the mint leaves come through over a small jar of ice.

It was so refreshing. The mint made it taste so cooling.

Although it didn’t need sugar, Mila asked for it to be a little sweeter. So, you can add sugar if you’d please. Again, tea is all about how your taste buds like it!

Sun tea is so fun to make and your kids will constantly be checking the water. It’s like a little science experiment.

We’ll be making another batch of sun tea soon enough!

What’s your favorite thing to add to tea?

While you’re at it, check out these other amazing iced tea recipes!

5 June Affirmations for Self Love.

With post school craziness, I’ve been lacking on setting aside time for self care. I knew for June that I needed to make self love affirmation cards to remind myself to take time for me.

Since I love painting, I did random doodles to be the backdrop for my affirmations.

I love that they can be as simple or complex as I want to make it.

For this month, I wanted to focus on how colors made me feel. It seems like I always am drawn to rainbows, so I’m not surprised that’s what I drew. All the other colors were straight from my emotions and I tried to get the words to match.

Here’s my June affirmations this month. I also shared my cross between watercolor and digital art. Please feel free to use and share them if you’d like!

I spread love wherever I go.

I choose to let go of past anger.

Just keep shining.

I will ride out this wave.

You are important too.

Affirmations are so important for me to do. I hang them up in my kitchen where I can see them. They don’t have to be big pieces of paper to make a huge impact.

These little reminders will help me remember to make time for myself this summer. Mothers need self care and self love. This is mine.

Even if it’s five minutes, make sure to take time for you.

You’re important. You deserve it.

What affirmations or quotes have been speaking to you lately? Let me know in the comments.

Backyard Mint Mojito

One of my favorite parts of having a backyard garden is making new recipes! Since my mint is sort of taking over, I needed to find something quick.

A mojito sounded like the perfect drink for my little problem.

I’ve never made a mojito at home before, but I figured I’d try! After seeing how easy it was, I’ll definitely be making it again.

Here’s the ingredients you’ll need:

  • 10 mint leaves
  • 1/2 lime juiced or 4 ounces
  • 1 ounce simple syrup
  • 2 ounces of white rum (I used lime flavored)
  • 3 ounces of seltzer
  • Ice

The first thing you need to do is collect your mint! You can get some at stores or in your backyard. This is what I’ve been working with lately…

My little garden smells so good, but it’s a lot of mint. I cut off two stems. They gave me the perfect amount of leaves and there’s still a ton of mint left.

After you figure out your mint situation, the fun begins.

The first thing you need to do is muddle your mint. I personally don’t have specific bar equipment, but I’m guessing it’d be easier. Honestly, I used the back of my spoon and it seemed to work pretty well.

Then, add your muddled mint, lime juice, rum, and simple syrup in a glass or cocktail shaker with ice. Again, I didn’t have a cocktail shaker, but I shook them with a glass and plastic cup.

It worked so I’m pretty impressed with my ingenuity.

Then, strain your mojito mixture in a glass filled with ice. Top the rest of it off with seltzer. After, you can garnish with extra mint or a lime wedge.

After you’re all done, enjoy it!

I love the taste of mint, so I added extra in there. It ended up tasting amazing, especially after letting it sit for a little bit before I drank it. It just tasted extra minty.

Hopefully I’ll be able to try and make a mint julep sometime this summer too. I have more than enough mint to experiment with! Once I find a recipe that I love, I’ll share it on here. Fingers crossed it goes as easily as this Backyard Mint Mojito.

Let me know what your favorite summer drink or refreshment is in the comments. If you tried this recipe, tell me how yours tasted too!

Enjoy!

Looking for some other tasty summer drinks, try these too!

My Everlasting Flowers.

I always dreamed of Jensen picking flowers for me. We’d have a house filled with dandelion and wildflower jars.

Although I do have a house like that now, it’s not from Jensen. Mila brings as much love as she does flowers into our house. Our life is happy, but we will always be missing a piece.

For a long time, I’ve wondered how I could get the dream of flowers from Jensen. Then I got a random tattoo.

After that tattoo, I talked to the tattoo artist about Jensen and how I’d love a bouquet of forget-me-not flowers on me. I wanted to always carry them, just like how he always walks with me.

So, we scheduled another tattoo session.

In a couple hours, I have my flowers picked by my Jensen. Every time I see blue forget-me-nots, I think of him. Now when I look at my arm, I think of him and the countless amounts of flowers he’ll have for me.

It felt a little radical to get a tattoo on my forearm that can always be seen, but I love it.

He and these flowers are a part of our story.

Most of my tattoos are in remembrance of Jensen. I love knowing that even though he’s not physically with us, I can always see him in my body. No matter if it’s on my foot, wrist, or arm, I can always catch a glimpse of him.

By the way, Mila likes this tattoo way more than the one on my ankle. She loves counting them and telling me how blue is for her brother.

What’s your favorite tattoo that you have? Or if you don’t have one, what would you get if you did?

5 Reasons We Love the Akron Zoo.

One great thing to do is go to the zoo. Ohio has some great ones! Our latest adventure was to the Akron Zoo.

Since the Akron Zoo is the closest to us, we seem to frequent it more. Although it’s smaller than the Cleveland and Columbus zoos we’ve been to in the last few months, it’s just as beautiful and educational.

Before you visit, here are five of the reasons why we LOVE the Akron Zoo.

The Size

Although the zoo may be smaller, it’s perfect for toddlers. There’s isn’t as many animals or as much walking as Columbus, Cleveland, or Cincinnati, but it still makes an impact.

We can walk and see all the animals in a few hours without rushing. Plus, we can play in certain areas without feeling like we need to hurry up to get through. It makes it nice for kids to actually play and explore.

The zoo is expanding though!

On May 29, 2021, they’ll be opening their Wild Asia expansion. Mila and I will be back to see. We love tigers! There were also signs about expanding Africa too!

Even though it is smaller, you’ll still be getting a workout. There’s a huge hill to walk up!

The Otter Exhibit

Any parent who goes to this zoo knows they’ll be spending a ton of time with the otters.

There’s a huge slide that goes right through the exhibit and water. Kids can see the otter swim right by them!

The slide goes surprisingly fast and it’s a big hit with the kids. Mila spent a ton of time going up the steps and sliding right down. It’s cute to see the kids make themselves stop midway so they can get a better look at the otter.

It also has two huge viewing spots to see the otter. So while parents are waiting for their kids, they can get a good view too.

The otter was adorable! This was my favorite exhibit as a kid!

The Komodo Dragon

One of mine and Mila’s favorite zoo animals is the Komodo Dragon. The exhibit at the Akron Zoo is beautiful and we can always get a close look at this guy.

We love seeing him walk and perk up. It’s not an animal you get to see everyday!

I’m pretty sure Mila think this guys either an actual dragon or a dinosaur. Honestly, I can’t say I disagree.

One of my favorite parts of the zoo is seeing animals you’d never be able to get close to in the wild. I think this is why Mila and I are both fascinated with this guy.

By the Komodo Dragon is other reptiles, amphibians, and sea creatures. Plus the Komodo Kingdom Cafe!

The Carousel

I know, I know. There’s carousels at every zoo, but it’s our favorite every time.

Mila genuinely gets so happy when she sees them. She picks out an animal in the line, then switches last minute!

This carousel has beautiful painting on all the saddles and above. It also has a variety of different sized animals you can ride, which I thought was really nice.

It’s also a great break before walking up the hill!

I think the carousel at every zoo will make our top five. It’s only $2 to ride at the Akron Zoo and if you’re a parent who has to accompany your child, you get on free. The best $2 spent!

The Greenery and Gardens

If you didn’t know, I love plants and greenery. The Akron Zoo has beautiful plants everywhere you look!

I love when zoos really step up their plant game. It makes it feel more relatable for the animals and gets you in a wild mindset.

The Zoo Gardens also gives you the opportunity to walk and really take in the flowers. Immersing yourself in nature is so healing and relaxing. Mila loves it too!

These aren’t the only things we love at the zoo, but are the ones that stuck out the most during the latest trip. We cannot wait to go back this summer to check out the new exhibit!

I love that this zoo is growing since it’s so close to us.

Here are some other pictures I have to share from our experience.

We love the Akron Zoo!

Anytime I can see Mila’s amazement by what’s around her makes me so happy. She loves the animals, the playgrounds, and the environment when we get to go.

What’s your favorite part of the zoo closest to you?

Mommy Recipe: Strawberry Lemonade Mimosa

Summer is quickly approaching and so are weekend brunches. Change up your mimosa game with this Strawberry Lemonade Mimosa. It’ll cool you down, without the overbearing champagne taste.

I love this combination and figured I’d try to make a mimosa with it. It’s a light drink and the Italian ice elevates it even more.

This drink would be perfect for a mimosa bar or anything brunch!

Here’s what you’ll need:

  • Champagne
  • Strawberry Lemonade
  • Strawberry Italian Ice
  • Pink Sugar
  • Fresh Strawberry

First, coat the rim of your flute by cutting a strawberry and putting it around the rim. Then, pour some sugar on a plate. To coat, just roll the rim around the sugar.

Next, put your Italian ice in the bottom of the cup.

Then, fill your flute to your discretion with champagne. It’s really up to you how much champagne you’d like. I’m not one to limit your drinking (haha). Then fill the rest up with the strawberry lemonade. Again, it’s up to you how much you want to drink.

While I was making this drink, Mila was obsessed with the pink salt and the bubbles. So, I threw together this little mix for her too. It’d be great for other littles too.

The Kid Version:

  • Strawberry Lemonade
  • Strawberry Italian Ice
  • Pink Salt
  • Fresh Strawberry
  • Carbonated water

This little spin on a classic mimosa is great for strawberry lemonade lovers and is just perfect for summer months too. The champagne taste isn’t too strong and it tastes really great. Being creative with drinks can be so much fun!

I absolutely loved making Mila one too. She felt like a ‘big kid’ and it was so easy to make her special drink.

Next time, I’d love to try a grapefruit mimosa. I’ll share when i do.

What’s your favorite type of mimosa?

Strawberry Chocolate Chip Cookies Recipe

One of the best and most classic desserts are chocolate chip cookies. They’re gooey and make you feel all warm inside. Up until now, I didn’t think they could get any better, until we added one ingredient: strawberries.

This new to us recipe is one I HAD to share with everyone, especially before National Chocolate Chip Day. Not only did we enjoy the finished results, Mila had a blast making these too.

Maybe a little too much fun with the extra flour!

Anyways, here’s what you’ll need to make these delicious cookies:

  • 2 1/4 cups of flour
  • 1 teaspoon of baking soda
  • 1/2 teaspoon of salt
  • 1 stick of unsalted butter
  • 1/2 cup of sugar
  • 3/4 cup of brown sugar
  • 1 tablespoon of vanilla extract
  • 2 large eggs
  • 1/2 cup of chopped strawberries
  • 1 cup of chocolate chips

Before making the cookie dough, preheat the oven to 370 F. Then line two large baking sheets with wax or parchment paper.

In a medium size bowl, whisk together the flour, baking soda, and salt. Set aside.

Next, in a large mixing bowl, use your mixer to cream the butter, sugar, brown sugar, and vanilla extract. I let my butter warm up a little bit to help it cream. Honestly, I just popped it in the microwave for 20 seconds.

Then, add eggs in one at a time. Mix in between eggs.

After it’s mixed, slowly add the flour mixture in. Just mix it until combined and don’t over mix.

Once you get a good dough consistency, fold in strawberries and chocolate chips. I used a spatula for this.

Now it’s time to place them on the cooking sheet. You can use an ice cream or cookie scoop to help with this part. I just used my hands and made little balls. It was way easier for me this way than using a spoon or anything.

Then, place in the oven and bake for 10 minutes. Rotate the cookie sheet after and place back in the oven for 4-6 more minutes. Your cookies should have holden brown on their edges.

Once it’s done, remove from the oven and let them cool down… or not.

We enjoyed these cookies a little too much. I have a feeling it’ll be a recipe we make over and over again.

Let me know in the comments if you end up trying this recipe… you most definitely should!

Check out these other chocolate chip creations too:

Motherhood freed me.

Last month, I saw a post by Avery’s Garden asking for submissions of creative grief. The prompt was, “What does motherhood look like to you?”

For me, motherhood has been complicated and full of ups and downs.

In the beginning, I was stripped away from physically mothering Jensen. I will never be able to fully explain that pain and how it will always linger. I’ve tried hundreds of time, but there are no words.

As the months and years have went past, my motherhood has evolved.

I have Mila and we remember Jensen each day. With the two of them, I parent and honor them so different. I’ve changed the way I look at my motherhood too.

Here’s how I see my motherhood this year…

Through the grief and nakedness
of losing the biggest part of me,
planted a seed.

Out of that pain and emptiness
came all the growth and beauty.
Motherhood freed me.

I’m definitely not an artist, but I enjoyed painting and creating. When I look at this piece, I think of how far I’ve come and how much love I give every day.

Motherhood isn’t a pretty thing. It’s hard and is never perfect. Somehow through it all, it’s freed me.

I couldn’t imagine a life without them. Everyday I’m glad they chose me to be their mom.

Mommy Recipe: Pink Whitney Lemonade

If you’re looking for a cool summer drink to enjoy during the hot months, you’ll love this Pink Whitney Lemonade.

Funny story, Mila calls any ‘drink’ I have ‘on my juice.’ It’s a really hilarious way for her to know not to drink what I’m drinking. I think it’s also nice that she thinks it’s just my juice and she has her juice.

Thankfully, she’s not that curious and respects that it’s mine. A little parenting win, right?

Anyways, back to the goods. You’ll love this mommy juice recipe that’s good for anyone who likes adult beverages that you can taste the alcohol.

Here’s what you’ll need:

  • 3/4 cup of Pink Whitney Vokda
  • Ice
  • 1 cup of Lemonade
  • 1 Pink lemonade Kool Aid mix pack
  • Lemon
  • Blender

Honestly guys, I pretty much eyeballed this drink so the measurements aren’t exact. When I make drinks, I do a lot of taste tests!

All you have to do is put a ton of ice in your blender, then all of the other ingredients.

Mix them all until they’re the consistency of a slushee. For extra tartness, I put lemon slices around the glass and to garnish.

This drink is easy to make and goes down smoothly. I feel like they will be DANGEROUS this summer while by the pool or around fires. It’s so yummy, I’ll take the chance though.

Let me know what your favorite parent juice or summer drink is in the comments.

But first, check out these other moms go to drink recipes: