Toddler Activity: DIY Letter Crayons

Today is Crayon Day! Did you know there was a day specifically for crayons? Me neither, but I love how these DIY Letter Crayons turned out. I think it’s so fun celebrating different days with Mila, but the activities along with it are even more fun.

Another thing I didn’t know before Mila and I did this activity was that anyone can purchase a ton of unwrapped crayons. It makes this DIY a lot easier!

Here’s what you’ll need if you want to create some of your own:
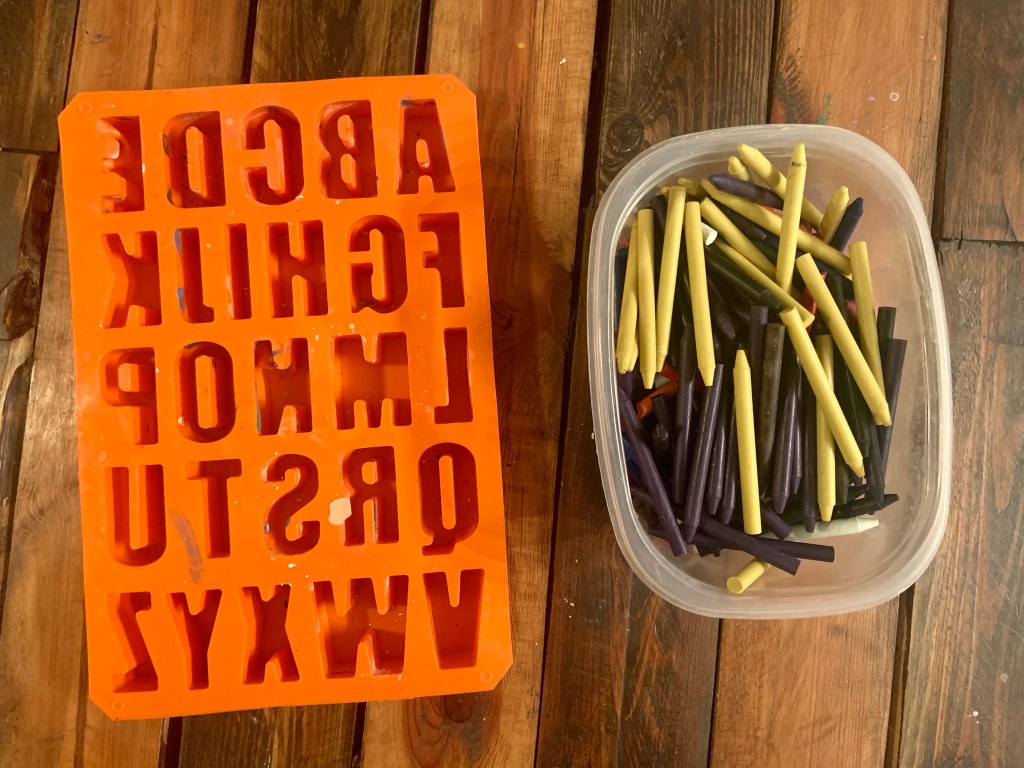
This can obviously be done without purchasing the unwrapped crayons. You can use broken ones at home or a smaller amount from a store. Just make sure that the wrapping is taken off. That’s most important.

Before you start cutting crayons for the mold, preheat your oven to 250°.

Then, start breaking up crayons to place in the mold. I’m pretty sure this was Mila’s favorite part of the whole DIY. It takes quite a bit of crayons to fill the mold up. One word of advice from me is even if it seems like a lot of crayon in the mold, they melt way down.

Figure out which colors you’d like to put together before hand too. I added a lot of white in between colors to prevent the crayons from getting mixed. Plus, the marble look is cute too.

Anyways, place the mold on a baking sheet then in the oven for about ten minutes or until they’re completely melted.

After they’re melted, let them completely cool before removing them.

That last step is super important. A few of our crayons broke during the removal process. To fix it, I just popped them back in the oven for a little while.

Overall, I think they turned out perfectly! We made sure to do “Mila’s letters” and Jensen’s too. She helped pick out the colors for both. It was the perfect opportunity to talk about letters and colors as well. I love how random activities can hold so much learning opportunities.

One mistake I made through the crayon making process was putting white on the corners. When we make more, I’ll keep away from that. It just made drawing a little harder for Mila and she didn’t understand why she couldn’t see what she was drawing.

Besides that, Mila noticed and loved how one crayon could have so many different colors. I can’t wait to see her future creations!

If you try this DIY out, let me know in the comments. Also, if you’ve done it before, tell me your tips in getting anything out of molds! I feel like it’s all up to patience, but I get too excited.

Before you go, check out what these other moms did to celebrate Crayon Day:

What Happened to Laundry Weekend?

It was supposed to be a laundry weekend.

Moms know what this means. We had a long weekend so all the clothes in the house were to be folded. Extra cleaning was to be done too. The chore list doesn’t just do itself. It was all supposed to be neat and tidy for the week ahead.

Even though it was supposed to happen, it didn’t.

All the clothes are still waiting to be folded. The floors are swept and the house is somewhat tidy, but not to the level it could have been.

Instead, I focused on the hardest job: being a mom.

Mila and I played outside most of time. We went to get dinner at a food truck and made new friends. When the weather was it’s nicest, we went on a hike. She made me wear silly headbands, pretending to be a pirate. I played along with all that she asked. At night, we cuddled and watched movies. I listened when she needed to be heard. She showed me her new superhero power. We did what we needed to as a family.

Even though there’s a to do list full of chores, it didn’t seem so important in the moment.

At this time next month four turns to five and two turns to three. Time is continuing on, even when I want to hit pause.

I’ll always think about the should be’s, the moments I missed, and the extra laundry too. The Jensen-size-hole in my heart is just aching a little more. It reminds me of the choices I make on weekends like these.

He reminds me of moments and why I soak them up with her. Things around the house will stay, but she’ll continue growing. I don’t want to miss any more.

So, if you ask how my laundry weekend went just know…

All the laundry that was supposed to be folded will always be there. These moments won’t.

7 Spring Books Your Toddler Will Love

With spring books comes beautiful illustrations that toddlers love. It’s also a perfect time to teach little ones about all the new things that happen in spring.

I can’t even explain the importance of reading to toddlers. That’s how they expand their vocabulary and learn about everything around them. Plus, it’s great time to bond with your little one too.

Here are seven spring books Mila and I are loving.

This is the latest book I’ve purchased for Mila. The covers illustration is beautiful and it carries on throughout the book too. I love how Mila is learning without even realizing it. Plus, it lets her know how important bees are to our world!

“Also an Animal” is a beautiful book about spring babies and the love between mothers and their babies. The book is so informative. I didn’t even know the name of some of the babies. Mila loves mama and baby pairs, so this book is perfect for that.

This classic book is perfect for spring and Easter too! Mila loves all the pictures and I enjoy sharing stories that I read when I was a child too. It’s a perfect book to make an Easter Eve tradition with too!

Everyone knows this classic song! This book version has beautiful illustrations that helps a toddler visualize what’s going on. At the end, it lets you know the hand motions to use too.

I also enjoy this book to explain to Mila that spiders aren’t scary. It seems to help!

Love You More
by Hannah Green

One of my favorite Aldi finds, “Love You More” is a beautiful book about family with bright colors. It lets young kids know that no matter what, they are loved. Mila loves pointing out the colors and we count the flowers on the page too.

If you can find this treasure online, let me know so I can link!

Another classic story, “Play With Me” is perfect for teaching patience and gentleness to little ones. If you have a toddler, you know those two aren’t their strong points. It was a great teaching moment for Mila. Plus, I personally love the illustrations in this book. They’re not as bright, but they’re still beautiful.

I was originally gifted this book and Mila and I fell in love. This is a beautiful story about mothers of all creatures love of their children. Again, the illustrations are beautiful and Mila loved the babies in it.

All of these books are staples in our home. Let me know in the comments what are your favorite spring time books?

Toddler Activity: Waffle Day Letters

If you hadn’t guessed it already, today is Waffle Day. To celebrate, Mila and I of course ate, you guessed it, waffles! She also did a fun activity that we thought you’d love too!

Mila is obsessed with numbers, which is wonderful. She can count to fourteen all by herself. But… letters… they’re not her thing yet. The only ones she likes are m, i, l, a. I’m sure you get why. To help her get excited about them, we got to play with out food again.

For this activity, we got to combine making brunch, learning letters, and eating. Yum!

Here’s all you’ll need:

You might be wondering… why waffles and why letters? The squares in waffles make GREAT place holders. Plus, it’s fun too.

To start this activity, make your preferred waffle recipe and cook one wafffle.

While this is cooking, get a small bowl of blueberries or chocolate chips ready. Then, make sure to have out a whiteboard and marker or a piece of paper and pencil.

Once the waffle is done, let it cool down a little bit and then place it in front of your child. Draw a letter on your white board or paper. Then instruct them to write the letter with the blueberries or chocolate chips on the waffle. They might need a little help at first!

While you’re cooking, you can keep writing different letters for them to try. Make sure to say the letters out loud and connect them to something they know. I started with Mila’s ‘letters.’

Just keep in mind, your little one might eat their tools!

This was such a fun activity that can be anytime you’re enjoying waffles. It teaches them their letters and challenges them how to create letters too! Plus, they’ll be using their fine motor skills too! Just an overall educational and interesting activity.

If you liked this activity, let me know in the comments! Have you ever used food to learn?

While you’re at it, check out the fun other bloggers had with Waffle Day!

California Avocado Chicken Recipe

This isn’t your average chicken recipe. So, if that’s what you’re looking for get off the page now.

Just kidding, all are welcome! But, this recipe is so good and perfect for spring and summer. It’s light and full of flavor. There may be a few steps, but the outcome is totally worth it.

This recipe is a touch more complex than other recipes I share. Mostly because there’s one prep step that I normally don’t have time to do. But, it only takes thirty minutes, which is no time when you’re playing outside.

I’m going to break the ingredients down into the two steps. Here’s what you’ll need:

Marinade:

  • 4 chicken breasts
  • 3/4 cup of balsamic vinegar
  • 1/4 cup of honey
  • 3 cloves of minced garlic
  • 2 tablespoons of olive oil
  • 2 teaspoons of Italian seasoning
  • Salt and pepper

Topping:

  • 2 avocados
  • 3 Roma tomatoes
  • Salt and pepper
  • Mozzarella cheese (optional)

The first thing you should do is make the marinade. Combine the balsamic vinegar, honest, garlic, olive oil, Italian seasoning, salt, and pepper together.

Once it’s mixed up, put the chicken breasts in the marinade and put in the fridge for at least 30 minutes.

While the marinade is working it’s magic, start making the topping.

Dice the avocados and tomatoes. Then add them to a bowl and top with salt and pepper. I also added some Italian seasoning too!

After this, heat your grill or griddle.

Pull out your marinated chicken and get to cooking. Usually, it only takes 5-7 minutes per side to cook chicken. When they’re done, melt mozzarella cheese over it then plant.

Before serving, add the avocado and tomato topping. I also drizzled more balsamic vinegar over if too.

The chicken in this recipe tastes so good; thanks to the marinade!

There were no leftovers since Mila and I both loved it. I’m so glad she loves these flavors. Actually, I had to cut another avocado while waiting for the chicken. She just eats it by the bowl.

Anyways, I think this recipe will be a great addition to your spring and summer rotation.

If you try it out, let me know in the comments!

Toddler Activity: Easter Bunny Nature Craft

Spring is finally here and we’re gearing up for Easter!

One way to celebrate was making a Easter Bunny Nature Craft. We were able to get outside and create, which is our favorite.

Everything we used, we found in our back yard, besides the paper and glue.

For our craft, I told Mila she was going to make a bunny out of leaves and flowers. Since she had a traumatic experience with the Easter Bunny this year, I wanted to help her see he wasn’t all that bad.

She loved finding leaves for the bunny’s ears and then a flower for his tail. It was a great hunt. I think it’d be awesome to have a scavenger hunt for all the components too.

Since the trees in Ohio still haven’t produced new leaves, a lot of what she found was old.

After we set it all out, I had her tell me what she wanted to use for the bunny’s body parts. She decided about its body, tails, and ears.

Then, I asked her if she thought we should make the bunny a crown. She did!

Once we added grass for the bunny to stay in, mila thought it was complete. As she played, I glued everything down.

It turned out so cute and it was fun watching Mila pick out different things around the yard. She was so creative in making the bunny too.

I can definitely see us doing something similar again! It’d be really challenging with having her find Easter eggs filled with supplies too. Maybe I’ll have a lamination machine by the next time we do an activity with nature. A girl can dream right?

As always, let me know in the comments if you tried to make an Easter Bunny Nature Craft! I know your child will love getting outside and creating too.

Toddler Friendly Spring Bucket List

Happy first day of spring, friends!

The suns out for longer now and the days are finally getting warmer. My indoor plants are growing. Mila and Max are wanting to play outside all the time. Spring is here.

If you can remember back to the summer of 2019, I wanted to start new bucket lists for every seasons. Our summer and Christmas bucket lists were a success and whole bunch of fun. Unfortunately, COVID came and changed everyone’s world, so it didn’t feel like there was a lot to celebrate.

Even though COVID’s still in our lives, we’re excited to do a springtime bucket list this year!

With Jensen and Mila’s birthday, the end of my student teaching, and whatever else this bucket list has in store for us… we’re definitely going to be busy.

Without me going on and on… here’s our spring bucket list:

I’d love to hear what you’re planning this spring. Let me know in the comments.

The Unwritten Milestone

To say I wasn’t prepared for Mila’s new and unwritten milestone would be a complete understatement. Not only did it come out of no where, it completely took me off guard.

Usually, Wednesdays are to tell you all about their weird things Mila does. It’s one of the things I look forward to sharing most about. They make me laugh to think about and I know other parents can connect to them too. I’m pretty sure all our kids are somewhat weird.

Anyways, I couldn’t even call what she did yesterday weird. It was more like… touching, heartwarming, and inspiring.

She absolutely made my heart grow with one little sentence.

Here’s what happened.

As I was leaving to go back to work after lunch, Mila did her normal goodbye routine. She has to give whoever a hug and kiss, at least two times. Then tells them she loves them and to have a good day. Just when you’re about to walk out the door, she’ll yell, “I need a hug and kiss!” Then run up to you.

Well, this lunch period was a little different. She ended up walking me out of the house, instead of watching me go. When I bent down to give her a hug and kiss, she said something new. Something no one prepared me about: the unwritten milestone.

You’re the best, Mom.

She has never, ever said that before; especially when I’m about to leave her for a few hours.

As she said it to me, she gave me a big squeeze. Then, she flashed her smile and walked back to the door. She waved and told me to have a good day.

In that big moment, I had to take a deep breath and get back to real life.

On the inside, I melted. I swear if it was any other time, I probably would have cried. With all the leaving her lately, I wonder how she thinks of me. That statement let me know everything I was doing was right.

It might sound silly to cherish this one unwritten rule, but no one told me what that one little saying would feel like when they said it.

There’s a high chance I’m not the best mom in the entire world, but I’m the best mom to MIla and that feels pretty good. One day she’ll learn the power in her words and how I’ll always think she’s the best girl.

For now, I’m celebrating this victory in motherhood and the unwritten milestone.

Toddler Activity: Snipped Paper Shamrock Collage

With St. Patrick’s Day right around the corner, I thought it’d be fun to work on Mila’s scissor skills and do some more process art. This Shamrock Collage is a fun way to teach them about a ton of different things, while they’re having fun.

Mila is so interested in scissors. Whenever I use mine, she asks for her and tries to cut different things. Although she’s still into using both hands to cut, I challenge her to try and use one hand.

If you didn’t know, toddlers Mila’s age shouldn’t really be cutting paper. They should practice on play-doh or something similar, which Mila does. But, I like seeing how she’s progressed. When she practices on paper, I try to cut strips for her so she can do short cuts.

Anyways, let’s get back to this project. Here’s all the supplies you’ll need:

  • Scrap paper
  • Scissors
  • Market
  • White paper

I’m going to go on about scissor skills (sorry!). If you want to age this activity up, use the green paper as a template. This is too old for Mila’s age and for most toddler-aged kids.

Anyways, I found extra scrapbook paper in the playroom. We don’t use a ton of green for crafts, so I actually had a good bit of it. To make the shamrock, I followed this pin. I cut long strips for her to make small cuts too.

She practiced holding the scissors and the paper.

Eventually, I ended up holding the paper for her to help out. She got a little bit frustrated with it, but she cut a good amount.

I ended up getting out play-doh and those scissors so she could continue cutting. Then I cut some extra squares and triangles so she had enough to do the collage. We sort of sham-rock team work. Okay, that was a lame joke, but it was festive.

Next, I placed the cut pieces in a bowl and covered all the white area of the clover in glue. Then, I instructed her to make a collage.

Specifically, I told her to cover all the white with green pieces.

She had a blast picking out the best pieces to put on her shamrock. We found some Irish music to listen to and it all came together pretty quickly.

One thing I would suggest is have a wet washcloth with you.

I think Mila’s going through something about sticky things. Every time her hand accidentally touched the glue, she immediately needed it wiped off. That took some time to do, but we had so much fun.

When she was done placing the paper, she wanted to draw around the sides. I think she just loves using markers.

Honestly, I loved the way it turned out.

It’s so festive and I feel like it’s a project that I can do with her through the years. For now, it’s hanging up on my fridge, waiting for the leprechauns to see!

Let me know what you think about this activity and if you try it out, I’d love to see what you and your little came up with.

3 Ingredient Lucky Charm Bars

If you’re looking to make St. Patrick’s Day magical or just want a tasty treat, try these Lucky Charm Bars. They’re just like Rice Krispy treats, but with the taste of Lucky Charms.

The best part is there are only 3 ingredients! Here’s what you’ll need:

  • 6 cups of Lucky Charms
  • 1 stick of unsalted butter
  • 16 oz of marshmallows

The process to making this treat can be a little messy, but it’s fairly easy to do.

First, start off melting the butter and marshmallows together. I used medium heat so it didn’t get too hot to burn the marshmallows. It took a little bit of time, but I made sure to stir to break them down too.

When it’s melted, take off the heat and add the Lucky Charms to it. Make sure it all gets coated. This can get messy quick!

Then, spray a nonstick spray to a baking pan.

Spread the mix evenly across the pan. Again, this is a little tricky to do because it is so sticky! Keep at it and it’ll work.

Before letting it cool, I picked out marshmallows from the bag, even though I tell Mila not to… oops. I thought it’d look cute to have some extra on top of the Lucky Charm Bars. If it’s not a leprechaun trap, it’s definitely a toddler trap!

After around 40 minutes, your bars will be cooled and set to take pictures.

Cut them into bars or try using cookie cutters for fun shapes. After they’re cut up, you can enjoy your Lucky Charms Bars!

To store them, keep them in an air tight container on the counter. If you put them in the fridge, they’ll just harden up and loose their chewy appeal.

As always, let me know if the comments what you think of this recipe or if you try it out!

Want more St. Patrick’s Day food and snacks? Check out these ideas: