DIY Leprechaun Trap

Are you looking for a little luck until next St. Patricks’s Day? Then it’s time to make a DIY Leprechaun Trap.

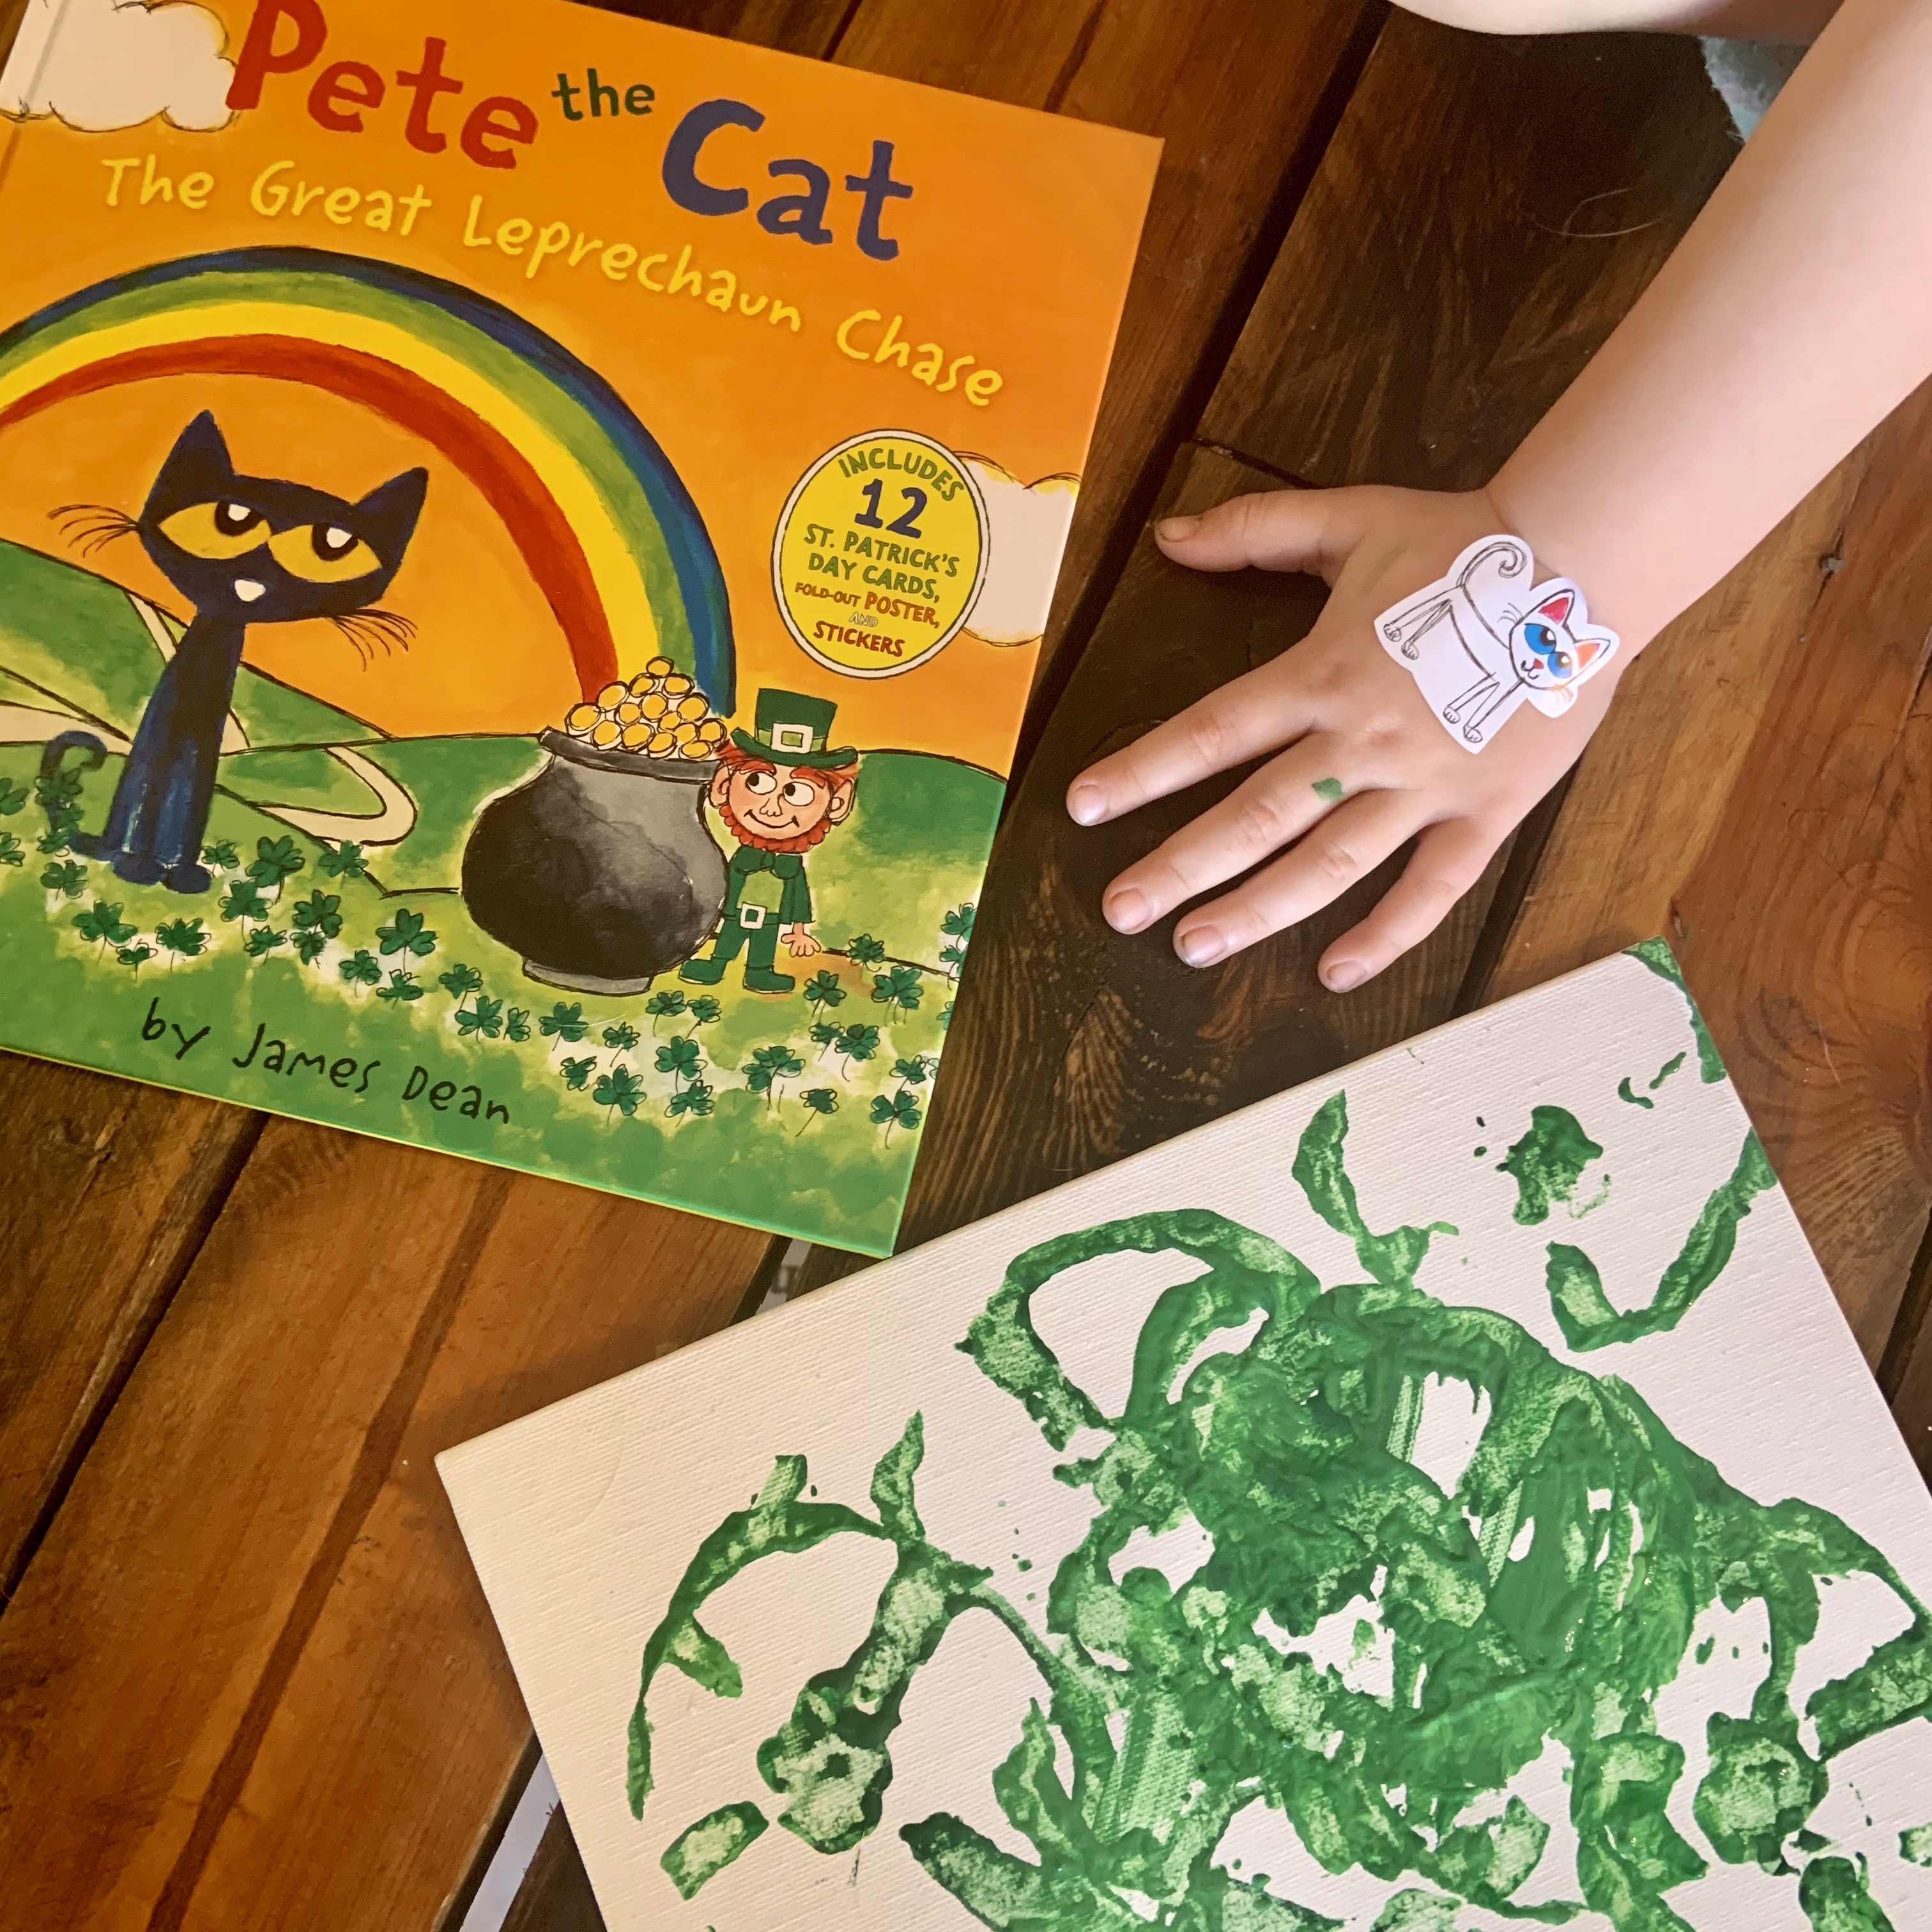
This fun trap was made out of items around the house and printables from Whimsically Wonderful. It also was fun to creatively collaborate with Mila and keep the magic of St. Patrick’s Day going.

If there was a classified ad for this DIY Leprechaun Trap, I think it would read something like this…

If you’re a weary leprechaun looking for a comfy place to rest for the night… or next year… You have to stay at The Rainbow Hotel!

Filled with a comfy bed, free gold, and magical decor, you’ll love your stay. You won’t miss The Rainbow Hotel because all you have to do is follow the rainbow exterior and the shamrock on the door.

Plus, it’ll only cost you a little luck.

Honestly, I’d want to stay in The Rainbow Hotel too. I just don’t have too much luck to give.

Anyways, here’s what we used for our DIY Leprechaun Trap:

Putting this together was really easy, but took some time.

It was a lot of cutting, gluing, and making sure everything looked cute in the right place.

It took us about an hour to cut and glue everything on, but it looked so cute. The best part of making leprechaun traps is everyone’s is going to look different and unique. I think this one celebrates how Mila and I are and view life.

Now it’s time to catch our leprechaun. You can only catch them on St. Patrick’s Day, so make sure you have yours ready!


Do you ever make leprechaun traps? If you do let me know how you made the next day special in the comments.

Advertisement

Baked Reuben Sliders Recipe

If you’re looking for something easy and delicious to make for St. Patrick’s Day, you HAVE to try these Baked Reuben Sliders.

The one food I always crave around St. Patrick’s Day are reuben sandwiches. They have so many good flavors and are such a comfort food.

Last year was the first time I’ve made them at home. Usually I’ll order out, but they were easy enough to make. Since we always like to change it up and everyone loved the Chicken Parmesan Sliders Recipe, I knew these classic reuben sandwiches needed a twist.

Let’s just say… it was another instant hit in our house. I think this means we’ll have Baked Reuben Sliders all year long. A total win for me and my cooking time!

I’m sure I’ve convinced you enough to try with just the picture. Here’s what you’ll need to make them for your family:

  • Corned Beef
  • Baby Swiss Cheese
  • Thousand Island Dressing
  • King’s Hawaiian Original Sweet Rolls
  • Sauerkraut
  • Butter
  • Italian Seasoning

Before I begin… I did not add the amount I used becuase it will probably be different for your family. For Mila and me, I bought a half pound of corned beef, a pack of baby Swiss cheese, a can of sauerkraut, and one pack of King’s Hawaiian Rolls. We had enough for leftovers, but that’s what worked for us!

First, preheat your oven to 350° F.

While that’s preheating, slice your Hawaiian rolls across the middle leaving a top and a bottom. You won’t want to pull the individual rolls apart. Before putting the rolls on a cooking sheet, coat the bottom of the sheet with melted butter.

Then, put some butter on the bottom rolls. Place the bottoms of the rolls in the oven for around three minutes. This will toast them and not make the bottoms soggy when you’re eating.

After it’s toasted, pull them out and start assembling.

First, put thousand island dressing on the rolls. Then add the corned beef, sauerkraut, and baby Swiss. Before putting on the top part of the buns, I added an extra layer of thousand island dressing.

Next, add the top of the buns. Brush melted butter and Italian seasoning to the top.

Place in the oven to bake for 15-20 minutes. You’ll know when they’re done when the buns are golden brown and the cheese is all melted.

Then enjoy all the goodness!

These Baked Reuben Sliders are so good. The sweetness of the King’s Hawaiian Rolls just elevates the taste. Plus, it makes them so much more shareable too.

You can pair these with different sides like French fries or a salad (since we always eat salads here). But make sure to pair with a tasty St. Patrick’s Day treat or drink. I’ve shared a few that you can choose from:


Do you make Reuben sandwiches for St. Patrick’s Day? If you don’t, what’s another Irish meal that you crave?

Lucky Charms Dipped Oreos

What’s better than regular gold? Gold you can eat and you’ll love the taste of these Lucky Charms Dipped Oreos.

This simple recipe can easily be done for an after school snack or whenever you have a quick five minutes to make some magic. You can even enjoy it with yummy leprechaun milk, which your kids will love even more.

Mila and I have still not saw the leprechaun playing tricks in our house. Our Pete the Cat book told us the only day you can catch one is on St. Patrick’s Day so we’re getting all our leprechaun bait ready.

We’re working on our leprechaun trap to set out the night before St. Patrick’s Day too! Hopefully that’ll do the trick.

This little recipe here was supposed to be leprechaun bait, but Mila decided it would be better suited for little girls. So, she just ate them instead. I can’t say I blame her!

For another magically delicious treat, you’ll need:

  • Golden Oreos
  • Lucky Charms
  • White Chocolate

The first thing you need to do is melt your white chocolate. I used the microwaveable kind because it’s way easier and quicker for us. Just make sure you microwave in small increments and stir frequently.

After it’s all melted, dip your Golden Oreos in the white chocolate and set them on wax paper.

Before the chocolate is cooled, place Lucky Charms on them. I did it randomly and in between coating the Oreos. The chocolate seemed to cool off pretty quickly!

While you wait, you can make some leprechaun milk to enjoy with your Lucky Charms Dipped Oreos.

All you need to do is add some green food coloring to milk and enjoy!

Mila was very pleased with these and did not seem to want to share with the leprechaun in our house. It was a fun little snack that only took a few minutes to make.


What has been your favorite St. Patrick’s Day recipe I’ve shared so far?

St. Patrick’s Day Drink: Shamrock Punch

If you’re looking for a tasty drink to draw in leprechauns, tiny humans, and adults.. you’ll need this Shamrock Punch recipe.

With its bright green appearance and sweet taste, it’ll be a hit at any St. Patrick’s Day party!

Mila suggested that leprechauns might like a drink when they’re getting into their shenanigans. She told me it had to be green and it needed rainbows.

Since we’re always down for punch, I had a magical idea. Here’s all you’ll need:

  • Green Juice – we used hugs but would’ve used Bug Juice if Mila hadn’t drank it first.
  • Sprite
  • Lemon-Lime Sherbet
  • Rainbow Candy (Airheads Xtreme Bites)
  • Green Food Coloring
  • Vodka – *Optional for Adults*

Just like any punch recipe I’ve talked about on this blog, this one is just as easy and good.

First, start off putting lemon-lime sherbet in a cup or punch bowl. I like to put extra because I’ve always been the person to want the sherbet in my cup!

Add some Airhead Xtreme Rainbow candies too! This is optional, but it amps up the magic.

Then, pour your green juice in. You could easily use Hawaiian Punch, but we used Hugs since it was just for a single cup.

To get the BRIGHT green color, put a few drops of green food coloring in Sprite. Add this to your cup or bowl too.

Then you’re all ready to attract some leprechauns or have a fun time! You can make it extra fun by adding your favorite choice of vodka to the adult drinks!

Fingers crossed this will help us catch our leprechaun. If not, we still have a few tricks up our sleeve.


What do you like to drink for St. Patrick’s Day? Let me know in the comments.

DIY Color Changing Shamrock Sign

The magic of St. Patrick’s Day keeps flowing, especially with this DIY Coloring Changing Shamrock Sign.

Littles will be amazed watching blue and yellow make green! You can also use this sign to help trap those pesky leprechauns. They’ll be attracted to the magic.

Mila has been super curious in two different things: leprechauns and how to make colors.

To be able to give her both in one day, we did a magical craft that we’ll use to bait leprechauns. It’s really been fun to hear all her ideas of how to catch a leprechaun. She had fun making magic like them!

Plus, we love an activity with a simple set up! This one gives you just that with some leprechaun magic too! Here’s what you’ll need:

  • Blue Paint
  • Yellow Paint
  • Black Paint
  • Gold Paint
  • Canvas
  • Plastic Wrap

All you need to do is pour some blue and yellow paint on a blank canvas. I actually had the canvas in a sensory bin to keep the mess at bay.

Then, I had Mila place plastic wrap on top and told her to mix all the colors.

For that part, I really had to tell her it was okay to get messy. She was really moving the plastic wrap around which mixed it up quicker. At first I think she was afraid of the messy paint!

Once it’s combined, take the plastic wrap off and let it dry.

To add a little more magic, I painted on a shamrock, ‘lucky,’ and splattered gold paint. I think it turned out as magical as a leprechaun would like.


What’s your favorite St. Patrick’s Day saying to put on signs?

Easy Leprechaun Parfait

If you’re in the midst of leprechaun hunting this year, you might be able to tempt one with this Easy Leprechaun Parfait.

With only a few tasty ingredients, your little ones won’t be able to resist the temptation of trying this magically delicious treat.

Mila is on a full fledge hunt for a leprechaun before St. Patrick’s Day. The one in our house has already turned all our milk green and is hiding things of her’s. We have a few tricks up our sleeve to capture him.

One tasty way we came up with was getting our leprechaun to try a tasty parfait. Of course filled with all a leprechaun’s favorite things…

Here’s what you’ll need to charm a leprechaun with this treat:

  • Lucky Charm Cereal
  • Vanilla Pudding
  • Food Coloring

The first thing for the sweet treat is to have littles separate the Lucky Charm’s cereal and marshmallows. Mila loves doing this and sneaking a few to eat too!

While they’re doing that, put green food coloring in the vanilla pudding. Of course leprechauns LOVE the color green. Mix it up until it’s consistently green. I tried to make it a lighter green, but it all depends on the amount of food coloring you put in.

Once you and your little are done, it’s time to start layering.

Our layering went like this: cereal, pudding, cereal, pudding, marshmallows. Personally, I think it was a pretty good decision.

The best part was, Mila was super excited to try this since it was for the leprechaun. She ate SO much for it, but left a little bit to catch one. They’re small anyways!

We’ll keep you updated on our catching adventure… until then, you have to try this sweet treat.


What are your tips and tricks to catch one of those sneaky leprechauns? Let me know in the comments.

Toddler Activity: Snipped Paper Shamrock Collage

With St. Patrick’s Day right around the corner, I thought it’d be fun to work on Mila’s scissor skills and do some more process art. This Shamrock Collage is a fun way to teach them about a ton of different things, while they’re having fun.

Mila is so interested in scissors. Whenever I use mine, she asks for her and tries to cut different things. Although she’s still into using both hands to cut, I challenge her to try and use one hand.

If you didn’t know, toddlers Mila’s age shouldn’t really be cutting paper. They should practice on play-doh or something similar, which Mila does. But, I like seeing how she’s progressed. When she practices on paper, I try to cut strips for her so she can do short cuts.

Anyways, let’s get back to this project. Here’s all the supplies you’ll need:

  • Scrap paper
  • Scissors
  • Market
  • White paper

I’m going to go on about scissor skills (sorry!). If you want to age this activity up, use the green paper as a template. This is too old for Mila’s age and for most toddler-aged kids.

Anyways, I found extra scrapbook paper in the playroom. We don’t use a ton of green for crafts, so I actually had a good bit of it. To make the shamrock, I followed this pin. I cut long strips for her to make small cuts too.

She practiced holding the scissors and the paper.

Eventually, I ended up holding the paper for her to help out. She got a little bit frustrated with it, but she cut a good amount.

I ended up getting out play-doh and those scissors so she could continue cutting. Then I cut some extra squares and triangles so she had enough to do the collage. We sort of sham-rock team work. Okay, that was a lame joke, but it was festive.

Next, I placed the cut pieces in a bowl and covered all the white area of the clover in glue. Then, I instructed her to make a collage.

Specifically, I told her to cover all the white with green pieces.

She had a blast picking out the best pieces to put on her shamrock. We found some Irish music to listen to and it all came together pretty quickly.

One thing I would suggest is have a wet washcloth with you.

I think Mila’s going through something about sticky things. Every time her hand accidentally touched the glue, she immediately needed it wiped off. That took some time to do, but we had so much fun.

When she was done placing the paper, she wanted to draw around the sides. I think she just loves using markers.

Honestly, I loved the way it turned out.

It’s so festive and I feel like it’s a project that I can do with her through the years. For now, it’s hanging up on my fridge, waiting for the leprechauns to see!

Let me know what you think about this activity and if you try it out, I’d love to see what you and your little came up with.

3 Ingredient Lucky Charm Bars

If you’re looking to make St. Patrick’s Day magical or just want a tasty treat, try these Lucky Charm Bars. They’re just like Rice Krispy treats, but with the taste of Lucky Charms.

The best part is there are only 3 ingredients! Here’s what you’ll need:

  • 6 cups of Lucky Charms
  • 1 stick of unsalted butter
  • 16 oz of marshmallows

The process to making this treat can be a little messy, but it’s fairly easy to do.

First, start off melting the butter and marshmallows together. I used medium heat so it didn’t get too hot to burn the marshmallows. It took a little bit of time, but I made sure to stir to break them down too.

When it’s melted, take off the heat and add the Lucky Charms to it. Make sure it all gets coated. This can get messy quick!

Then, spray a nonstick spray to a baking pan.

Spread the mix evenly across the pan. Again, this is a little tricky to do because it is so sticky! Keep at it and it’ll work.

Before letting it cool, I picked out marshmallows from the bag, even though I tell Mila not to… oops. I thought it’d look cute to have some extra on top of the Lucky Charm Bars. If it’s not a leprechaun trap, it’s definitely a toddler trap!

After around 40 minutes, your bars will be cooled and set to take pictures.

Cut them into bars or try using cookie cutters for fun shapes. After they’re cut up, you can enjoy your Lucky Charms Bars!

To store them, keep them in an air tight container on the counter. If you put them in the fridge, they’ll just harden up and loose their chewy appeal.

As always, let me know if the comments what you think of this recipe or if you try it out!

Want more St. Patrick’s Day food and snacks? Check out these ideas:

Toddler Activity: St. Patrick’s Day ‘Clover’ Painting

Ever wonder how you can combine listening and creativity? This St. Patrick’s Day activity does it.

My house is already rapidly getting ready for spring. Our plants are growing, we’ve been playing outside, and spring cleaning is in full effect. Just over the weekend, our house has rainbows, spring, and St. Patrick’s Day decor up and hanging.

To get Mila ready for next week’s fun holiday, we read Pete the Cat: The Great Leprechaun Chase.

I thought we could do a painting with it too. When I pre read it, I tried to find repetitive words she wasn’t super familiar with before. Clover is the leprechauns name in the story and is used quite often. So, that’s what I decided on.

To make a regular painting a little more fun, I continued using an unusual painting tool.

The supplies you’ll need:

Yes, you read that right. We’re using a bell pepper to paint!

I guess I just really wanted to play with my food as a child since I’m constantly letting Mila play with hers.

Bell peppers make a clover shape when they’re painted and stamped.

She actually wasn’t super fond on just gripping the pepper though. You can stick a fork in the pepper to do the same effect. It looked like she had more control that way too.

All we did for this activity was read the book and stamp the pepper every time Clover was said.

It turns out, Clover was said way more than I remembered when I first read the story. Mila was constantly going back and forth with from paint to canvas.

There were a few times she didn’t do it because she was so interested in the book. Cute right?

Don’t worry. We read it again afterwards.

Honestly, this was such a cute activity.

It proved that my toddler can actually listen (I’m such a jokester) and she’s so creative.

I think my favorite part of the painting is where you can tell Clover was said three times in a page. She just stamped it quickly in the same spot.

We hope you love this activity as much as we did!

It’s a quick one to do with your toddler or older child. You’ll get a new St. Patrick’s Day decor price and the knowledge that kids can listen when they want.

Let me know in the comments if you try it out.

Make sure to check out these great St. Patrick’s Day activities too!

Also, I’m looking to expand Mila’s Easter/Spring books. Do you have an Easter/Spring childrens book recommendation?