Unknown's avatar

About danielleridgway

Momma to an angel and a rainbow. Journeying through grief, parenting after loss, and living life one day at a time. Want to hear more from me? Follow me on Instagram: @greyskies.rainbowhighs If you have any other questions or anything else, just let me know. Thanks for reading!

Toddler Activity: Poetry and Watercolors

April is National Poetry Month, which makes my English heart flutter. Of course, I had to get Mila writing poetry too.

To create watercolor poetry with a toddler, here’s what you’ll need:

So you’re probably thinking, how can an almost three year old write poetry? Well, after spending all day with a chatty toddler, they end up saying pretty important things. Even if they don’t realize it!

Inspiration strikes any and everywhere.

A couple weeks ago, I did six word memoirs with my students. Before the lesson, I came up with a few at home. Mila, unknowingly, helped contribute as well.

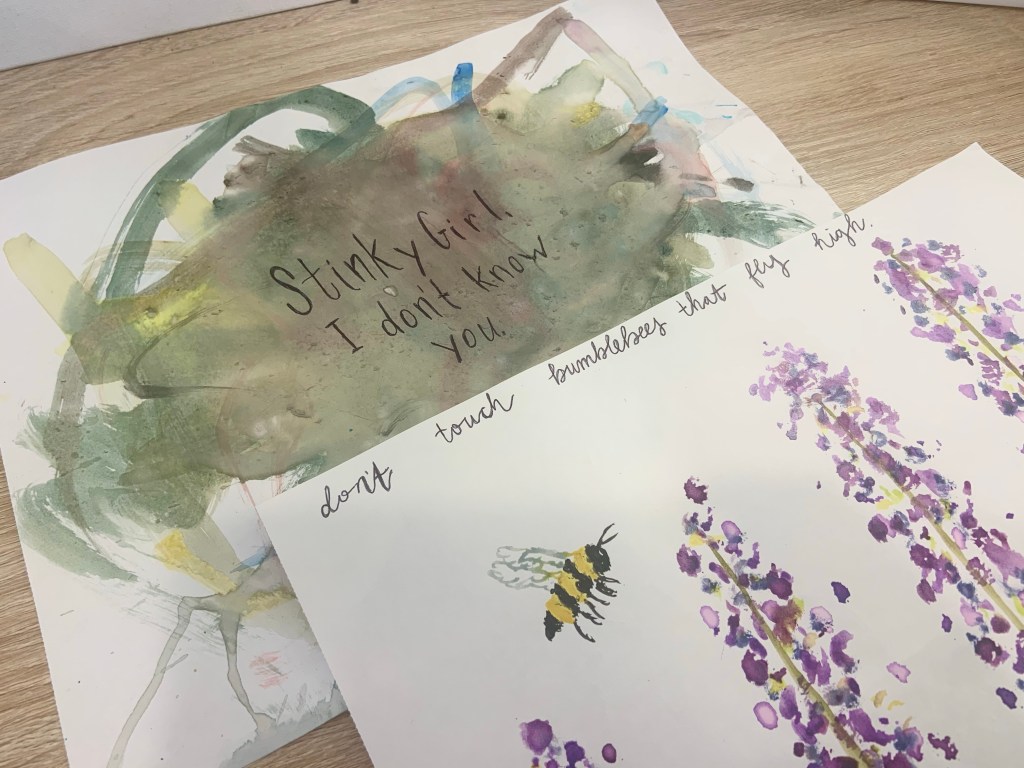
She said one silly thing and another one that really made me think. Both are great pieces of poetry…

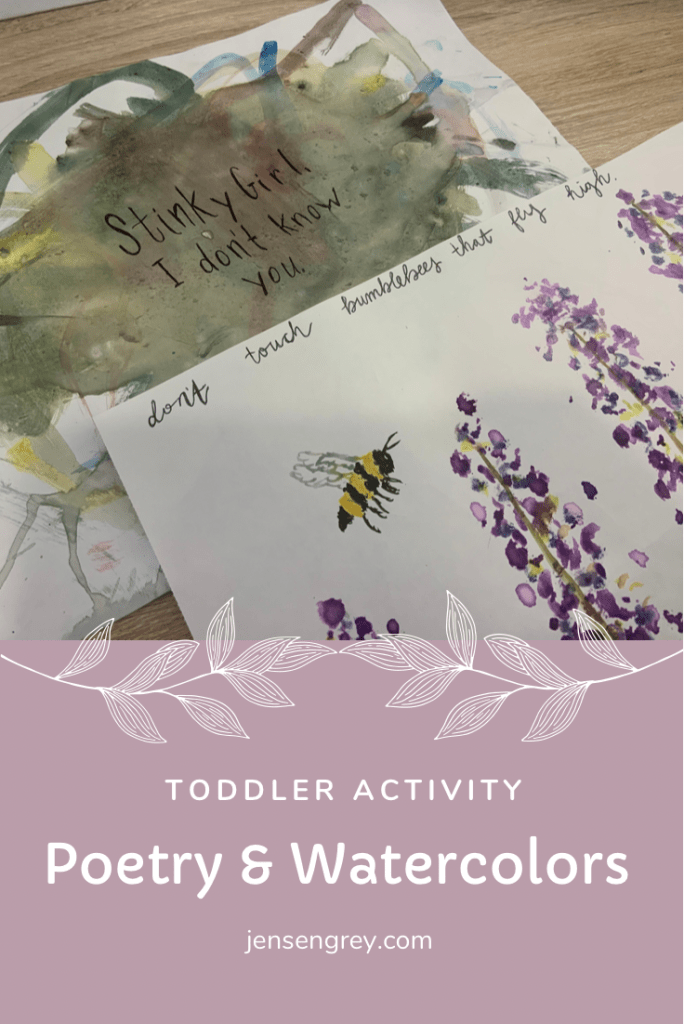
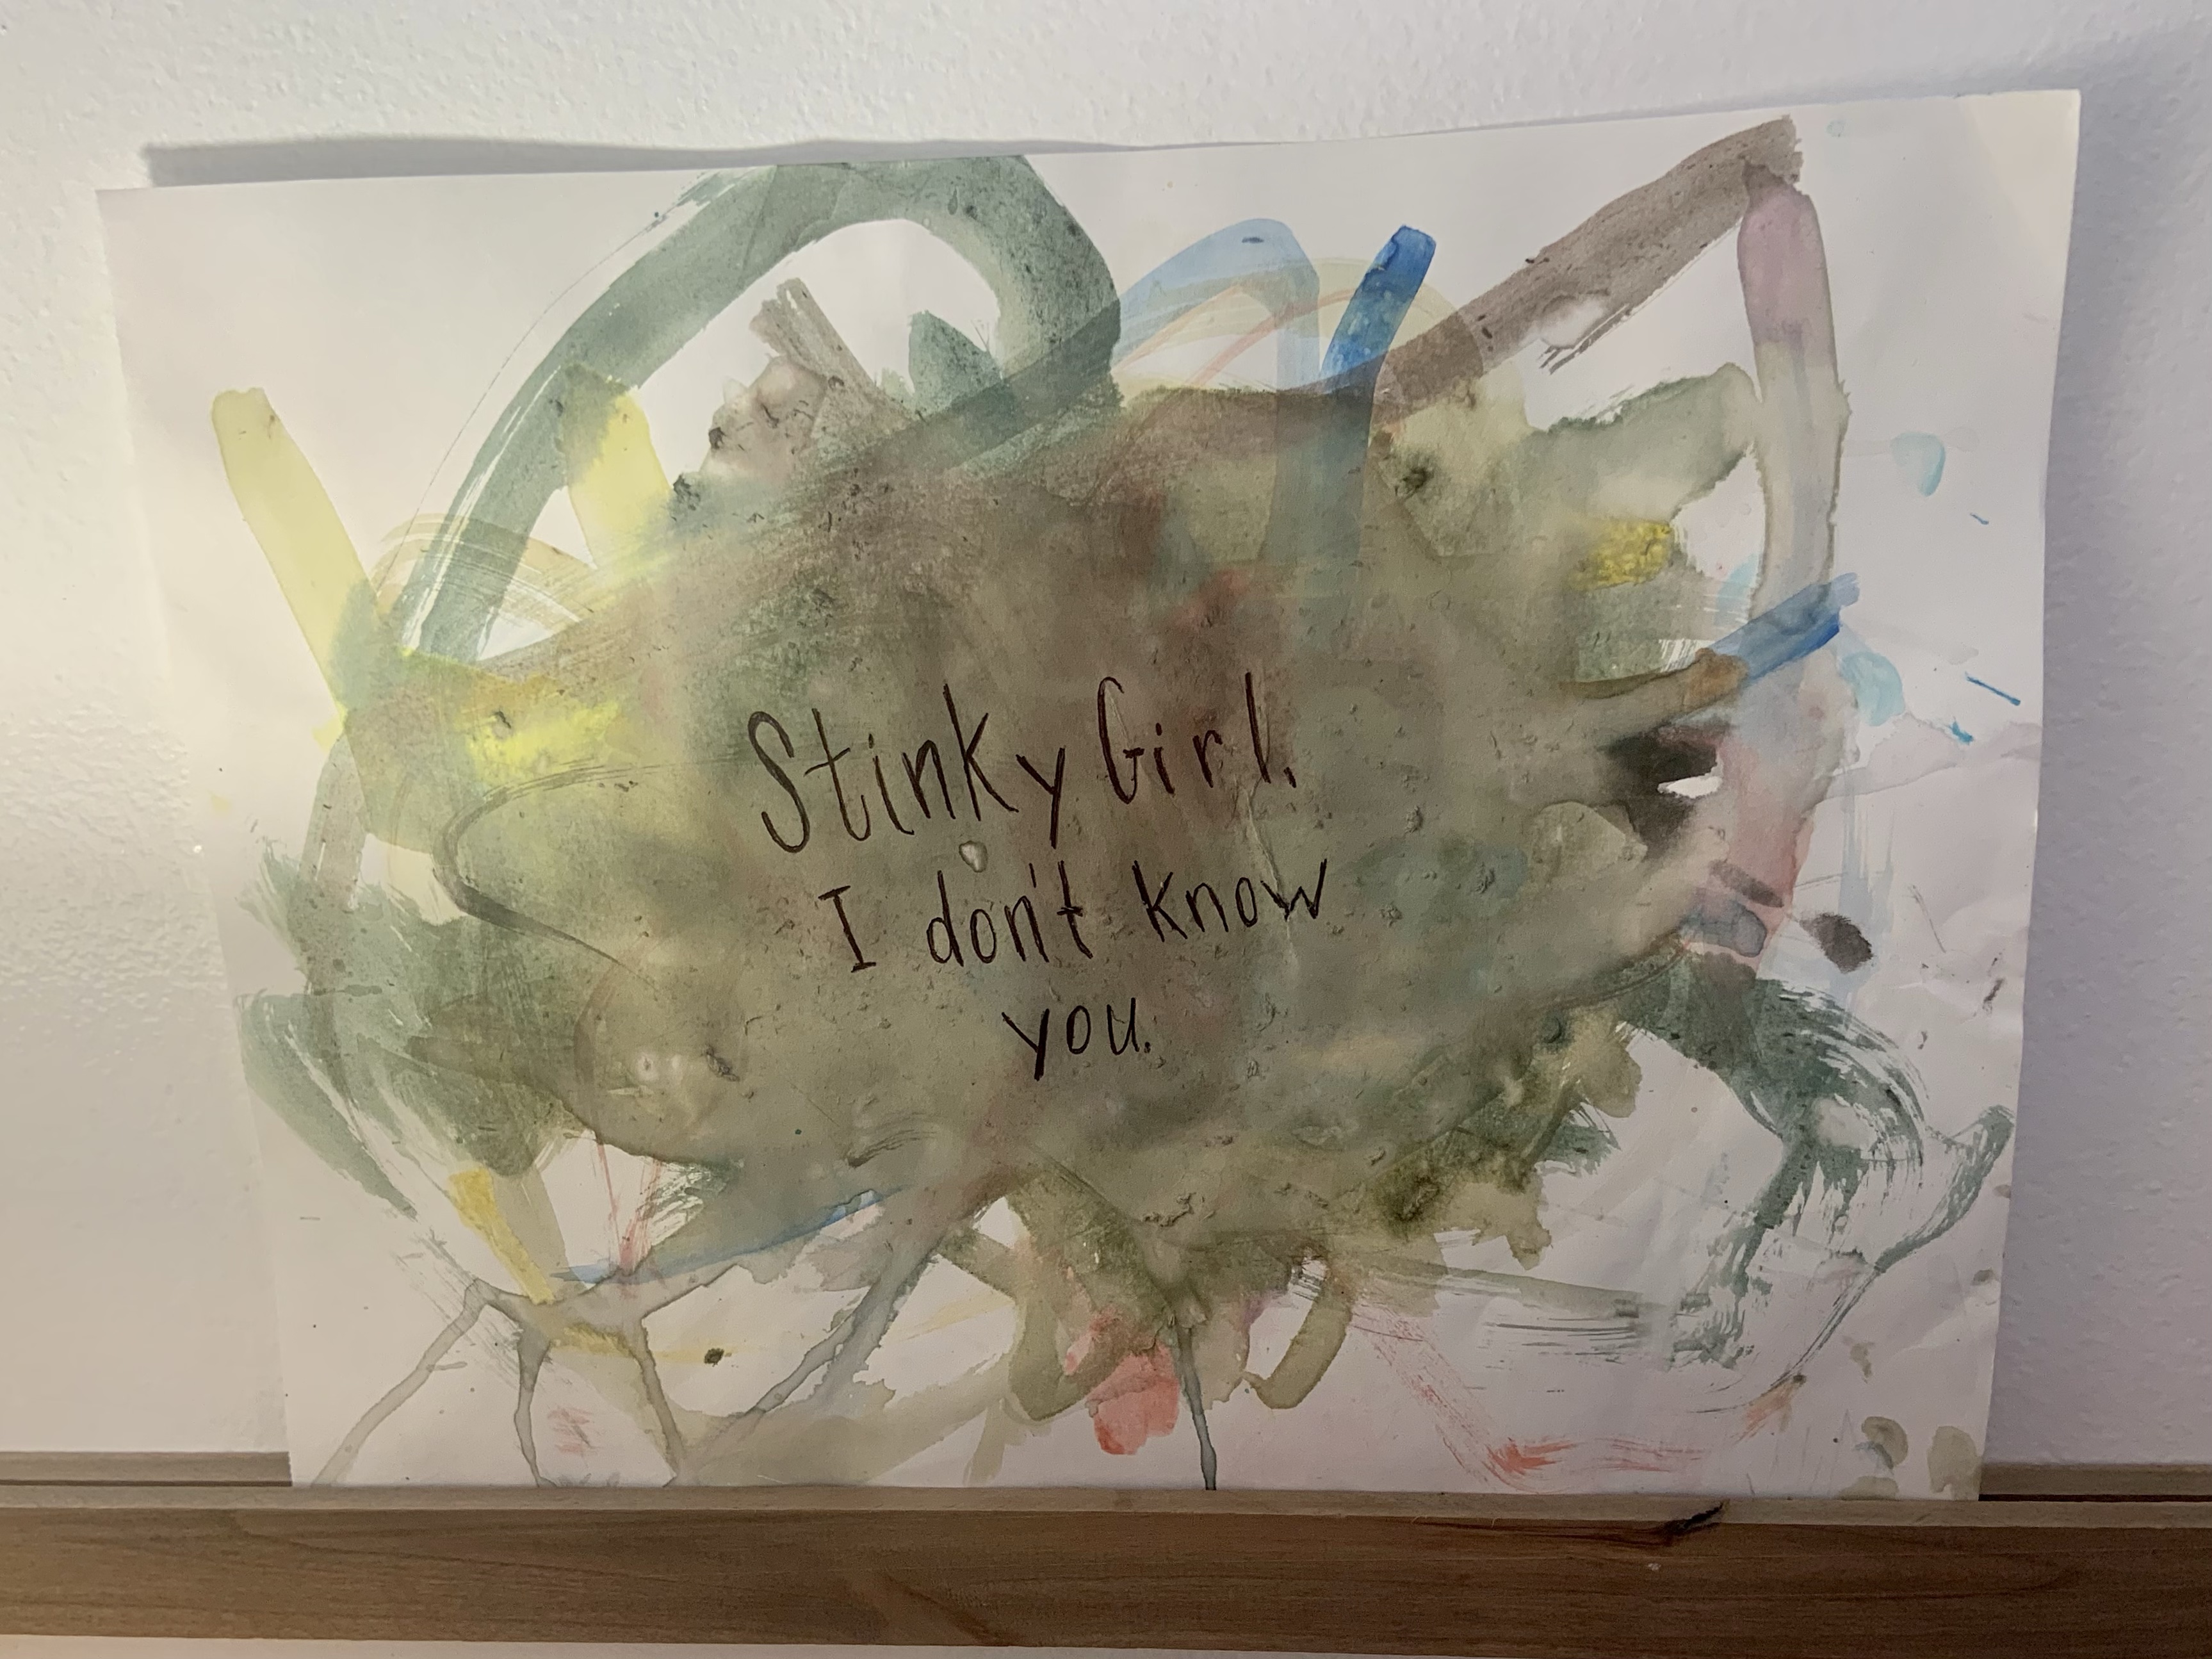
Stinky girl, I don’t know you.

Don’t touch bumblebees that fly high.

Okay, the first one made me laugh a lot. But, it’s something I don’t want to ever forget.

The second one made me think. She definitely meant it literal, but I thought deeply about it. For me, it meant like don’t mess up something that’s going well. That’s what makes poetry so much fun.

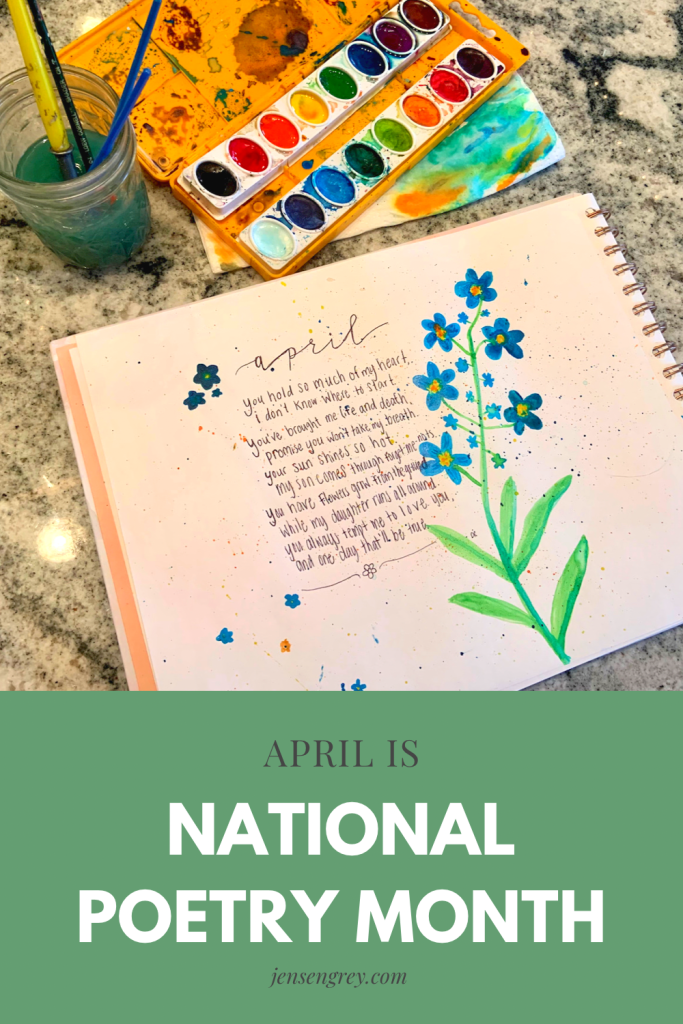
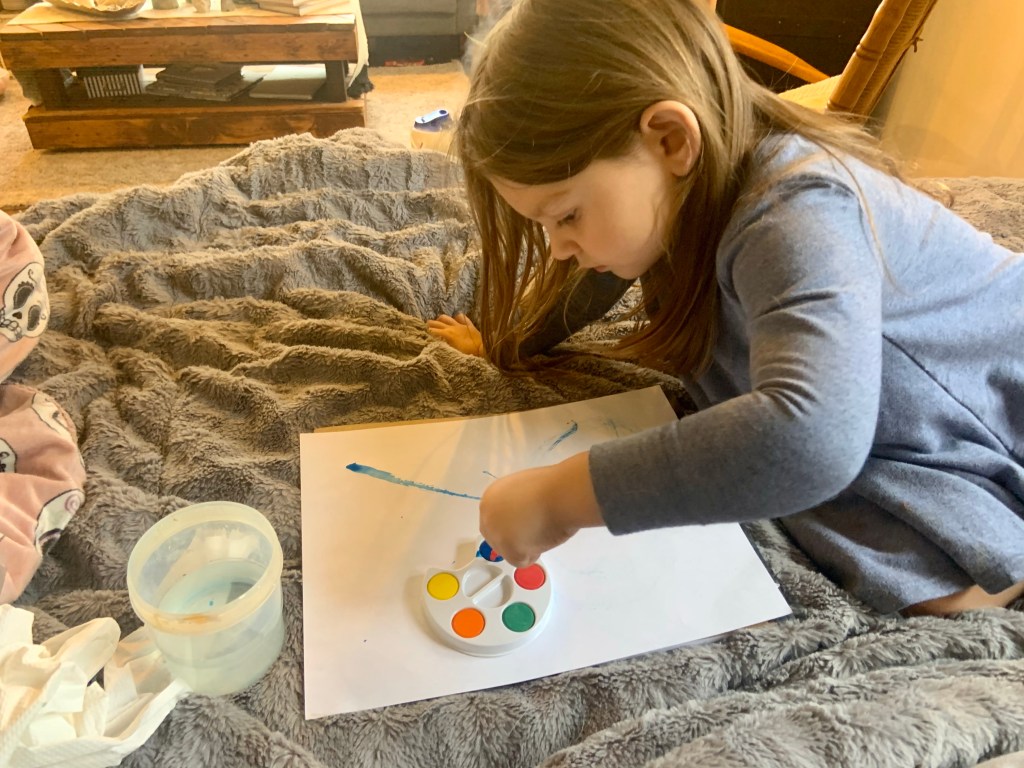
To showcase Mila’s wise words, we made watercolor paintings. I had her use whatever colors she wanted. It came up a little messy and sort of made me think of stinky girls or that sort of idea.

Then, I created the lavender and bee watercolor for her bumblebee poem.

This is a very simple way to introduce poetry to your child. It’s only six words! I believe that when kids see their work showcased, they know it’s good too. Letting Mila know those were her words, goes a long way.

I can’t wait to build upon poetry for Mila. It’s a beautiful way to express oneself.

Another alternative for this activity is to let your child do any type of watercolor activity and then you come up with the words.

Either way, you both can be creative and let each other know poetry isn’t that scary.

Let me know in the comments if you ever write poetry and if or how you introduce it to your children.

Toddler Activity: Egg Rescue

If you’re stuck with abundant amount of plastic eggs from Easter, let your toddlers play with them! This Egg Rescue is fun for active toddlers who like to work with their hands.

Mila loved ripping through and tearing all the tape off the eggs. It was fun to watch her too!

Here’s what you’ll need:

  • Plastic Easter Eggs
  • Washi Tape
  • Candy, little prizes, or change.

This activity takes a little time to set up. It’s worth it because they get really into it.

Fill Easter eggs with whatever stuffing you’d like. Think of leftover eggs from Easter Egg hunts!

Then, tape them on to whatever table.

Next, have your toddler rip the tape completely off. I made Mila tear off every single piece of tape before she could open the egg. It made her be precise in how she did it.

When they have all their tape off, it’s time for the surprise. Mila had no idea they were filled and was so excited! I let her open the eggs all by herself too.

This activity has so many important motor skills that they use. I also had Mila tell me the color of the egg she was opening to get some color recognition in.

Although I think I spent more time prepping, it really was a lot of fun to watch. She even taped down some of the eggs to keep practicing.

The star of the show was the quarter though!

Mila was genuinely excited that the egg gave it to her. Plus, she got to use her piggy bank which is ALWAYS a treat.

Overall, this is such a fun activity. I think it’d be awesome to do if it was a rainy Easter or in the days following. Since they’re mostly plastic eggs, reusing them for other activities and saving them for next year is great for our world!

I hope you liked this activity and if you try it out, let me know in the comments.

Bacon and Avocado Egg Sliders Recipe

If you’re like me? You probably wonder what to do with all the hard boiled eggs every Easter. I have a simple recipe that you might solve your problems!

And… it’s not deviled eggs!

These bacon and avocado egg sliders are keto friendly. Plus, they pack a lot of big flavor in a little package!

Here’s all you need:

  • Hard boiled eggs
  • Avocado
  • Bacon
  • Salt and pepper
  • Quantities depend on how much you want to make!

The first step if you don’t have any leftover Easter eggs is to hard boil eggs. Everyone has different ways to doing this.

If you already have eggs made, start with your bacon. I like mine a little crispy, so I keep it on there for a while. Same as with the eggs, I won’t tell anyone how to cook their bacon either!

Next, cut your avocado up. Then mash it.

Usually, I add salt and pepper to the avocado to give it some spice. Make sure no one steals this mixture… like Mila.

When you’re bacon and hard boiled eggs have cooled down. It’s time to assemble these sliders

Then, slice your eggs in half, longways.

They can get a little slippery at this stage. Be careful of which plate you put them on! I’m speaking from experience if you couldn’t tell.

Then spoon avocado on top.

After, break the bacon up in smaller pieces. Then stick it on top of your egg slider.

If you have extra bacon left, you can add more to it too! I usually add one to the bottom to make a little sandwich.

This little bite-sized slider has amazing tastes. I love the saltiness of the bacon and the creaminess of the avocado. Plus, it’s a great mix of textures too.

Honestly, this is one of my favorite ways to eat hard boiled eggs. Mila loves them too!

There’s not a ton of steps to follow and kids can easily help making these. Bacon and avocado egg sliders are really great for the days following Easter.

If you liked and tried this recipe, let me know in the comments!

Before you go, check out these Easter recipes from other moms that blog:

April is National Poetry Month…

…and a bunch more too.

April is not an easy month for me and this year feels extra difficult too. On top of my intense grief with Jensen’s birthday only four days away, I’m drowning in my last semester of school, work, and Mila’s birthday too. It’s a dangerous combination. Breakdown probably imploding soon.

Through it all, I’m trying to remain positive, even when it feels really hard.

This morning, I didn’t know if I was going to blog today. Instead, I took the morning easy and painted with Mila. Since it’s National Poetry Month, I thought it’d be fun to write a poem too.

My plan is to write a poem a day, whether I share it or not. It challenges me to think inward and be expressive. In a month where I don’t have a ton of time to self reflect or do a lot of self care, this will be my time.

For the first one, I thought it’d be poetic to write one about April.


April.
you hold so much of my heart,
i don’t know where to start.
you’ve brought me life and death,
promise you won’t take my breath.
your sun shines so hot,
my son comes through forget-me-nots.
you have flowers grow all around,
while my daughter runs all around.
you always tempt me to love you,
and one day that’ll be true.

It may not be the best poem around, but I think it perfectly describes this month for me.

Here’s what’s coming up for the rest of the month. Again, it’s going to be really busy here, but I’ll be around… promise.

  • April 4 – Easter & Family Pictures
  • April 5 – Jensen turns FIVE!
  • Mila’s Birthday Party
  • April 14 – Mila turns THREE!
  • April 22 – Earth Day
  • April 27 – Last day of this semester.

When it’s listed out like that, it doesn’t seem like so much. Yet, behind every single one of those is a lot of emotions and time. So, I’ll be just a bit busy.

Let me know if I should share my daily poems. Maybe I’ll paint too!

Toddler Activity: DIY Letter Crayons

Today is Crayon Day! Did you know there was a day specifically for crayons? Me neither, but I love how these DIY Letter Crayons turned out. I think it’s so fun celebrating different days with Mila, but the activities along with it are even more fun.

Another thing I didn’t know before Mila and I did this activity was that anyone can purchase a ton of unwrapped crayons. It makes this DIY a lot easier!

Here’s what you’ll need if you want to create some of your own:

This can obviously be done without purchasing the unwrapped crayons. You can use broken ones at home or a smaller amount from a store. Just make sure that the wrapping is taken off. That’s most important.

Before you start cutting crayons for the mold, preheat your oven to 250°.

Then, start breaking up crayons to place in the mold. I’m pretty sure this was Mila’s favorite part of the whole DIY. It takes quite a bit of crayons to fill the mold up. One word of advice from me is even if it seems like a lot of crayon in the mold, they melt way down.

Figure out which colors you’d like to put together before hand too. I added a lot of white in between colors to prevent the crayons from getting mixed. Plus, the marble look is cute too.

Anyways, place the mold on a baking sheet then in the oven for about ten minutes or until they’re completely melted.

After they’re melted, let them completely cool before removing them.

That last step is super important. A few of our crayons broke during the removal process. To fix it, I just popped them back in the oven for a little while.

Overall, I think they turned out perfectly! We made sure to do “Mila’s letters” and Jensen’s too. She helped pick out the colors for both. It was the perfect opportunity to talk about letters and colors as well. I love how random activities can hold so much learning opportunities.

One mistake I made through the crayon making process was putting white on the corners. When we make more, I’ll keep away from that. It just made drawing a little harder for Mila and she didn’t understand why she couldn’t see what she was drawing.

Besides that, Mila noticed and loved how one crayon could have so many different colors. I can’t wait to see her future creations!

If you try this DIY out, let me know in the comments. Also, if you’ve done it before, tell me your tips in getting anything out of molds! I feel like it’s all up to patience, but I get too excited.

Before you go, check out what these other moms did to celebrate Crayon Day:

What Happened to Laundry Weekend?

It was supposed to be a laundry weekend.

Moms know what this means. We had a long weekend so all the clothes in the house were to be folded. Extra cleaning was to be done too. The chore list doesn’t just do itself. It was all supposed to be neat and tidy for the week ahead.

Even though it was supposed to happen, it didn’t.

All the clothes are still waiting to be folded. The floors are swept and the house is somewhat tidy, but not to the level it could have been.

Instead, I focused on the hardest job: being a mom.

Mila and I played outside most of time. We went to get dinner at a food truck and made new friends. When the weather was it’s nicest, we went on a hike. She made me wear silly headbands, pretending to be a pirate. I played along with all that she asked. At night, we cuddled and watched movies. I listened when she needed to be heard. She showed me her new superhero power. We did what we needed to as a family.

Even though there’s a to do list full of chores, it didn’t seem so important in the moment.

At this time next month four turns to five and two turns to three. Time is continuing on, even when I want to hit pause.

I’ll always think about the should be’s, the moments I missed, and the extra laundry too. The Jensen-size-hole in my heart is just aching a little more. It reminds me of the choices I make on weekends like these.

He reminds me of moments and why I soak them up with her. Things around the house will stay, but she’ll continue growing. I don’t want to miss any more.

So, if you ask how my laundry weekend went just know…

All the laundry that was supposed to be folded will always be there. These moments won’t.

7 Spring Books Your Toddler Will Love

With spring books comes beautiful illustrations that toddlers love. It’s also a perfect time to teach little ones about all the new things that happen in spring.

I can’t even explain the importance of reading to toddlers. That’s how they expand their vocabulary and learn about everything around them. Plus, it’s great time to bond with your little one too.

Here are seven spring books Mila and I are loving.

This is the latest book I’ve purchased for Mila. The covers illustration is beautiful and it carries on throughout the book too. I love how Mila is learning without even realizing it. Plus, it lets her know how important bees are to our world!

“Also an Animal” is a beautiful book about spring babies and the love between mothers and their babies. The book is so informative. I didn’t even know the name of some of the babies. Mila loves mama and baby pairs, so this book is perfect for that.

This classic book is perfect for spring and Easter too! Mila loves all the pictures and I enjoy sharing stories that I read when I was a child too. It’s a perfect book to make an Easter Eve tradition with too!

Everyone knows this classic song! This book version has beautiful illustrations that helps a toddler visualize what’s going on. At the end, it lets you know the hand motions to use too.

I also enjoy this book to explain to Mila that spiders aren’t scary. It seems to help!

Love You More
by Hannah Green

One of my favorite Aldi finds, “Love You More” is a beautiful book about family with bright colors. It lets young kids know that no matter what, they are loved. Mila loves pointing out the colors and we count the flowers on the page too.

If you can find this treasure online, let me know so I can link!

Another classic story, “Play With Me” is perfect for teaching patience and gentleness to little ones. If you have a toddler, you know those two aren’t their strong points. It was a great teaching moment for Mila. Plus, I personally love the illustrations in this book. They’re not as bright, but they’re still beautiful.

I was originally gifted this book and Mila and I fell in love. This is a beautiful story about mothers of all creatures love of their children. Again, the illustrations are beautiful and Mila loved the babies in it.

All of these books are staples in our home. Let me know in the comments what are your favorite spring time books?

Toddler Activity: Waffle Day Letters

If you hadn’t guessed it already, today is Waffle Day. To celebrate, Mila and I of course ate, you guessed it, waffles! She also did a fun activity that we thought you’d love too!

Mila is obsessed with numbers, which is wonderful. She can count to fourteen all by herself. But… letters… they’re not her thing yet. The only ones she likes are m, i, l, a. I’m sure you get why. To help her get excited about them, we got to play with out food again.

For this activity, we got to combine making brunch, learning letters, and eating. Yum!

Here’s all you’ll need:

You might be wondering… why waffles and why letters? The squares in waffles make GREAT place holders. Plus, it’s fun too.

To start this activity, make your preferred waffle recipe and cook one wafffle.

While this is cooking, get a small bowl of blueberries or chocolate chips ready. Then, make sure to have out a whiteboard and marker or a piece of paper and pencil.

Once the waffle is done, let it cool down a little bit and then place it in front of your child. Draw a letter on your white board or paper. Then instruct them to write the letter with the blueberries or chocolate chips on the waffle. They might need a little help at first!

While you’re cooking, you can keep writing different letters for them to try. Make sure to say the letters out loud and connect them to something they know. I started with Mila’s ‘letters.’

Just keep in mind, your little one might eat their tools!

This was such a fun activity that can be anytime you’re enjoying waffles. It teaches them their letters and challenges them how to create letters too! Plus, they’ll be using their fine motor skills too! Just an overall educational and interesting activity.

If you liked this activity, let me know in the comments! Have you ever used food to learn?

While you’re at it, check out the fun other bloggers had with Waffle Day!

California Avocado Chicken Recipe

This isn’t your average chicken recipe. So, if that’s what you’re looking for get off the page now.

Just kidding, all are welcome! But, this recipe is so good and perfect for spring and summer. It’s light and full of flavor. There may be a few steps, but the outcome is totally worth it.

This recipe is a touch more complex than other recipes I share. Mostly because there’s one prep step that I normally don’t have time to do. But, it only takes thirty minutes, which is no time when you’re playing outside.

I’m going to break the ingredients down into the two steps. Here’s what you’ll need:

Marinade:

  • 4 chicken breasts
  • 3/4 cup of balsamic vinegar
  • 1/4 cup of honey
  • 3 cloves of minced garlic
  • 2 tablespoons of olive oil
  • 2 teaspoons of Italian seasoning
  • Salt and pepper

Topping:

  • 2 avocados
  • 3 Roma tomatoes
  • Salt and pepper
  • Mozzarella cheese (optional)

The first thing you should do is make the marinade. Combine the balsamic vinegar, honest, garlic, olive oil, Italian seasoning, salt, and pepper together.

Once it’s mixed up, put the chicken breasts in the marinade and put in the fridge for at least 30 minutes.

While the marinade is working it’s magic, start making the topping.

Dice the avocados and tomatoes. Then add them to a bowl and top with salt and pepper. I also added some Italian seasoning too!

After this, heat your grill or griddle.

Pull out your marinated chicken and get to cooking. Usually, it only takes 5-7 minutes per side to cook chicken. When they’re done, melt mozzarella cheese over it then plant.

Before serving, add the avocado and tomato topping. I also drizzled more balsamic vinegar over if too.

The chicken in this recipe tastes so good; thanks to the marinade!

There were no leftovers since Mila and I both loved it. I’m so glad she loves these flavors. Actually, I had to cut another avocado while waiting for the chicken. She just eats it by the bowl.

Anyways, I think this recipe will be a great addition to your spring and summer rotation.

If you try it out, let me know in the comments!

Toddler Activity: Easter Bunny Nature Craft

Spring is finally here and we’re gearing up for Easter!

One way to celebrate was making a Easter Bunny Nature Craft. We were able to get outside and create, which is our favorite.

Everything we used, we found in our back yard, besides the paper and glue.

For our craft, I told Mila she was going to make a bunny out of leaves and flowers. Since she had a traumatic experience with the Easter Bunny this year, I wanted to help her see he wasn’t all that bad.

She loved finding leaves for the bunny’s ears and then a flower for his tail. It was a great hunt. I think it’d be awesome to have a scavenger hunt for all the components too.

Since the trees in Ohio still haven’t produced new leaves, a lot of what she found was old.

After we set it all out, I had her tell me what she wanted to use for the bunny’s body parts. She decided about its body, tails, and ears.

Then, I asked her if she thought we should make the bunny a crown. She did!

Once we added grass for the bunny to stay in, mila thought it was complete. As she played, I glued everything down.

It turned out so cute and it was fun watching Mila pick out different things around the yard. She was so creative in making the bunny too.

I can definitely see us doing something similar again! It’d be really challenging with having her find Easter eggs filled with supplies too. Maybe I’ll have a lamination machine by the next time we do an activity with nature. A girl can dream right?

As always, let me know in the comments if you tried to make an Easter Bunny Nature Craft! I know your child will love getting outside and creating too.