DIY Match the Egg Memory Game

Looking for a fun way to challenge your little this season? A DIY Match the Egg Memory Game is an egg-ellent option!

When I saw the egg match printable from The Letter Vee, I knew I had to utilize it. Mila loves playing memory games, especially when they’re seasonal.

With a little work, it became such a cute and fun way for her to settle and use her brain.

This DIY Match the Egg Memory Game takes a little bit to make and set up. After the hard work though, it looks beautiful and my little loved it! She spent about 30 consecutive minutes playing with it.

Here’s what you’ll need:

Not going to lie… this DIY took a little work.

First, you need to print out the sheet from The Letter Vee. Then cut each of the egg pieces out.

Next, use modge podge to glue the paper on to pieces of cardboard. I only used a thin layer between the paper and cardboard. It seemed to have stuck perfectly fine.

Once the glue is dry, cut the cardboard into the right sized pieces too.

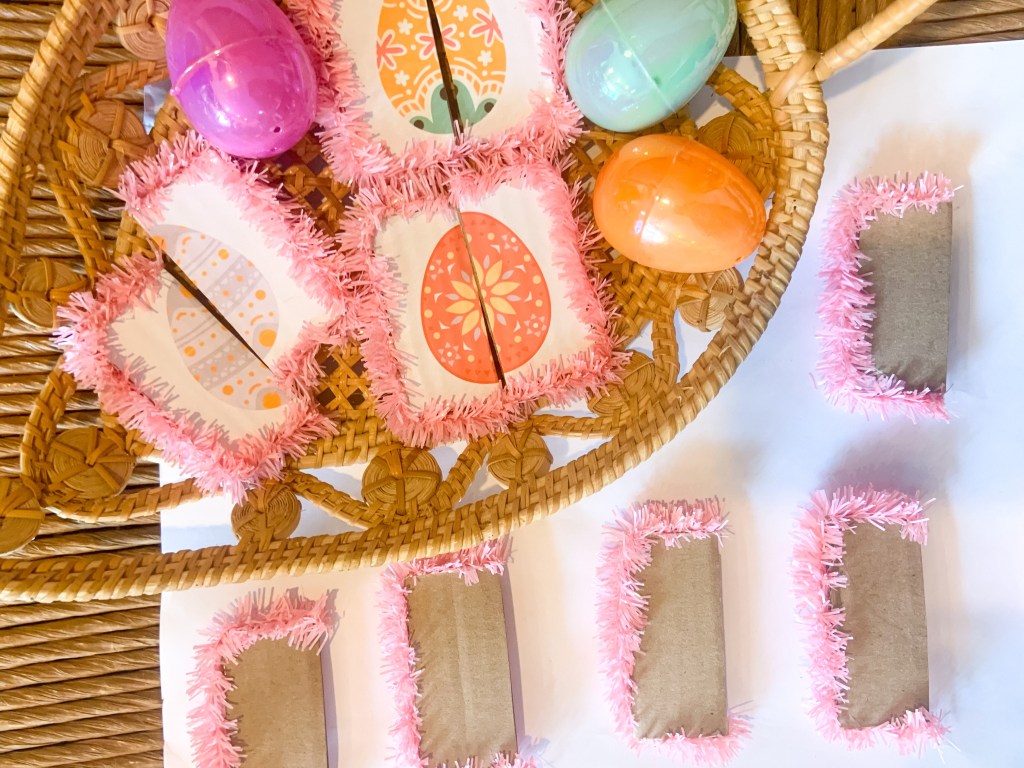
You could easily be done with your Match the Egg Memory Game, but we wanted to make it extra cute. This is totally optional, but I think it made it extra special.

We reused pink tinsel to trim out the pieces. To do this, I just cut the tinsel to size and hot glued around the cardboard. Then you just stick the tinsel around the outside and let it cool. I decided to leave the tinsel off of the side where the eggs come together too.

You can use these pieces as a traditional memory game or make it a little more special by hiding them in eggs around the house. Either way, it’s full of Easter fun!


What Easter games do you play with your kiddos? Let me know in the comments.

DIY Melted Crayon Artwork

Happy National Crayon Day, friends! To celebrate the day, Mila and I made these adorable DIY Melted Crayon Artwork eggs.

This was a fun and different way to utilize our broken crayons.

Mila and I like to color a lot and sometimes we can left with small ones that can’t color anymore. We’ve melted them to make other crayons, but we wanted to be more creative this time.

I’ve been so inspired by all the Easter content lately that I thought it’d be adorable to make Easter eggs.

Here’s what you’ll need to make yours…

  • Crayons
  • Grater
  • Iron
  • Wax Paper
  • Thick Paper

This activity is really simple, but there’s definitely a decent amount of prep and clean up for parents.

First, collect your broken crayons that are not useable. Then it’s time to start grating them.

Mila picked out a ton of different colors. Beware of this! They can all mix and melt together. She didn’t seem to mind so it all worked out for us!

Once everything’s grated, it’s time to design your Easter eggs. I’m sure older kids would be able to create different designs. You could even use washi tape to keep everything separated.

Mila had a fun time putting the crayon shreds on the paper and had even more fun watching the next part.

When the design is complete, lay wax paper over it. Then with a heated iron, lightly press on it to melt the crayons. Mila was not expecting it to melt so we got to talk about why and about color mixing too!

After it melted, we let the crayon melting dry and then cut out the eggs shape.

We will make these eggs into a cute garland with different textures of yarn… and maybe some glitter too. Glitter is always the answer in our house!

This is an inexpensive way to decorate for Easter while doing a fun craft and science experiment with littles.


Check out other ways Mila and I have utilized and upcycled old crayons:

Let me know in the comments what you do with old crayons. I’d love to hear what our other options could be!

Strawberry Cheesecake Stuffed French Toast

If you’re looking for a new breakfast recipe for this Easter, you have to try this Strawberry Cheesecake Stuffed French Toast. You can easily make it in regular squares or spice it up for Easter morning.

On Easter morning, we have the same routine. Wake up, find our Easter basket and eggs, and then eat a big breakfast before all the festivities of the day! It’s important on holidays to make sure to get food before everyone gets together and plays. That’s why I’m always on the hunt for recipes that Mila will love.

Since I love french toast and Mila’s into strawberries (I mean, me too if you remember last summer), this seemed like a perfect one to try! It combined all of our favorite flavors in one bite! Who wouldn’t love that?

I had most of the ingredients on hand, but if you’re wanting to try this recipe out, here’s what you’ll need:

For this Strawberry Cheesecake Stuffed French Toast recipe, it’s made similarly to regular french toast… besides the stuffed part!

The strawberry cheesecake stuffing consists of mixing cream cheese, vanilla, a pinch of sugar, and strawberries in a bowl. I mashed the strawberries a little bit to get the flavor consistent throughout the cream cheese. Then spread the mixture on one of the slices of bread. Next, put another piece of bread on top.

If you’re making your french toast with cut outs, this is the time to do it. We used different Easter shapes! No matter if you’re making it fun or traditional, make sure to press the sides down so it doesn’t all escape!

Now it’s time to dip them. Make a mixture consisting of one egg, milk, cinnamon, vanilla, and a pinch of sugar. Dip your bread in the mix. I make sure to add extra cinnamon every time.

After it’s coated, place on a hot pan that’s coated with butter to cook.The Strawberry Cheesecake Stuffed French Toast is done when both sides are brown and toasty.

Once it’s done, I’ll add maple syrup and sprinkles to top it off. Sprinkles make everything better.

Then enjoy!

We loved this tasty breakfast and I can tell we’ll be trying different flavors to stuff our french toast with. I think using the Easter cut outs made it even more fun and festive.


What’s your favorite breakfast food for Easter morning?

Farm Clean Up Sensory Play

What’s Mila’s favorite part about spring, minus the flowers and nice weather? All the baby animals! This Farm Clean Up Sensory Play idea is a perfect way to talk about new baby animals AND have fun being messy too.

This interactive play was easy to set up and let her play for a long time. The best part… it’s completely edible too.

First, I want to say a HUGE thank you to Terra by Battat for gifting Mila these animals to play with. They have these big Bucket Sets full of different types of animals that are amazing. Terra by Battat sent us farm animals, marine animals, and a few other goodies that we love.

Their toys are super realistic and come in their own world. Mila has spent hours with both the buckets. The marine animals have became her favorite bath tub toys. I’ll be posting different ways we’re playing with them. You should still totally check Terra by Battat out though. Would make perfect Easter presents!

Anyways…

When I saw the country world bucket, I instantly thought of this fun sensory play. To further create this world, here’s what you’ll need:

The hardest part of this sensory play is the set up. It just takes a little time, but it’s worth it.

To set the scene, all you need to do is spread chocolate pudding in one part of your sensory tray. I also added some crushed kix cereal to make it look more realistic.

I also made sure to make the animals ‘muddy’ too. Honestly, I didn’t know if Mila would want to do that so it just made it a little more fun for me.

Then, I set up the cleaning area. This just consisted of a wash cloth, cleaning brush, and soapy water. It was nice doing the water in a bowl because Mila instantly thought it was a bathtub! Which works for me.

The next little area was where the animals dried off. I just used shredded paper and tissue paper.

After it was all ready for her, I just let her do whatever. When we do sensory set ups like this, I try not to give her too much direction. She immediately started cleaning off the animals.

It was so cute to listen to her too. She pretended she was a zookeeper and it was cleaning day.

After the first clean up was done, she made the animals muddy again and kept the process going. I loved watching how creative she was through it all.

I think this activity would have been even better outside with more space, but it worked well inside too.

The clean up for this activity was really easy too. All I did was recycle the paper. Then I just used water to clean everything else off. It was quick and simple!

I have a feeling we’ll definitely be doing this set up again in the near future. Until then, I can’t wait to show you the other fun activities we have planned with the marine world bucket. It was another hit with Mila.

Make sure to check out Terra by Battat and order realistic play animals that your kids will love.


What edible sensory play do you do with your kids? I would love to hear ideas.

DIY Spring Bucket List

If you’re wanting to help plan on getting the most out of spring this year, this DIY Spring Bucket List can help! Not only will it motivate you to get everything you want done, it’ll look great in your home.

Mila and I love bucket lists. We make them every Christmas break and try to do one for the other seasons too! Here’s our one from last spring.

We usually just make ours out of craft paper, but when I saw the tags from The Letter Vee, I wanted to do something a little different. I used an existing floral mobile I had and gave it another use!

To make our bucket list come to life, we used:

First things first… it’s time for a family meeting. Have a talk with your family about what you would all like to do this spring. This will look different for every family.

Once you figure this out, it’s time to print.

The Letter Vee has some bucket list items already on their site, but also gives blank cards too! This way you can easily write down what you’d like. For our ‘other’ items, I just used a normal pen and you could easily see my writing.

Next cut them out and use a hole puncher for each tag.

I actually taped the tags on spring scrapbook paper to give it an extra pop and used a daisy hole punch. The extra details made it so cute.

We also decided to use pink, grey, purple, and light blue yarn to connect our tags.

All you have to do is a light tie on a piece of the yarn or ribbon on your wall hanging. I just shuffled them around so we could easily see them.

You can add as many bucket list items you’d like.

Our plan is to take pictures with each bucket list item. When we do it, we’ll pull it off and make a little scrapbook of our spring.

It’ll be a fun way to record what we do and reflect on it at the end of the year.

Either way, we’re super ready for springtime and to start pulling items off of our bucket list. We can wait to keep you all updated.


In the comments, let me know what’s on your spring bucket list.

DIY Flower Pom Poms

Springtime is here and we’re bringing the best parts inside. To decorate and embrace spring, we made DIY Flower Pom Poms.

These boho flowers are easy to make and really make a statement to any wall.

Mila and I are obsessed with plant and flowers. They bring us so much joy and are beautiful to look at too. I think they’re one of our favorite parts about springtime.

Even though we have plants and see flowers constantly, you can never have too many! That’s why I love this DIY Flower Garland.

Here’s the only two things you need for it.

  • Yarn
  • Scissors
  • Large needle
  • Pom pom maker (optional)

The first thing I did was pick out what color yarn I wanted for this project. I am in love with this orange, yellow, and pink color scheme lately. It gives me 70’s floral pattern vibes.

Then you need to make your pom poms. I personally don’t use a pom pom maker, just my hand.

All you need to do is cut and hold a string in your hands horizontally, then start wrapping string vertically around your four fingers. Wrap it around 150 times to get a full pom pom.

Next, you have to tie the first string you had horizontally. Once it’s tied, cut the loops for the rest of the strings to flare out.

After you have your little yarn ball, it’s time to shape and make it look fluffy. You’re going to trim A LOT of yarn here. Just keep cutting it down until it’s the size and puffiness you’d like. Once that’s done, your first pom pom is complete.

For each flower you do, you need to make six pom poms. I usually do a white center with colors on the outside.

To connect them, you can either use hot glue or stitch them together.

I made a garland of hearts, but you could easily make a single wall hanging, faux flowers, or a rear view window decoration. You can also change the size of your poms using a pom pom maker or different technique.

Personally, I love how this turned out and totally want to make one for my room too.

Prepare yourself for all the spring and Easter content. We are so excited for this tike of year and are so ready to create!


What craft or activity are you ready to tackle this spring? Let me know in the comments.

DIY Leprechaun Trap

Are you looking for a little luck until next St. Patricks’s Day? Then it’s time to make a DIY Leprechaun Trap.

This fun trap was made out of items around the house and printables from Whimsically Wonderful. It also was fun to creatively collaborate with Mila and keep the magic of St. Patrick’s Day going.

If there was a classified ad for this DIY Leprechaun Trap, I think it would read something like this…

If you’re a weary leprechaun looking for a comfy place to rest for the night… or next year… You have to stay at The Rainbow Hotel!

Filled with a comfy bed, free gold, and magical decor, you’ll love your stay. You won’t miss The Rainbow Hotel because all you have to do is follow the rainbow exterior and the shamrock on the door.

Plus, it’ll only cost you a little luck.

Honestly, I’d want to stay in The Rainbow Hotel too. I just don’t have too much luck to give.

Anyways, here’s what we used for our DIY Leprechaun Trap:

Putting this together was really easy, but took some time.

It was a lot of cutting, gluing, and making sure everything looked cute in the right place.

It took us about an hour to cut and glue everything on, but it looked so cute. The best part of making leprechaun traps is everyone’s is going to look different and unique. I think this one celebrates how Mila and I are and view life.

Now it’s time to catch our leprechaun. You can only catch them on St. Patrick’s Day, so make sure you have yours ready!


Do you ever make leprechaun traps? If you do let me know how you made the next day special in the comments.

Baked Reuben Sliders Recipe

If you’re looking for something easy and delicious to make for St. Patrick’s Day, you HAVE to try these Baked Reuben Sliders.

The one food I always crave around St. Patrick’s Day are reuben sandwiches. They have so many good flavors and are such a comfort food.

Last year was the first time I’ve made them at home. Usually I’ll order out, but they were easy enough to make. Since we always like to change it up and everyone loved the Chicken Parmesan Sliders Recipe, I knew these classic reuben sandwiches needed a twist.

Let’s just say… it was another instant hit in our house. I think this means we’ll have Baked Reuben Sliders all year long. A total win for me and my cooking time!

I’m sure I’ve convinced you enough to try with just the picture. Here’s what you’ll need to make them for your family:

  • Corned Beef
  • Baby Swiss Cheese
  • Thousand Island Dressing
  • King’s Hawaiian Original Sweet Rolls
  • Sauerkraut
  • Butter
  • Italian Seasoning

Before I begin… I did not add the amount I used becuase it will probably be different for your family. For Mila and me, I bought a half pound of corned beef, a pack of baby Swiss cheese, a can of sauerkraut, and one pack of King’s Hawaiian Rolls. We had enough for leftovers, but that’s what worked for us!

First, preheat your oven to 350° F.

While that’s preheating, slice your Hawaiian rolls across the middle leaving a top and a bottom. You won’t want to pull the individual rolls apart. Before putting the rolls on a cooking sheet, coat the bottom of the sheet with melted butter.

Then, put some butter on the bottom rolls. Place the bottoms of the rolls in the oven for around three minutes. This will toast them and not make the bottoms soggy when you’re eating.

After it’s toasted, pull them out and start assembling.

First, put thousand island dressing on the rolls. Then add the corned beef, sauerkraut, and baby Swiss. Before putting on the top part of the buns, I added an extra layer of thousand island dressing.

Next, add the top of the buns. Brush melted butter and Italian seasoning to the top.

Place in the oven to bake for 15-20 minutes. You’ll know when they’re done when the buns are golden brown and the cheese is all melted.

Then enjoy all the goodness!

These Baked Reuben Sliders are so good. The sweetness of the King’s Hawaiian Rolls just elevates the taste. Plus, it makes them so much more shareable too.

You can pair these with different sides like French fries or a salad (since we always eat salads here). But make sure to pair with a tasty St. Patrick’s Day treat or drink. I’ve shared a few that you can choose from:


Do you make Reuben sandwiches for St. Patrick’s Day? If you don’t, what’s another Irish meal that you crave?

Lucky Charms Dipped Oreos

What’s better than regular gold? Gold you can eat and you’ll love the taste of these Lucky Charms Dipped Oreos.

This simple recipe can easily be done for an after school snack or whenever you have a quick five minutes to make some magic. You can even enjoy it with yummy leprechaun milk, which your kids will love even more.

Mila and I have still not saw the leprechaun playing tricks in our house. Our Pete the Cat book told us the only day you can catch one is on St. Patrick’s Day so we’re getting all our leprechaun bait ready.

We’re working on our leprechaun trap to set out the night before St. Patrick’s Day too! Hopefully that’ll do the trick.

This little recipe here was supposed to be leprechaun bait, but Mila decided it would be better suited for little girls. So, she just ate them instead. I can’t say I blame her!

For another magically delicious treat, you’ll need:

  • Golden Oreos
  • Lucky Charms
  • White Chocolate

The first thing you need to do is melt your white chocolate. I used the microwaveable kind because it’s way easier and quicker for us. Just make sure you microwave in small increments and stir frequently.

After it’s all melted, dip your Golden Oreos in the white chocolate and set them on wax paper.

Before the chocolate is cooled, place Lucky Charms on them. I did it randomly and in between coating the Oreos. The chocolate seemed to cool off pretty quickly!

While you wait, you can make some leprechaun milk to enjoy with your Lucky Charms Dipped Oreos.

All you need to do is add some green food coloring to milk and enjoy!

Mila was very pleased with these and did not seem to want to share with the leprechaun in our house. It was a fun little snack that only took a few minutes to make.


What has been your favorite St. Patrick’s Day recipe I’ve shared so far?

St. Patrick’s Day Drink: Shamrock Punch

If you’re looking for a tasty drink to draw in leprechauns, tiny humans, and adults.. you’ll need this Shamrock Punch recipe.

With its bright green appearance and sweet taste, it’ll be a hit at any St. Patrick’s Day party!

Mila suggested that leprechauns might like a drink when they’re getting into their shenanigans. She told me it had to be green and it needed rainbows.

Since we’re always down for punch, I had a magical idea. Here’s all you’ll need:

  • Green Juice – we used hugs but would’ve used Bug Juice if Mila hadn’t drank it first.
  • Sprite
  • Lemon-Lime Sherbet
  • Rainbow Candy (Airheads Xtreme Bites)
  • Green Food Coloring
  • Vodka – *Optional for Adults*

Just like any punch recipe I’ve talked about on this blog, this one is just as easy and good.

First, start off putting lemon-lime sherbet in a cup or punch bowl. I like to put extra because I’ve always been the person to want the sherbet in my cup!

Add some Airhead Xtreme Rainbow candies too! This is optional, but it amps up the magic.

Then, pour your green juice in. You could easily use Hawaiian Punch, but we used Hugs since it was just for a single cup.

To get the BRIGHT green color, put a few drops of green food coloring in Sprite. Add this to your cup or bowl too.

Then you’re all ready to attract some leprechauns or have a fun time! You can make it extra fun by adding your favorite choice of vodka to the adult drinks!

Fingers crossed this will help us catch our leprechaun. If not, we still have a few tricks up our sleeve.


What do you like to drink for St. Patrick’s Day? Let me know in the comments.