Toddler Activity: Waffle Day Letters

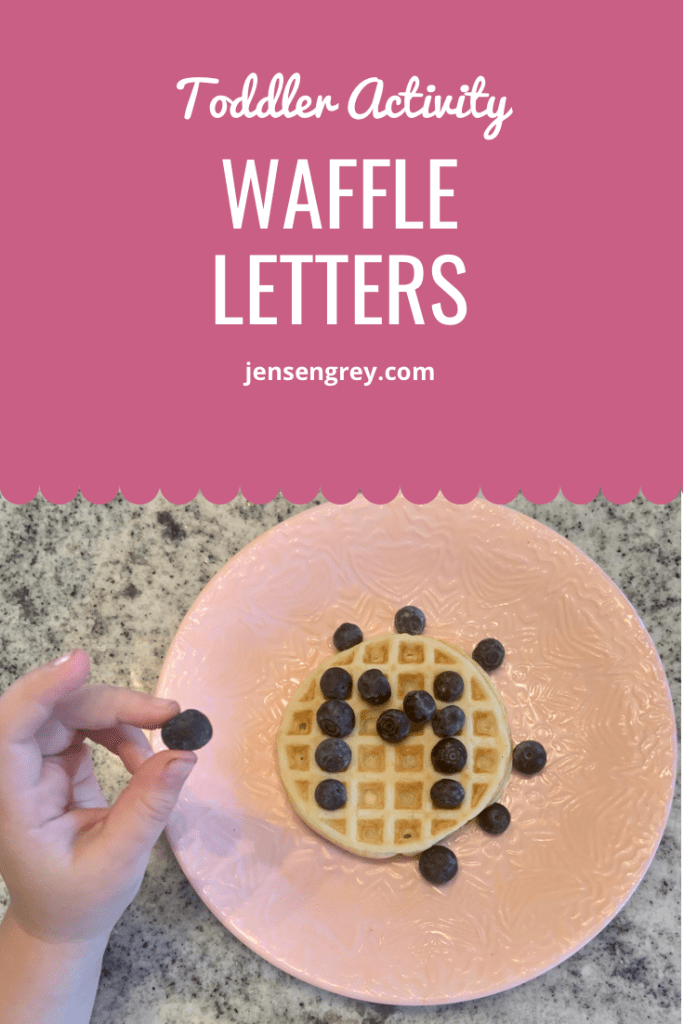
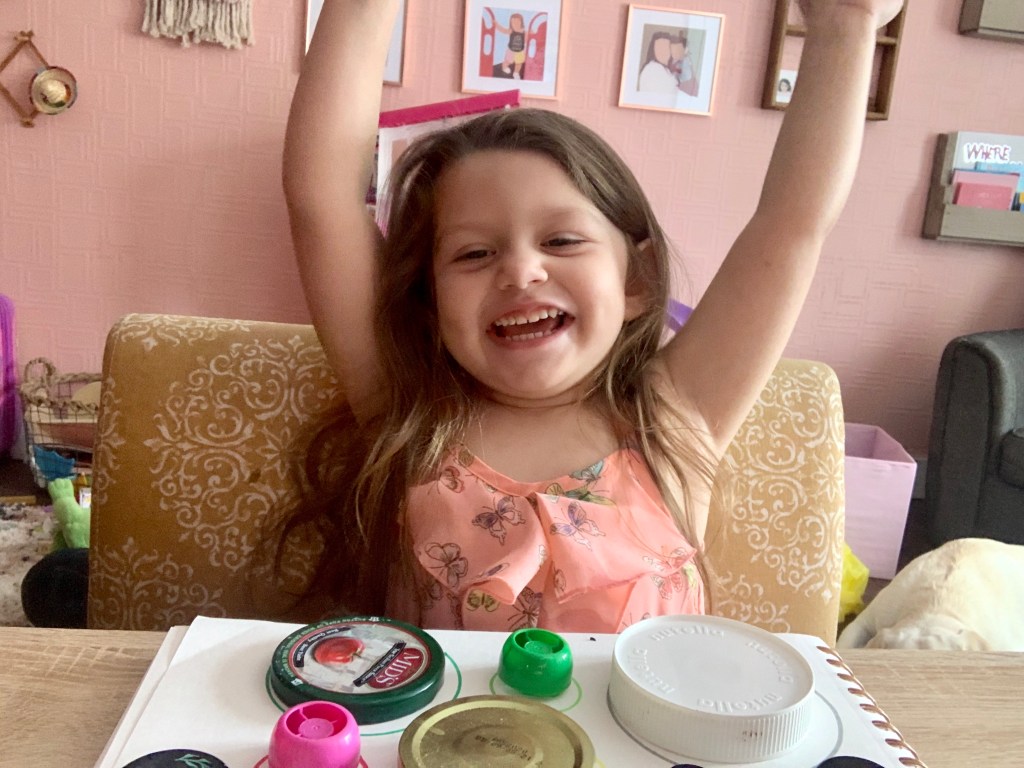
If you hadn’t guessed it already, today is Waffle Day. To celebrate, Mila and I of course ate, you guessed it, waffles! She also did a fun activity that we thought you’d love too!

Mila is obsessed with numbers, which is wonderful. She can count to fourteen all by herself. But… letters… they’re not her thing yet. The only ones she likes are m, i, l, a. I’m sure you get why. To help her get excited about them, we got to play with out food again.

For this activity, we got to combine making brunch, learning letters, and eating. Yum!

Here’s all you’ll need:
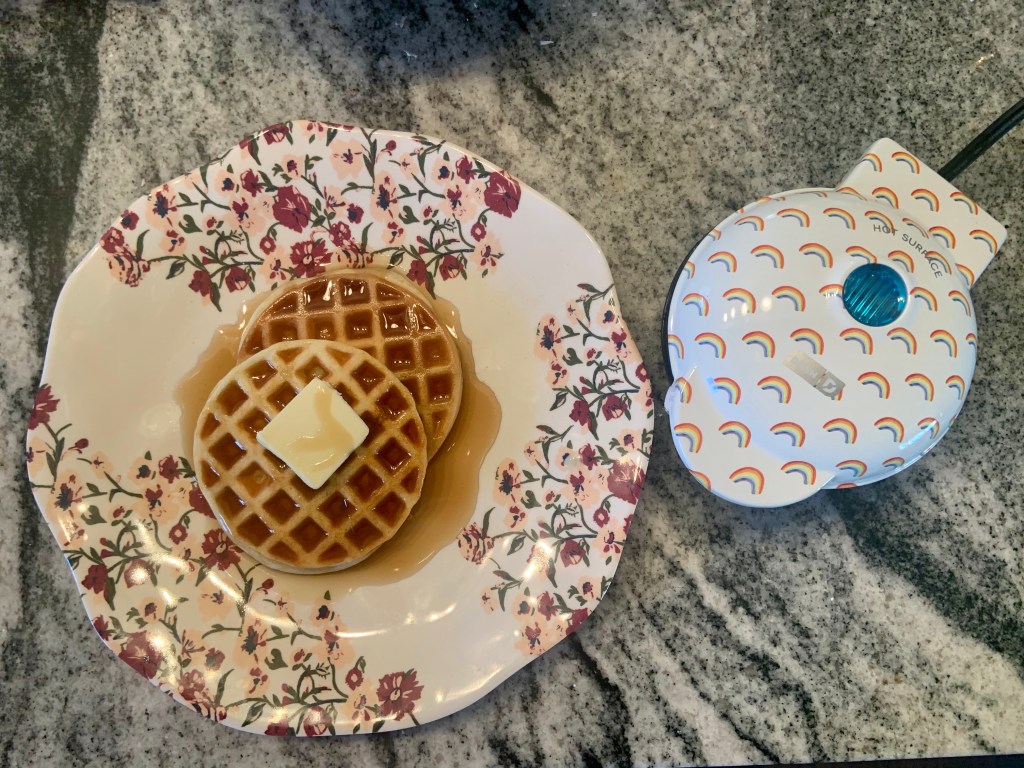
You might be wondering… why waffles and why letters? The squares in waffles make GREAT place holders. Plus, it’s fun too.

To start this activity, make your preferred waffle recipe and cook one wafffle.

While this is cooking, get a small bowl of blueberries or chocolate chips ready. Then, make sure to have out a whiteboard and marker or a piece of paper and pencil.

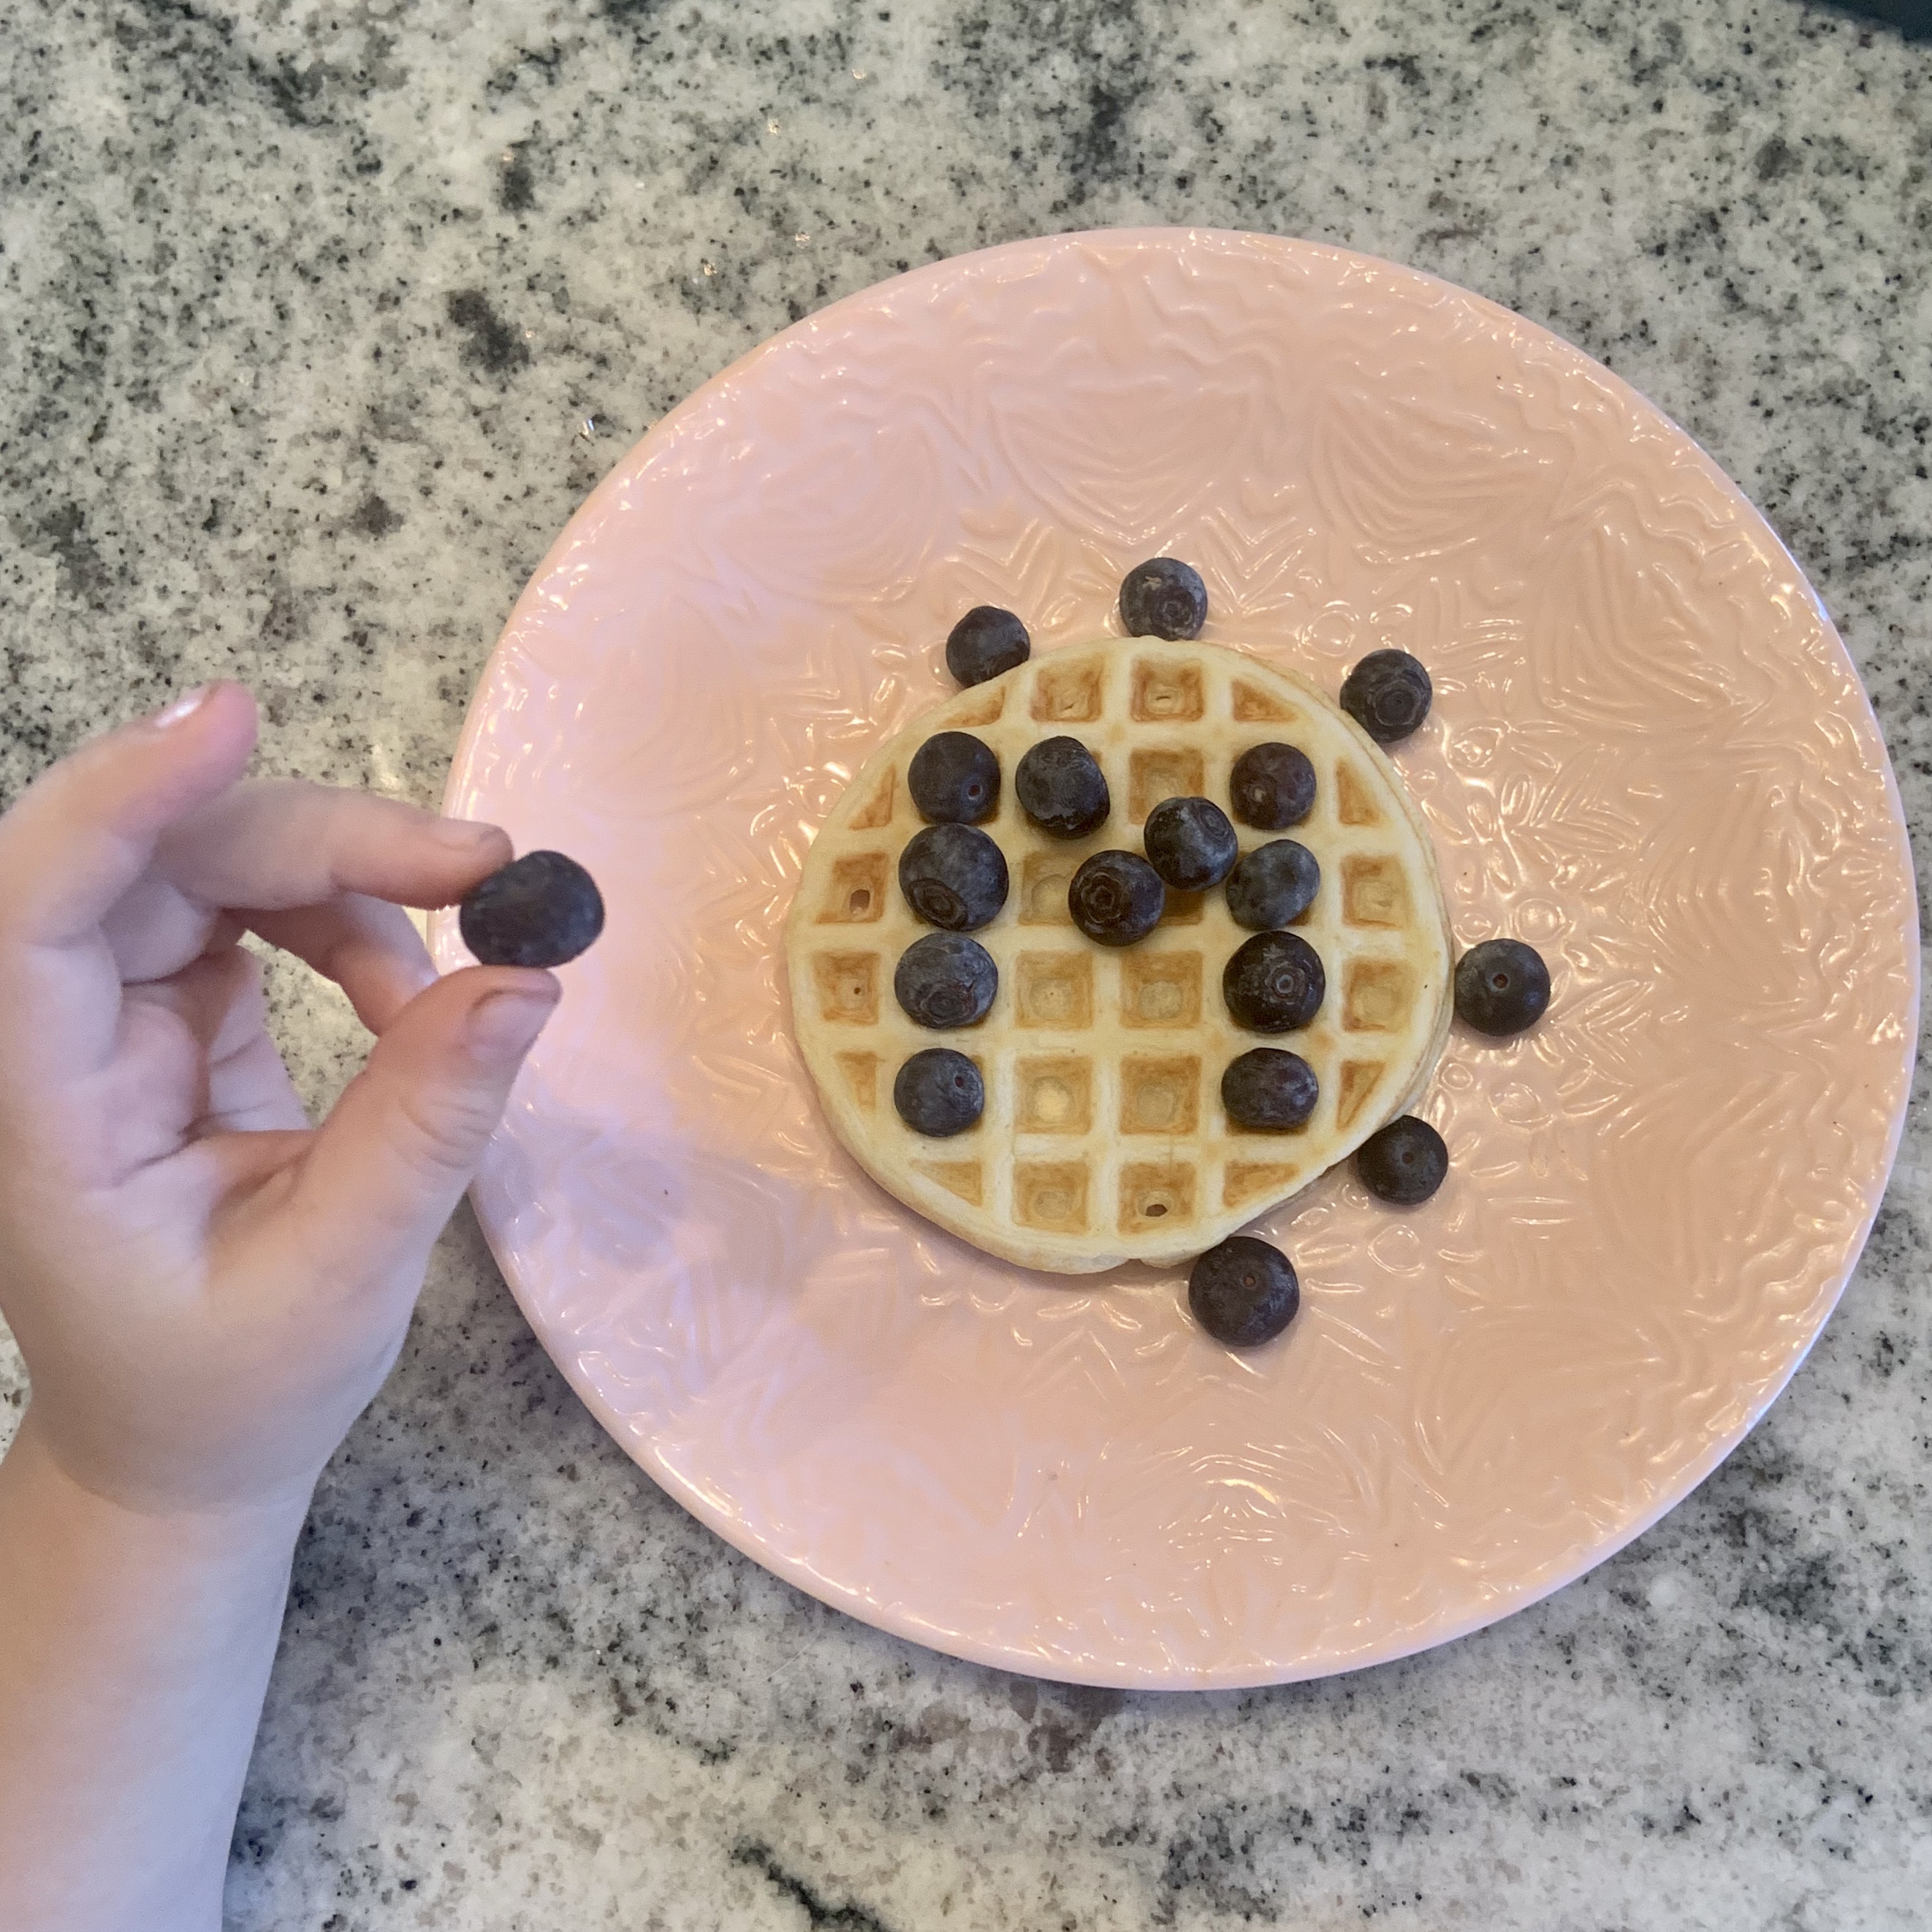
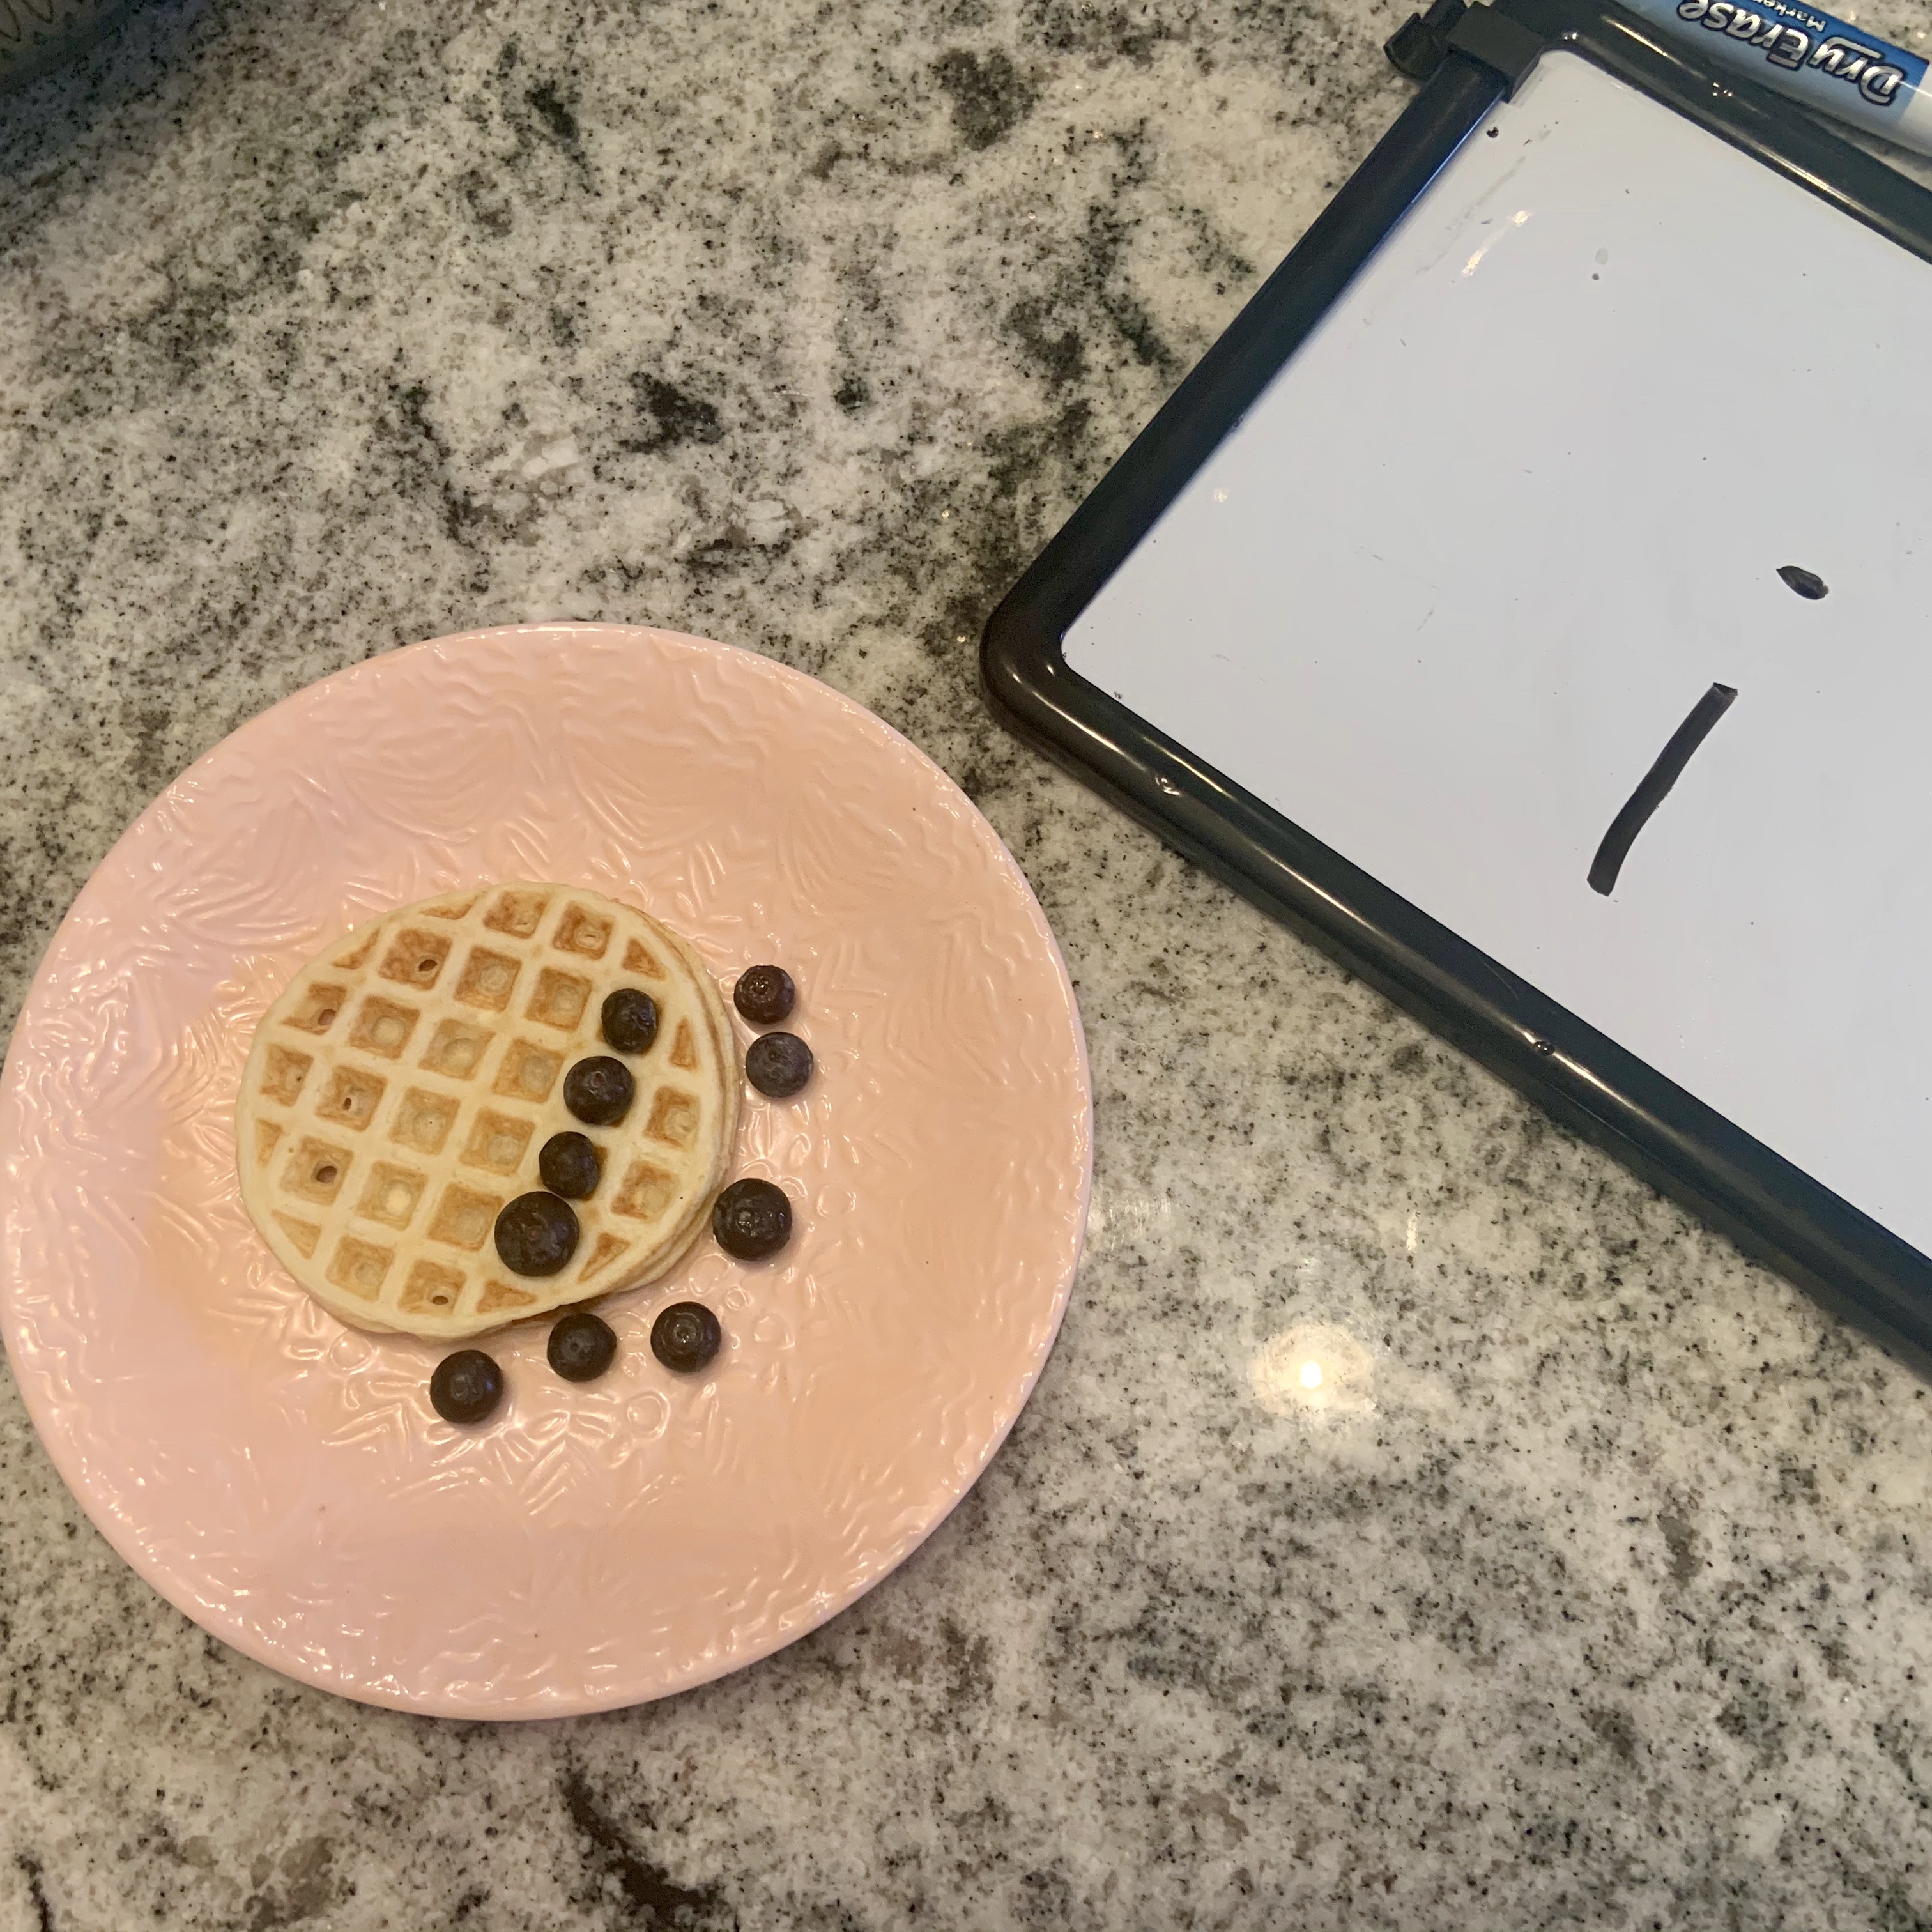
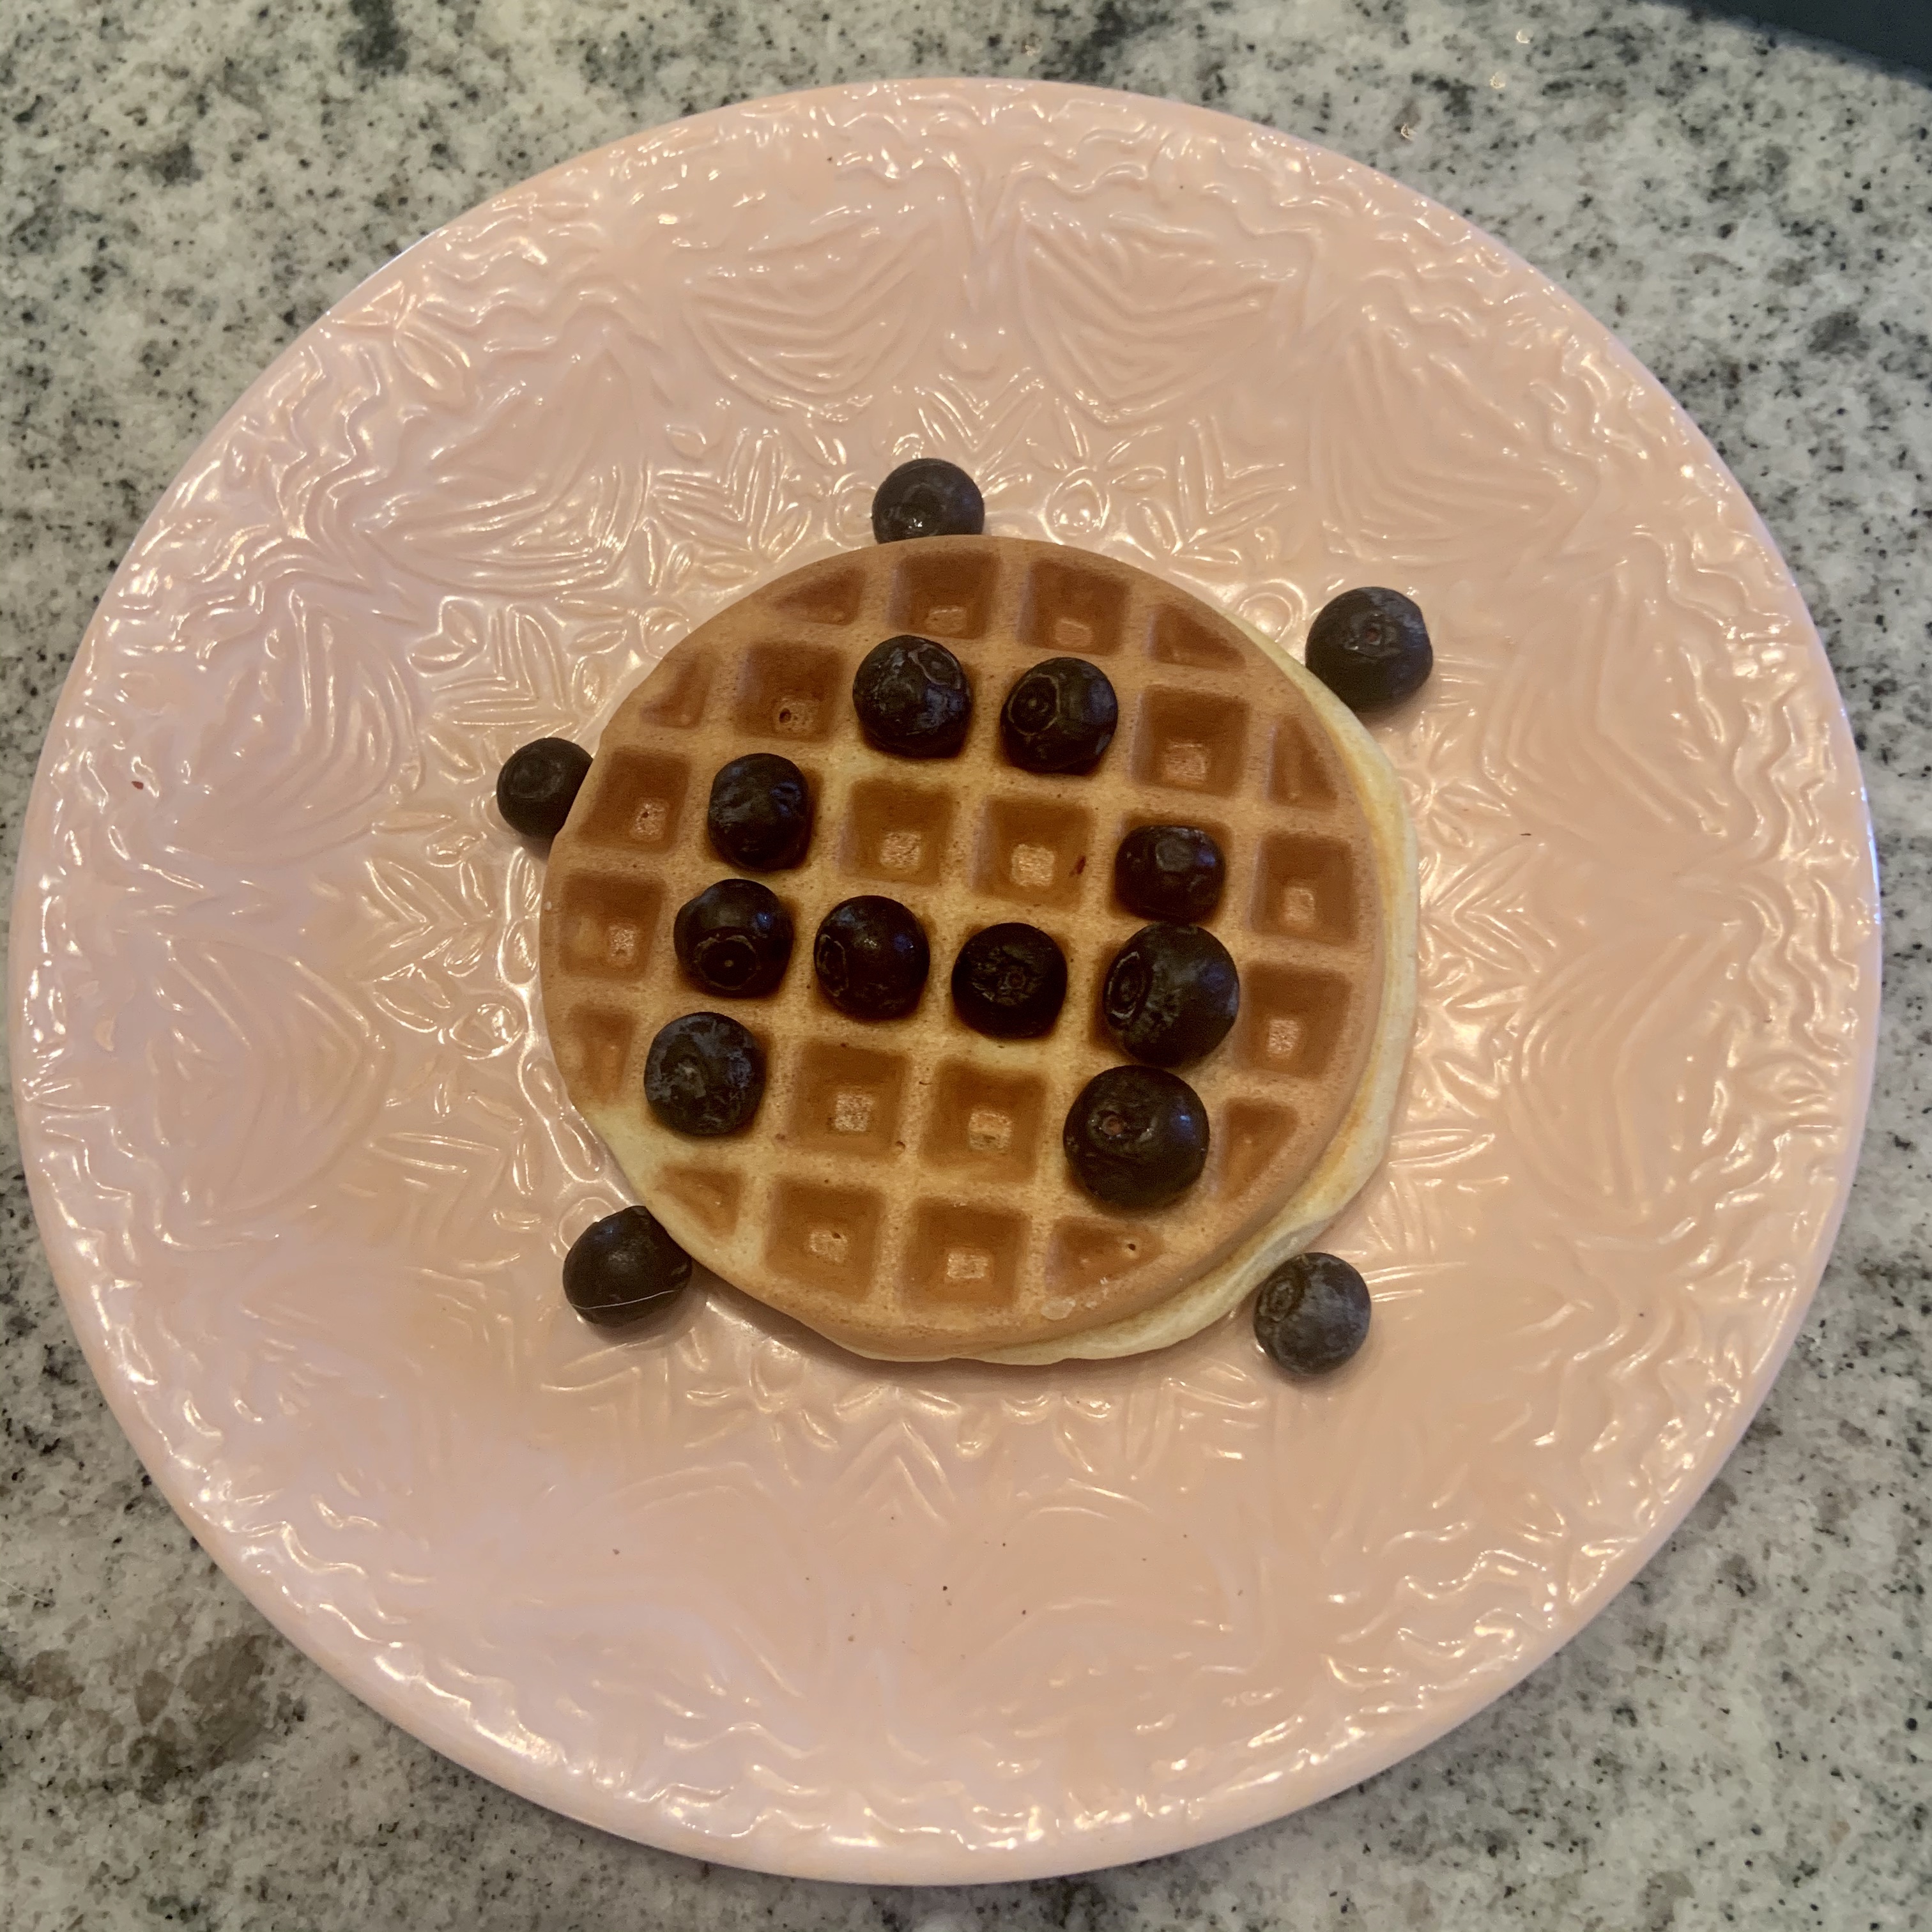
Once the waffle is done, let it cool down a little bit and then place it in front of your child. Draw a letter on your white board or paper. Then instruct them to write the letter with the blueberries or chocolate chips on the waffle. They might need a little help at first!

While you’re cooking, you can keep writing different letters for them to try. Make sure to say the letters out loud and connect them to something they know. I started with Mila’s ‘letters.’

Just keep in mind, your little one might eat their tools!

This was such a fun activity that can be anytime you’re enjoying waffles. It teaches them their letters and challenges them how to create letters too! Plus, they’ll be using their fine motor skills too! Just an overall educational and interesting activity.

If you liked this activity, let me know in the comments! Have you ever used food to learn?

While you’re at it, check out the fun other bloggers had with Waffle Day!

California Avocado Chicken Recipe

This isn’t your average chicken recipe. So, if that’s what you’re looking for get off the page now.

Just kidding, all are welcome! But, this recipe is so good and perfect for spring and summer. It’s light and full of flavor. There may be a few steps, but the outcome is totally worth it.

This recipe is a touch more complex than other recipes I share. Mostly because there’s one prep step that I normally don’t have time to do. But, it only takes thirty minutes, which is no time when you’re playing outside.

I’m going to break the ingredients down into the two steps. Here’s what you’ll need:

Marinade:

  • 4 chicken breasts
  • 3/4 cup of balsamic vinegar
  • 1/4 cup of honey
  • 3 cloves of minced garlic
  • 2 tablespoons of olive oil
  • 2 teaspoons of Italian seasoning
  • Salt and pepper

Topping:

  • 2 avocados
  • 3 Roma tomatoes
  • Salt and pepper
  • Mozzarella cheese (optional)

The first thing you should do is make the marinade. Combine the balsamic vinegar, honest, garlic, olive oil, Italian seasoning, salt, and pepper together.

Once it’s mixed up, put the chicken breasts in the marinade and put in the fridge for at least 30 minutes.

While the marinade is working it’s magic, start making the topping.

Dice the avocados and tomatoes. Then add them to a bowl and top with salt and pepper. I also added some Italian seasoning too!

After this, heat your grill or griddle.

Pull out your marinated chicken and get to cooking. Usually, it only takes 5-7 minutes per side to cook chicken. When they’re done, melt mozzarella cheese over it then plant.

Before serving, add the avocado and tomato topping. I also drizzled more balsamic vinegar over if too.

The chicken in this recipe tastes so good; thanks to the marinade!

There were no leftovers since Mila and I both loved it. I’m so glad she loves these flavors. Actually, I had to cut another avocado while waiting for the chicken. She just eats it by the bowl.

Anyways, I think this recipe will be a great addition to your spring and summer rotation.

If you try it out, let me know in the comments!

Toddler Activity: Easter Bunny Nature Craft

Spring is finally here and we’re gearing up for Easter!

One way to celebrate was making a Easter Bunny Nature Craft. We were able to get outside and create, which is our favorite.

Everything we used, we found in our back yard, besides the paper and glue.

For our craft, I told Mila she was going to make a bunny out of leaves and flowers. Since she had a traumatic experience with the Easter Bunny this year, I wanted to help her see he wasn’t all that bad.

She loved finding leaves for the bunny’s ears and then a flower for his tail. It was a great hunt. I think it’d be awesome to have a scavenger hunt for all the components too.

Since the trees in Ohio still haven’t produced new leaves, a lot of what she found was old.

After we set it all out, I had her tell me what she wanted to use for the bunny’s body parts. She decided about its body, tails, and ears.

Then, I asked her if she thought we should make the bunny a crown. She did!

Once we added grass for the bunny to stay in, mila thought it was complete. As she played, I glued everything down.

It turned out so cute and it was fun watching Mila pick out different things around the yard. She was so creative in making the bunny too.

I can definitely see us doing something similar again! It’d be really challenging with having her find Easter eggs filled with supplies too. Maybe I’ll have a lamination machine by the next time we do an activity with nature. A girl can dream right?

As always, let me know in the comments if you tried to make an Easter Bunny Nature Craft! I know your child will love getting outside and creating too.

Toddler Friendly Spring Bucket List

Happy first day of spring, friends!

The suns out for longer now and the days are finally getting warmer. My indoor plants are growing. Mila and Max are wanting to play outside all the time. Spring is here.

If you can remember back to the summer of 2019, I wanted to start new bucket lists for every seasons. Our summer and Christmas bucket lists were a success and whole bunch of fun. Unfortunately, COVID came and changed everyone’s world, so it didn’t feel like there was a lot to celebrate.

Even though COVID’s still in our lives, we’re excited to do a springtime bucket list this year!

With Jensen and Mila’s birthday, the end of my student teaching, and whatever else this bucket list has in store for us… we’re definitely going to be busy.

Without me going on and on… here’s our spring bucket list:

I’d love to hear what you’re planning this spring. Let me know in the comments.

The Unwritten Milestone

To say I wasn’t prepared for Mila’s new and unwritten milestone would be a complete understatement. Not only did it come out of no where, it completely took me off guard.

Usually, Wednesdays are to tell you all about their weird things Mila does. It’s one of the things I look forward to sharing most about. They make me laugh to think about and I know other parents can connect to them too. I’m pretty sure all our kids are somewhat weird.

Anyways, I couldn’t even call what she did yesterday weird. It was more like… touching, heartwarming, and inspiring.

She absolutely made my heart grow with one little sentence.

Here’s what happened.

As I was leaving to go back to work after lunch, Mila did her normal goodbye routine. She has to give whoever a hug and kiss, at least two times. Then tells them she loves them and to have a good day. Just when you’re about to walk out the door, she’ll yell, “I need a hug and kiss!” Then run up to you.

Well, this lunch period was a little different. She ended up walking me out of the house, instead of watching me go. When I bent down to give her a hug and kiss, she said something new. Something no one prepared me about: the unwritten milestone.

You’re the best, Mom.

She has never, ever said that before; especially when I’m about to leave her for a few hours.

As she said it to me, she gave me a big squeeze. Then, she flashed her smile and walked back to the door. She waved and told me to have a good day.

In that big moment, I had to take a deep breath and get back to real life.

On the inside, I melted. I swear if it was any other time, I probably would have cried. With all the leaving her lately, I wonder how she thinks of me. That statement let me know everything I was doing was right.

It might sound silly to cherish this one unwritten rule, but no one told me what that one little saying would feel like when they said it.

There’s a high chance I’m not the best mom in the entire world, but I’m the best mom to MIla and that feels pretty good. One day she’ll learn the power in her words and how I’ll always think she’s the best girl.

For now, I’m celebrating this victory in motherhood and the unwritten milestone.

Toddler Activity: Snipped Paper Shamrock Collage

With St. Patrick’s Day right around the corner, I thought it’d be fun to work on Mila’s scissor skills and do some more process art. This Shamrock Collage is a fun way to teach them about a ton of different things, while they’re having fun.

Mila is so interested in scissors. Whenever I use mine, she asks for her and tries to cut different things. Although she’s still into using both hands to cut, I challenge her to try and use one hand.

If you didn’t know, toddlers Mila’s age shouldn’t really be cutting paper. They should practice on play-doh or something similar, which Mila does. But, I like seeing how she’s progressed. When she practices on paper, I try to cut strips for her so she can do short cuts.

Anyways, let’s get back to this project. Here’s all the supplies you’ll need:

  • Scrap paper
  • Scissors
  • Market
  • White paper

I’m going to go on about scissor skills (sorry!). If you want to age this activity up, use the green paper as a template. This is too old for Mila’s age and for most toddler-aged kids.

Anyways, I found extra scrapbook paper in the playroom. We don’t use a ton of green for crafts, so I actually had a good bit of it. To make the shamrock, I followed this pin. I cut long strips for her to make small cuts too.

She practiced holding the scissors and the paper.

Eventually, I ended up holding the paper for her to help out. She got a little bit frustrated with it, but she cut a good amount.

I ended up getting out play-doh and those scissors so she could continue cutting. Then I cut some extra squares and triangles so she had enough to do the collage. We sort of sham-rock team work. Okay, that was a lame joke, but it was festive.

Next, I placed the cut pieces in a bowl and covered all the white area of the clover in glue. Then, I instructed her to make a collage.

Specifically, I told her to cover all the white with green pieces.

She had a blast picking out the best pieces to put on her shamrock. We found some Irish music to listen to and it all came together pretty quickly.

One thing I would suggest is have a wet washcloth with you.

I think Mila’s going through something about sticky things. Every time her hand accidentally touched the glue, she immediately needed it wiped off. That took some time to do, but we had so much fun.

When she was done placing the paper, she wanted to draw around the sides. I think she just loves using markers.

Honestly, I loved the way it turned out.

It’s so festive and I feel like it’s a project that I can do with her through the years. For now, it’s hanging up on my fridge, waiting for the leprechauns to see!

Let me know what you think about this activity and if you try it out, I’d love to see what you and your little came up with.

3 Ingredient Lucky Charm Bars

If you’re looking to make St. Patrick’s Day magical or just want a tasty treat, try these Lucky Charm Bars. They’re just like Rice Krispy treats, but with the taste of Lucky Charms.

The best part is there are only 3 ingredients! Here’s what you’ll need:

  • 6 cups of Lucky Charms
  • 1 stick of unsalted butter
  • 16 oz of marshmallows

The process to making this treat can be a little messy, but it’s fairly easy to do.

First, start off melting the butter and marshmallows together. I used medium heat so it didn’t get too hot to burn the marshmallows. It took a little bit of time, but I made sure to stir to break them down too.

When it’s melted, take off the heat and add the Lucky Charms to it. Make sure it all gets coated. This can get messy quick!

Then, spray a nonstick spray to a baking pan.

Spread the mix evenly across the pan. Again, this is a little tricky to do because it is so sticky! Keep at it and it’ll work.

Before letting it cool, I picked out marshmallows from the bag, even though I tell Mila not to… oops. I thought it’d look cute to have some extra on top of the Lucky Charm Bars. If it’s not a leprechaun trap, it’s definitely a toddler trap!

After around 40 minutes, your bars will be cooled and set to take pictures.

Cut them into bars or try using cookie cutters for fun shapes. After they’re cut up, you can enjoy your Lucky Charms Bars!

To store them, keep them in an air tight container on the counter. If you put them in the fridge, they’ll just harden up and loose their chewy appeal.

As always, let me know if the comments what you think of this recipe or if you try it out!

Want more St. Patrick’s Day food and snacks? Check out these ideas:

Always Blow the Bubbles.

In a month, Mila will be three.

Three whole years of learning about and loving her. I’m going to admit, two has been my favorite. It’s a gift that I only have a month more to cherish.

If I could go back to a year ago and talk to myself about parenting, I’d tell myself one thing.

Always blow the bubbles.

When she has her bubble bottle outstretched to you, take that ten minutes and blow them. Even when you’re swamped with work and need to clean, blow the bubbles.

This is the purest time in their lives. The world around them is magical.

With all the worries adults have going on, bubbles are the only thing on a toddler’s mind. That and seeing their favorite smile in the world.

Bubbles are, of course, metaphoric.

They can be singing, or playing, or running, or listening, or dancing. Whatever it may be, when your child asks, try and blow the bubbles.

The years go so fast and in the moments you drop everything, time stands still.

Their laugh is all you can hear. And their smile… well, there hasn’t been a sweeter sight. They’re engrossed in the moment as much as you. All it took was focusing on this second.

Work, a dirty house, and other adults will always be around, but they won’t be little forever.

There will come a time where they don’t want you to blow bubbles. They’ll just do it themselves. The freedom you crave now will come and those toddler cuddles and desires will fade away.

Two and these toddler years are hard, but they go away so soon.

For us, two ends in a month.

If three-year-old Mila’s mom came to talk to me today, I bet she’d tell me the same advice…

Always blow the bubbles.

What advice would you give to toddler moms?

I Pretended to be a Beauty Blogger!

Since I’ve been getting ready every morning since August, I’ve definitely used a lot more makeup. It’s also let me experiment too.

When I had the chance the last month to try a few new products, I took it. Honestly, it felt different reviewing beauty products, but I had a ton of fun with it!

Instead of just sitting with these pictures and experiences, I figured I’d share them!

benefit • they’re real! mascara

My favorite type of makeup is mascara. It can completely change someone’s face. For me, I feel like it frames my eyes and just makes my face look more polished.

When I had the opportunity to get this mascara in a VoxBox for free, I took it!

To make myself feel official for the review, I took progress pictures and all. It was intense, but I think I did alright?

As you can see, the mascara is pretty nice. I love the wand and how easily it applies.

One thing that I have noticed with it is the mascara smears off by the end of the day. It’s probably a me thing though. I have oily skin, so that plays a big part in it.

I guess I could flip that negative and say it’s nice to clean up at the end of the day too!

If you like the results of this type of mascara or just want to try something new, you can find benefit’s they’re real! mascara here.

Mary Kay • Color Card

A Facebook friend recently reached out to me to try a color card.

She got a quick assessment of my makeup likes and dislikes. I also let her know I wanted to be adventurous in whatever I tried. Maybe I was feeling a little confident after my mascara review.

After a little mailing hiccup, I got to try a new look!

I followed the instructions on the card and tried new application techniques. Honestly, I think it turned out gorgeous. I only wish I could have showed my lipstick off in person.

After looking at these pictures again, the shades of eyeshadows are beautiful. I love how they all blended together. It was almost creamy, but still powdery too.

There’s some blush on my cheeks too. Just can’t see it as much! Isn’t that what makeups about?

Both looks and products were so much fun to try.

If I learned anything about my week of makeup blogging/testing, it’s to just say yes! Often we don’t want to try new things, but it can be a lot of fun. Maybe you’ll find something you love.

A big THANK YOU to everyone that let me try these products out. It was a blast.

If you liked this blog and have any suggestions of things I should try and review let me know in the comments, please.

Toddler Activity: Pi Day Matching Game

Most toddlers probably don’t understand what Pi is or what maths really all about. Heck, I’m not sure I even know either.

But let’s be rational and not talk in circles.

Dah dah dum.

Did you get me one math joke I’ve ever told or no? Either way, it’s Pi Day and I made Mila a fun matching game that includes all different sizes of circles. You can do that same at home with items located in your house, at this very moment.

Not only does it introduce toddlers to what pi looks like and that it deals with circles, this game incorporates color and size matching too.

All you’ll need to make this matching game is a piece of paper, markers, and random lids.

Once you find a few lids, just trace around them on the paper. I did corresponding colors with the varying shapes. This really helped Mila with some of the shapes that are similar in size.

To be a little festive and help her connect circles with pi, I added the symbol inside all of them. She loved identifying the numbers at the top too.

I love being sneaky and adding learning points. She has no idea that she’s doing an educational activity. All she knows is that she’s having fun. It reinforces that learning is FUN.

Before letting her play, I randomly spread out the lids. Then I gave her directions to match them.

For her first match through, I had her focus on the size of the circles.

Mila actually did an amazing job.

She was able to correctly match all the lids. There were only two green ones that gave her a little trouble. With some encouragement, she was able to figure it out though.

When she was done, I cleared them off and had her do it again. This time, I had her focus on the color of the circles.

If you couldn’t have guessed from Mila’s reaction, she matched them up perfectly for the second time. She started stacking them after this time, which worked for me.

This matching game is a fun way to introduce Mila to math concepts that are advanced for her age. But, by just becoming familiar with pi and pairing it with circles, infinitely helps for the future.

Let’s hope she’s a little better at math than me!

I hope you and your toddler will enjoy this activity. It’s one you can create immediately at home.

As always, if you do participate, let me know in the comments!