Whole Strawberry S’more Recipe

It’s campfire season and I had to add my strawberry summer twist. If you’ve liked all my other strawberry recipes so far, you’re going to love this.

I actually saw this on a Tik Tok video and had to try it. Two of my favorite flavors are strawberry and s’mores.

Honestly, I can’t think of anything that screams summer more.

To make these, you’ll need:

This recipe is pretty self explanatory.

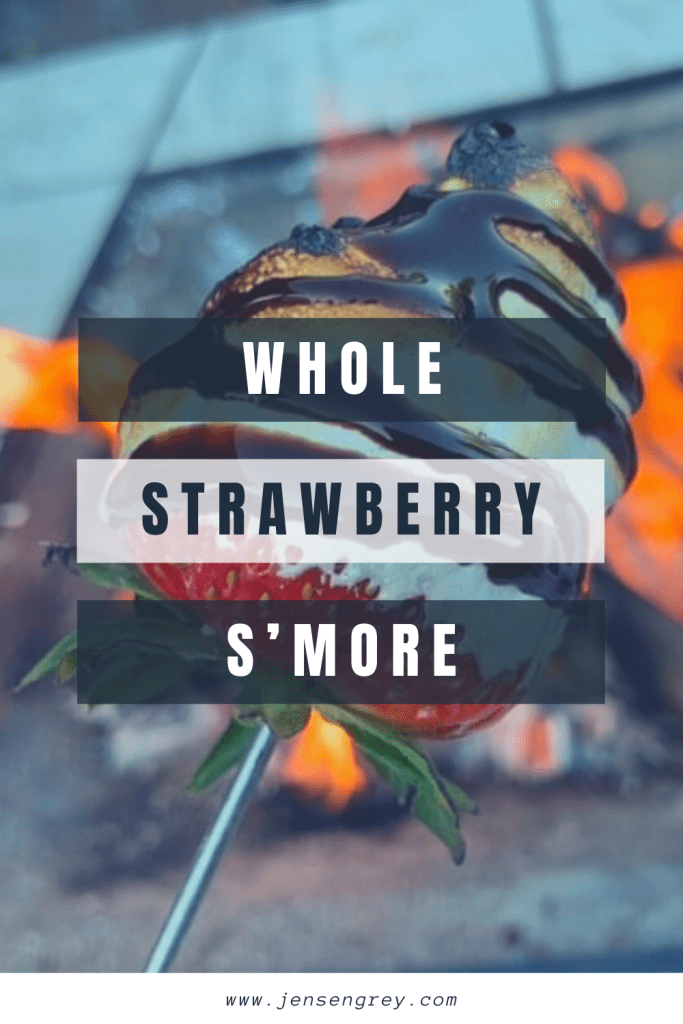
All you need to do is dip your strawberry in the marshmallow fluff. This is a little more difficult than I thought. The best way was to deeply dip the strawberry and twist. You can adjust how much marshmallow fluff gets on there!

Then, roast it like a marshmallow.

Seeing a strawberry roasting looked hilarious to me. It felt like I was roasting the biggest marshmallow ever!

Roast to your preferred marshmallow done-ness. I like mine slightly burnt.

The next part is MESSY… well it was for me.

Drizzle chocolate sauce over top the strawberry marshmallow combo. It might have been easier to dip it, but I just drizzled over a plate.

Now you’re ready to eat it!

Although I didn’t take a picture of it, I added crushed graham crackers to this whole strawberry s’more. It gave it the crunch that I love about s’mores.

Here’s a bonus strawberry s’mores idea.

Since I was just making random s’mores, I tried slicing strawberries and adding them to a regular s’more.

It’s a real game changer!

I loved both strawberry twisted s’mores, but loved the chocolate bar taste on this a little more.

Either way you make it, I’m telling you, add strawberries to your s’more agenda. It adds such a fresh bite to a sweet, summer treat.

Do you add any extras to your s’mores? Let me know in the comments.

Mommy Recipe: Tequila Sunrise

When I think of summer, I think of the sun, pool, and occasional refreshments. One drink I’ve loved for years and looks like summer is the Tequila Sunrise.

Even if you’re not a tequila fan, this drink will win you over. The flavors from the orange juice and grenadine work perfectly together.

The only thing better than this drinks taste is how pretty it looks.

Now that I’ve sold you, here’s what you need:

  • 1/2 ounce of grenadine
  • 4 ounces of orange juice
  • 2 ounces of tequila
  • Ice
  • Maraschino cherries *optional

To make this beautiful drink, shake tequila, orange juice, and ice together. Then strain in an ice filled glass.

Next, use a spoon to pour grenadine over. This way it goes to the bottom. It somehow feels like an adult science experiment. I love seeing the layered look.

Before drinking or serving, lightly stir to create the sunrise effect.

Then you’re done!

You can garnish with maraschino cherries, orange slices, or fondant flowers. I sort of just got lucky to have the extra pretties.

It truly is such a beautiful looking drink and tastes so good too. Since it’s only three ingredients and not a lot of prep time, it’s one of my go to’s! Plus… it’s an easy way to drink tequila.

What’s your favorite pool side drink?

Make sure to check out these other summertime drinks that you’ll enjoy!

Strawberry Yogurt Popsicles

Looking for a cool treat this summer? Try this three ingredient Strawberry Yogurt Popsicle recipe. I promise you won’t want to share with anyone!

Before I go on… I know I’m hitting the strawberry game hard this summer. They’re just tasty.

This recipe is actually my favorite snack not frozen. It’s simple to mix up and has so many good flavors.

Here’s what you’ll need:

  • I cup Vanilla Greek Yogurt
  • 1 cup Strawberries
  • 1/4 cup Brown Sugar
  • Popsicle Mold

All you have to do is combine the three ingredients in a bowl. Then, mix them up.

Next, transfer to a popsicle mold. I got this cute one here. This part can get a little messy. Just make sure if you get it on the mold to wipe it off.

Last, pop them in the freezer and wait!

I left mine in the freezer for about six hours, but overnight would have taken the ‘hurry up’ feeling away.

This is quite the tasty treat. I love how refreshing it is. It also feels like an adult popsicle. I’m all for sharing with Mila, but there’s real ingredients and I can actually see the strawberries!

Hopefully, I’ll expand to using other ingredients this summer. If not, they’re still really good.

What’s your favorite popsicle flavor?

If you need some other popsicle recipes, check out these!

Boozy Root Beer Floats

Summer season is upon us! I can’t think of anything more nostalgic than root beer floats to drink on a hot day. The kids love it. To step it up a notch for the adults, I add one more ingredient to make Boozy Root Beer Floats.

One of my favorite things about being an adult is putting a twist on my favorite childhood drinks. It seems silly, but it’s a lot of fun to taste. I imagine this is what all the adults did when I was a kid too.

Plus, when it’s only one extra step, it makes it a lot easier to do.

Here’s what you’ll need:

  • Root Beer
  • Vanilla Ice Cream
  • Whiskey (I used Jack Daniels)
  • Chocolate sauce *optional
  • Maraschino Cherry *optional

All you have to do is make it like a classic root beer float. I add the whiskey in first, then ice cream, and then the root beer. It feels like it mixes up the whiskey the best!

I also like to add chocolate drizzle and maraschino cherries to the top of my root beer floats too. It tastes so good.

This Boozy Root Beer Float drink will be such a summer staple. Mila loves drinking root beer floats too. So, I guess she’ll be motivating me to make them all the time!

What kind of childhood drinks do you like to put an adult spin on?

If you’re craving some other root beer flavor try this one Root Beer Float Ice Pop by Mom Buns and Mayhem.

Strawberry Mint Sun Tea

One of my favorite summer drinks is sun tea. It’s so easy to make and even more refreshing. Since I’m still battling the mint take over, I thought I could combine my favorite flavors. Out of it came Strawberry Mint Sun Tea.

When I first got my house, my grandpa gave my my grandma’s sun tea container. It felt like such an honor. I usually put iced tea in there when I make it. Now it feels like when I make sun tea, I can connect with her.

Even though I used a different container for this batch (thanks toddler and dog!), it was magical seeing the transformation. Mila loved it too.

Here’s what we used for our Strawberry Mint Sun Tea:

  • Big glass jar with a tight lid
  • Tea bags
  • Strawberries
  • Mint
  • Water
  • A sunny day

Obviously I didn’t put specific amounts for the ingredients. There’s a reason why (there’s always a reason).

The size of your jar or container determines what you’ll need. I personally used six tea bags and then just eyeballed the strawberries and mint. Maybe around seven strawberries and a handful or two of mint!

It’s all about preference! But, I made a l it take cheat sheet in case you’d like some guidance.

The first thing you need for sun tea is a sunny day! With summer coming up, you’ll have no issues with that.

Honestly, all you have to do is fill up your container. Then, put all the ingredients in. We mixed it around to activate the mint leaves, but it’s not needed!

Once every thing is in there, shut the lid and stick it outside.

It’s truly that simple.

We let it stay outside for around seven hours. I could tell it was time to take it in by the color of the water. Again, this is all about preference and what you like in a tea.

To serve, I strained the strawberries, but let the mint leaves come through over a small jar of ice.

It was so refreshing. The mint made it taste so cooling.

Although it didn’t need sugar, Mila asked for it to be a little sweeter. So, you can add sugar if you’d please. Again, tea is all about how your taste buds like it!

Sun tea is so fun to make and your kids will constantly be checking the water. It’s like a little science experiment.

We’ll be making another batch of sun tea soon enough!

What’s your favorite thing to add to tea?

While you’re at it, check out these other amazing iced tea recipes!

Backyard Mint Mojito

One of my favorite parts of having a backyard garden is making new recipes! Since my mint is sort of taking over, I needed to find something quick.

A mojito sounded like the perfect drink for my little problem.

I’ve never made a mojito at home before, but I figured I’d try! After seeing how easy it was, I’ll definitely be making it again.

Here’s the ingredients you’ll need:

  • 10 mint leaves
  • 1/2 lime juiced or 4 ounces
  • 1 ounce simple syrup
  • 2 ounces of white rum (I used lime flavored)
  • 3 ounces of seltzer
  • Ice

The first thing you need to do is collect your mint! You can get some at stores or in your backyard. This is what I’ve been working with lately…

My little garden smells so good, but it’s a lot of mint. I cut off two stems. They gave me the perfect amount of leaves and there’s still a ton of mint left.

After you figure out your mint situation, the fun begins.

The first thing you need to do is muddle your mint. I personally don’t have specific bar equipment, but I’m guessing it’d be easier. Honestly, I used the back of my spoon and it seemed to work pretty well.

Then, add your muddled mint, lime juice, rum, and simple syrup in a glass or cocktail shaker with ice. Again, I didn’t have a cocktail shaker, but I shook them with a glass and plastic cup.

It worked so I’m pretty impressed with my ingenuity.

Then, strain your mojito mixture in a glass filled with ice. Top the rest of it off with seltzer. After, you can garnish with extra mint or a lime wedge.

After you’re all done, enjoy it!

I love the taste of mint, so I added extra in there. It ended up tasting amazing, especially after letting it sit for a little bit before I drank it. It just tasted extra minty.

Hopefully I’ll be able to try and make a mint julep sometime this summer too. I have more than enough mint to experiment with! Once I find a recipe that I love, I’ll share it on here. Fingers crossed it goes as easily as this Backyard Mint Mojito.

Let me know what your favorite summer drink or refreshment is in the comments. If you tried this recipe, tell me how yours tasted too!

Enjoy!

Looking for some other tasty summer drinks, try these too!

Mommy Recipe: Strawberry Lemonade Mimosa

Summer is quickly approaching and so are weekend brunches. Change up your mimosa game with this Strawberry Lemonade Mimosa. It’ll cool you down, without the overbearing champagne taste.

I love this combination and figured I’d try to make a mimosa with it. It’s a light drink and the Italian ice elevates it even more.

This drink would be perfect for a mimosa bar or anything brunch!

Here’s what you’ll need:

  • Champagne
  • Strawberry Lemonade
  • Strawberry Italian Ice
  • Pink Sugar
  • Fresh Strawberry

First, coat the rim of your flute by cutting a strawberry and putting it around the rim. Then, pour some sugar on a plate. To coat, just roll the rim around the sugar.

Next, put your Italian ice in the bottom of the cup.

Then, fill your flute to your discretion with champagne. It’s really up to you how much champagne you’d like. I’m not one to limit your drinking (haha). Then fill the rest up with the strawberry lemonade. Again, it’s up to you how much you want to drink.

While I was making this drink, Mila was obsessed with the pink salt and the bubbles. So, I threw together this little mix for her too. It’d be great for other littles too.

The Kid Version:

  • Strawberry Lemonade
  • Strawberry Italian Ice
  • Pink Salt
  • Fresh Strawberry
  • Carbonated water

This little spin on a classic mimosa is great for strawberry lemonade lovers and is just perfect for summer months too. The champagne taste isn’t too strong and it tastes really great. Being creative with drinks can be so much fun!

I absolutely loved making Mila one too. She felt like a ‘big kid’ and it was so easy to make her special drink.

Next time, I’d love to try a grapefruit mimosa. I’ll share when i do.

What’s your favorite type of mimosa?

Strawberry Chocolate Chip Cookies Recipe

One of the best and most classic desserts are chocolate chip cookies. They’re gooey and make you feel all warm inside. Up until now, I didn’t think they could get any better, until we added one ingredient: strawberries.

This new to us recipe is one I HAD to share with everyone, especially before National Chocolate Chip Day. Not only did we enjoy the finished results, Mila had a blast making these too.

Maybe a little too much fun with the extra flour!

Anyways, here’s what you’ll need to make these delicious cookies:

  • 2 1/4 cups of flour
  • 1 teaspoon of baking soda
  • 1/2 teaspoon of salt
  • 1 stick of unsalted butter
  • 1/2 cup of sugar
  • 3/4 cup of brown sugar
  • 1 tablespoon of vanilla extract
  • 2 large eggs
  • 1/2 cup of chopped strawberries
  • 1 cup of chocolate chips

Before making the cookie dough, preheat the oven to 370 F. Then line two large baking sheets with wax or parchment paper.

In a medium size bowl, whisk together the flour, baking soda, and salt. Set aside.

Next, in a large mixing bowl, use your mixer to cream the butter, sugar, brown sugar, and vanilla extract. I let my butter warm up a little bit to help it cream. Honestly, I just popped it in the microwave for 20 seconds.

Then, add eggs in one at a time. Mix in between eggs.

After it’s mixed, slowly add the flour mixture in. Just mix it until combined and don’t over mix.

Once you get a good dough consistency, fold in strawberries and chocolate chips. I used a spatula for this.

Now it’s time to place them on the cooking sheet. You can use an ice cream or cookie scoop to help with this part. I just used my hands and made little balls. It was way easier for me this way than using a spoon or anything.

Then, place in the oven and bake for 10 minutes. Rotate the cookie sheet after and place back in the oven for 4-6 more minutes. Your cookies should have holden brown on their edges.

Once it’s done, remove from the oven and let them cool down… or not.

We enjoyed these cookies a little too much. I have a feeling it’ll be a recipe we make over and over again.

Let me know in the comments if you end up trying this recipe… you most definitely should!

Check out these other chocolate chip creations too:

Mommy Recipe: Pink Whitney Lemonade

If you’re looking for a cool summer drink to enjoy during the hot months, you’ll love this Pink Whitney Lemonade.

Funny story, Mila calls any ‘drink’ I have ‘on my juice.’ It’s a really hilarious way for her to know not to drink what I’m drinking. I think it’s also nice that she thinks it’s just my juice and she has her juice.

Thankfully, she’s not that curious and respects that it’s mine. A little parenting win, right?

Anyways, back to the goods. You’ll love this mommy juice recipe that’s good for anyone who likes adult beverages that you can taste the alcohol.

Here’s what you’ll need:

  • 3/4 cup of Pink Whitney Vokda
  • Ice
  • 1 cup of Lemonade
  • 1 Pink lemonade Kool Aid mix pack
  • Lemon
  • Blender

Honestly guys, I pretty much eyeballed this drink so the measurements aren’t exact. When I make drinks, I do a lot of taste tests!

All you have to do is put a ton of ice in your blender, then all of the other ingredients.

Mix them all until they’re the consistency of a slushee. For extra tartness, I put lemon slices around the glass and to garnish.

This drink is easy to make and goes down smoothly. I feel like they will be DANGEROUS this summer while by the pool or around fires. It’s so yummy, I’ll take the chance though.

Let me know what your favorite parent juice or summer drink is in the comments.

But first, check out these other moms go to drink recipes:

Bacon and Avocado Egg Sliders Recipe

If you’re like me? You probably wonder what to do with all the hard boiled eggs every Easter. I have a simple recipe that you might solve your problems!

And… it’s not deviled eggs!

These bacon and avocado egg sliders are keto friendly. Plus, they pack a lot of big flavor in a little package!

Here’s all you need:

  • Hard boiled eggs
  • Avocado
  • Bacon
  • Salt and pepper
  • Quantities depend on how much you want to make!

The first step if you don’t have any leftover Easter eggs is to hard boil eggs. Everyone has different ways to doing this.

If you already have eggs made, start with your bacon. I like mine a little crispy, so I keep it on there for a while. Same as with the eggs, I won’t tell anyone how to cook their bacon either!

Next, cut your avocado up. Then mash it.

Usually, I add salt and pepper to the avocado to give it some spice. Make sure no one steals this mixture… like Mila.

When you’re bacon and hard boiled eggs have cooled down. It’s time to assemble these sliders

Then, slice your eggs in half, longways.

They can get a little slippery at this stage. Be careful of which plate you put them on! I’m speaking from experience if you couldn’t tell.

Then spoon avocado on top.

After, break the bacon up in smaller pieces. Then stick it on top of your egg slider.

If you have extra bacon left, you can add more to it too! I usually add one to the bottom to make a little sandwich.

This little bite-sized slider has amazing tastes. I love the saltiness of the bacon and the creaminess of the avocado. Plus, it’s a great mix of textures too.

Honestly, this is one of my favorite ways to eat hard boiled eggs. Mila loves them too!

There’s not a ton of steps to follow and kids can easily help making these. Bacon and avocado egg sliders are really great for the days following Easter.

If you liked and tried this recipe, let me know in the comments!

Before you go, check out these Easter recipes from other moms that blog: