Easy 3 Ingredient Beignets Recipe

If you’re looking for a fun and tasty was to celebrate Mardi Gras, try this Easy 3 Ingredient Beignets Recipe.

You’ll have the taste of New Orleans in twenty minutes.

We like to celebrate everything in my household. It just makes life a little more fun. In this case, it made it a little more sweet too!

Before I go on, I want to share that I originally saw this recipe on Instagram: @lorafied. It looks like a fun and recipe I knew I needed to try with Mila. I’m so glad I did that I had to share with all of you.

Here’s the three ingredients you’ll need to let the good times roll:

  • 1 can of biscuits
  • 3 tablespoons of melted butter
  • 1/2 cup of sugar

First, you’ll need to preheat your oven to 375 F.

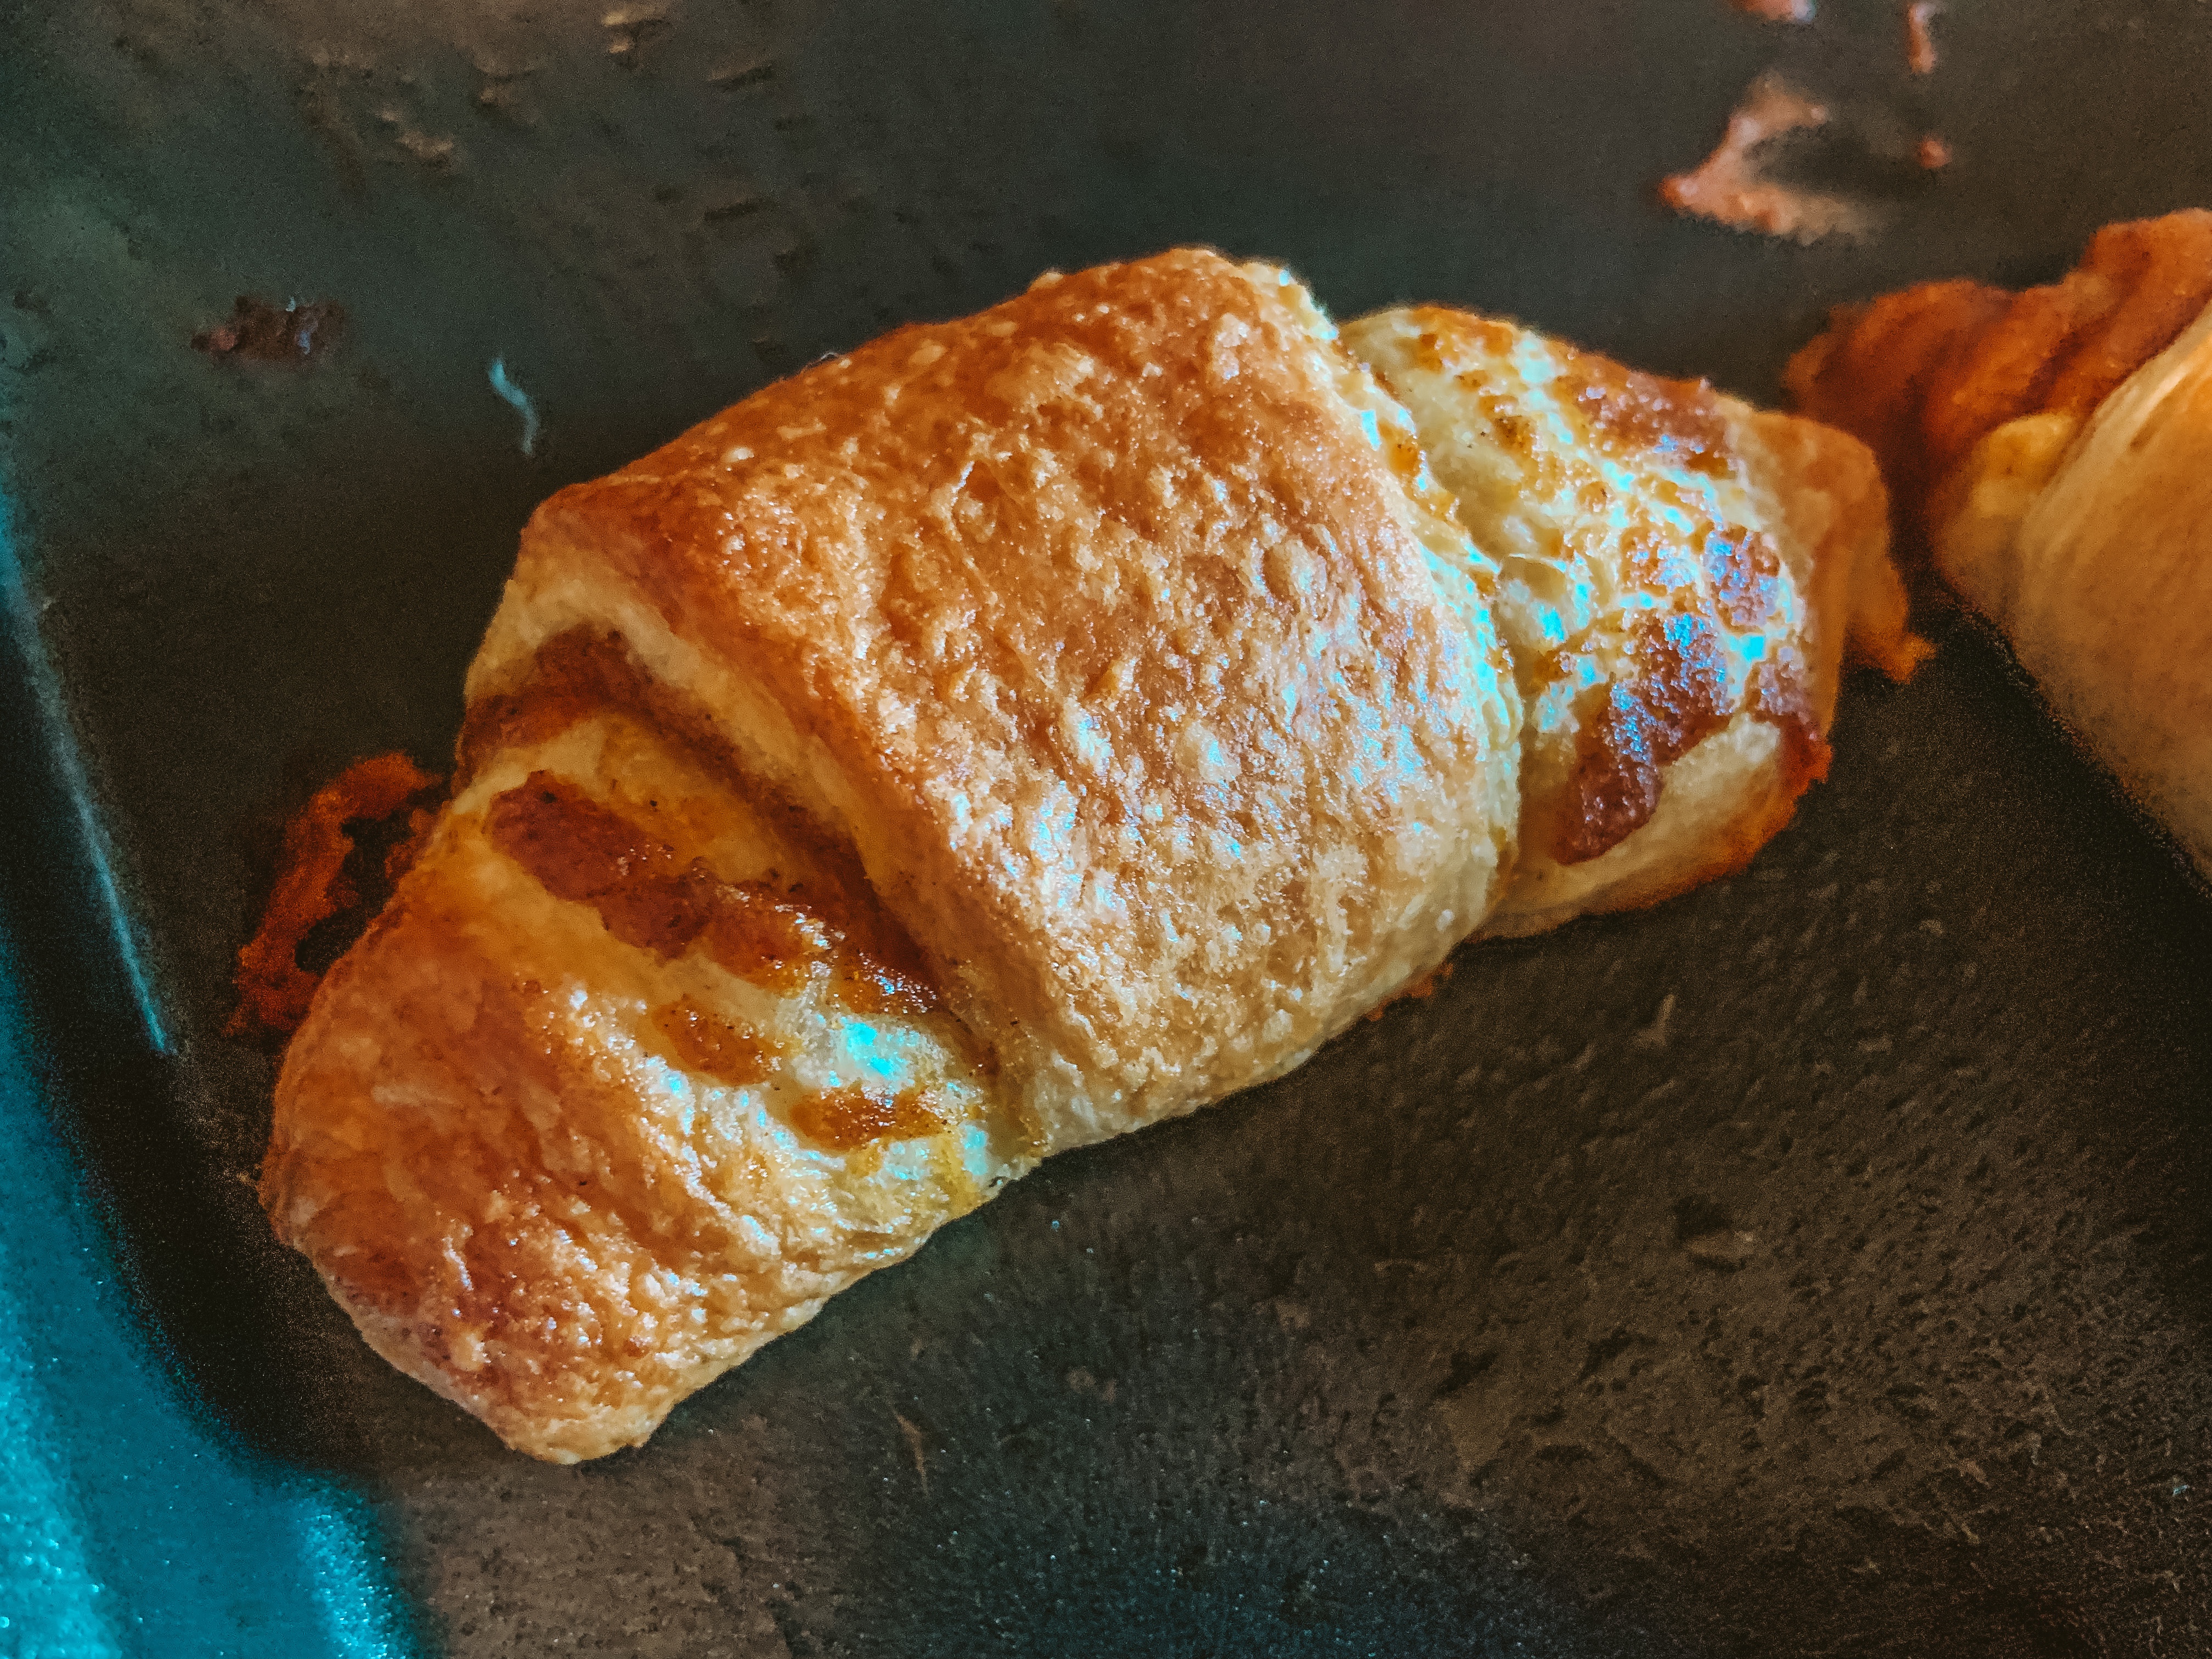
While your oven is warming up, get out your canned biscuits. I always love the way it pops and just expands instantly. It brings make so many childhood memories!

Then, cut your biscuits in small pieces. I just did a cross section in mine to make four bites per biscuit.

Next, melt your butter. Put biscuit bites in a bowl and coat them with butter.

After they’re covered, pour the sugar all over them. I took my hands to mix them up and make sure all sides were covered. Move them to a plan after they’re all good.

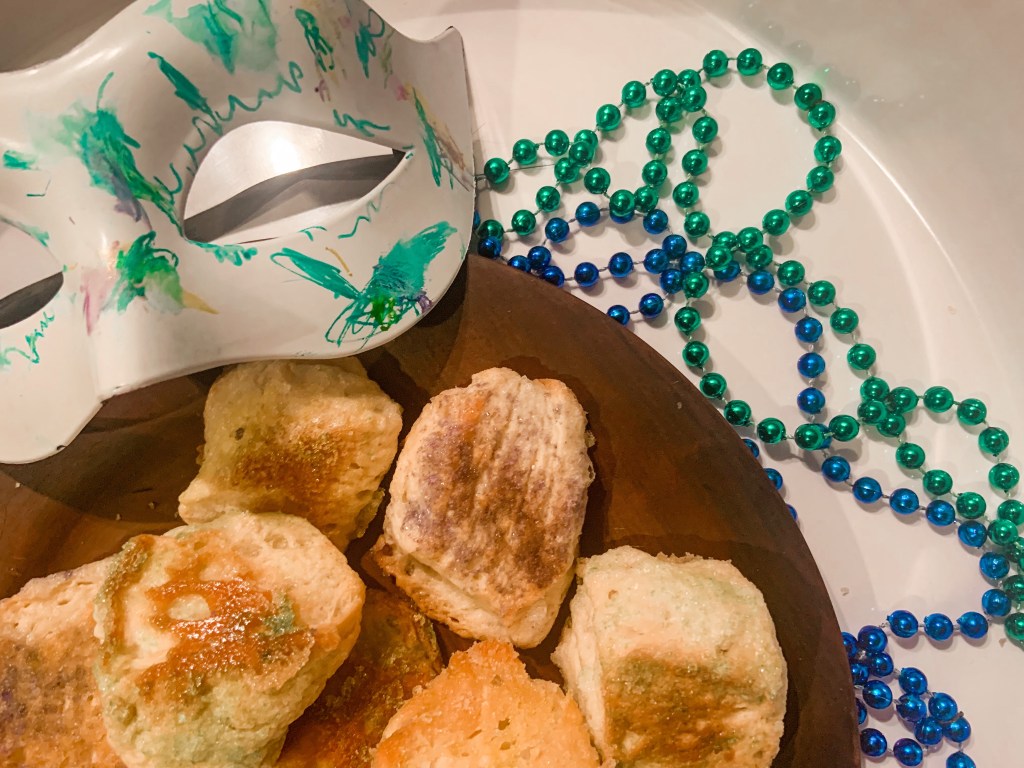
At this point, I added some colored sugar to make them a little more festive for Mardi Gras.

Place them in your oven for 10-15 minutes. Make sure to flip your little beignets half way through too! You’ll know they’re done when they’re a beautiful, golden brown.

You can either dust with powder sugar or enjoy them as is!

We loved how our sweet treat tasted. Plus, it was such a fun way to talk about Mardi Gras with Mika while she did a mini activity too.

Hopefully you can get to make and enjoy these beignets for Fat Tuesday!


If you’re looking for a fun creative piece for Mardi Gras, take a look at what Mila and I did last year. I guarantee your child will love the art and beignet combo!

What’s your favorite Mardi Gras food or tradition? Let me know in the comments.

Advertisement

Chicken Parmesan Sliders Recipe

One of the biggest sports days of the year is coming up. You’ll have your friends and family cheering for you when you bring these Chicken Parmesan Sliders to your Super Bowl party.

After you have these once, you’ll easily want to keep making them for easy week night dinners too.

My family watches the Super Bowl every year. It’s a tradition that I love, even though I’m in it for the commercials and half time show now. Instead of just buying chips and drinks, I made one of my favorite meals into handheld sandwich.

Before I go into how to make this, I’d highly suggest doubling this recipe.

It goes FAST!

But, you’ll score a touchdown with this meal by getting these ingredients:

  • Chicken Nuggets
  • Hawaiian Rolls
  • Pasta or Pizza Sauce
  • Mozzarella Cheese (I used shredded)
  • Parmesan
  • Butter
  • Italian Seasoning

First, cook your chicken nuggets or tenders as directed on their bag or box.

While they are cooking, slice your Hawaiian rolls across the middle leaving a top and a bottom. You won’t want to pull the individual rolls apart.

Before putting the rolls on a cooking sheet, coat the bottom of the sheet with melted butter. After the chicken nuggets are cooked, put your oven to 350.

Place the bottoms of the rolls in the oven for around three minutes. This will toast them and not make the bottoms soggy when you’re eating. Trust me, it’s a much needed step!

When it’s toasted, it’s time to assemble the sliders.

Place a chicken nugget on each roll.

Then, coat them with pizza or pasta sauce. I personally like the taste of pizza sauce better so that’s what I chose to do!

Next, either sprinkle shredded cheese or place mozzarella slices on your sliders. I probably put way too much cheese on mine, but that’s the way I like them! It makes it more satisfying to pull apart after they’re cooked too.

Place the top half of the rolls on top. Add melted butter mixed with Italian seasoning and garlic over the rolls.

Cook in the oven for 18-20 minutes.

Once they’re done, allow them five minutes to cool down before eating.

I love the simplicity and quickness of this recipe. Mila and I both loved it and I know the rest of my family will too.

If you have any left over, they taste great as leftovers!

These Chicken Parmesan Sliders will definitely be in our dinner rotation for a long time. I hope they will be for your family as well


What’s your go to Super Bowl food? Let me know in the comments.

Valentine’s Day Drink: Sweetheart Punch

Whether your spending your Valentine’s Day weekend with your partner or throwing a party for your child, this Sweetheart Punch will be a hit.

Perfectly sweet, you can easily transform this into an adult drink too.

Mila has loved making pink lemonade lately. I think she likes pouring everything in and stirring it up. So, when I was thinking of a fun Valentine’s Day drink, I knew I had to incorporate those elements to make it fun for her.

This Sweetheart Punch has the typical punch ingredients, but elevated with what gives it some color. Here’s what you’ll need:

  • Sprite
  • Raspberry Sherbet
  • Strawberry Kool-Aid Packet
  • Pink Lemonade
  • Sugar
  • Lemon Juice
  • Water
  • Pink Whitney Vodka (optional for adults)

First, Mila and I made the strawberry lemonade. We mixed one strawberry Kool-Aid packed with pink lemonade mix. We followed the instructions on the container to make all of it. You could also just buy premade pink lemonade and add a packet to it too.

At first, it was really sweet. To make it a little more tart, I added lemon juice in it. This made it taste really good to me and Mila didn’t mind cutting out the sweetness either.

When that’s mixed up really good, it’s time to add in the punch elements.

I start off with putting the raspberry sherbet in a glass. Usually, I just do 1/2 of whatever cup of the sherbet.

Then, I filled up until 3/4 of the cup with the strawberry lemonade. The rest of the cup should be topped off with Sprite. When it’s all filled, I usually give it a little spin.

If you’d want to make this an adult drink, add a shot (or two) of Pink Whitney Vodka when you pour the lemonade in. I love this Vodka and it’s perfect with lemonade. I’ve used this in other recipes I’ve shared on the blog.

This drink turned out tasting amazing. Mila and I both enjoyed it and it was easy to make. I’ll definitely be using this again for Mila’s Valentine’s Day party.

I hope you like it too and update me with your thoughts on it.


Let me know in the comments what your favorite type of punch is or what you’ll be drinking on Valentine’s Day.

Week Night Minestrone Soup Recipe

Looking to warm up on a chilly week night? This Minestrone Soup takes a little love, but worth every bite.

Whoever you’re making this delicious meal for, they’ll be sure to love it: especially you!

My favorite soup ay Olive Garden is their minestrone soup. It’s filled with fresh veggies and the broth is always spot on. I knew I had to try to make it at home.

Since I was recently gifted beef broth from Kettle and Fire, it felt like my sign to go get the other ingredients too. Kettle and Fire‘s broth was so easy to work with, tasted amazing, and has all whole food ingredients without any artificial flavors, hormones, or additives. All things I feel 100% happy with giving Mila.

Again, I took a TON of videos and not a lot of pictures. Thankfully the pictures I did get make it look as yummy as it tasted! You can see the video down below.

Here’s the other ingredients you’ll need for this Week Night Minestrone Soup:

  • Kettle and Fire Bone Broth
  • Zucchini
  • Carrot
  • Red beans
  • White beans (Cannellini)
  • Pasta (we used penne)
  • Diced tomatoes (in jar)
  • Onion
  • Garlic
  • Salt and Pepper
  • Italian Seasoning

First, chop up your vegetables and open the can to the tomatoes.

Then, heat olive oil in a pan and soften the onions and carrots (if you have celery, you’d add it here too). Once they’re translucent, add in garlic for a minute.

Next, add in the broth, a few cups of water, and the tomatoes. Bring this to a boil. Then turn down the heat. Let the broth simmer for an hour.

After the hour is up, add in the zucchini, beans, seasoning., and pasta to the pot. I also added two more cups of water too. The pasta soaks up all the juices and I like the broth!

Cook until the pasta is ready.

Once your noodles are all cooked, take the pot off the heat. Now it’s time to enjoy your soup.

I topped my soup off with parmesan cheese, just like they do at Olive Garden. You can always make bread sticks to enjoy with your soup as well.

We had salad to accompany our soup and it was a nice little meal. Since it’s been so cold, we love warming up with soup.

I know you’d love it too!


What’s your favorite week night recipe? Or let me know your favorite Sooo in the comments.

Sparkling Cotton Candy Mocktail

New Years Eve is traditionally has drinks all around. If you have kids or don’t drink, you HAVE to try this Sparkling Cotton Candy Mocktail.

Not only is it pretty and tasty, it’s easy to make with only four ingredients. Trust me, when the ball drops into 2022, you’ll want to be holding this drink in your hand.

I’m always on the look out for fun things to make Mila. When I was browsing Instagram a few days ago, I came across this fun cotton candy drink from @hecticmomlifestyle. Instantly I knew Mila would love it.

So I went and bought everything to test for NYE. Spoiler alert: she and I both loved it so I had to share @hecticmomlifestyle’s recipe!

Here’s what you need to make your NYE sparkle:

  • Sparkling grape juice
  • Cotton candy
  • Marshmallow creme
  • Sugar sprinkles

This drink is simple to make and Mila was amazed by the magic behind it.

First, dip your glass and cover the rim with marshmallow creme. I’ll admit, I made a huge mess on this part and gave it a thick coating. Mila still loved it.

Then, layer sugar sprinkles on the marshmallow creme rim. I suggest using a small plate or bowl.

Here’s the fun and interactive part for kids… or adults… put some cotton candy in the cup. We put a decent amount in since Mila loves the flavor. That’s up to whoever is making it though!

Then, pour in the sparkling grape juice. Of course the cotton candy disappears and your juice will slightly change colors.

After, I garnished her cup with another piece of cotton candy and let her enjoy.

I ended up tasting this drink, before she ate the entire bag of cotton candy. It was surprisingly not overly sugary. If you’d want this mocktail to be a cocktail, I’d suggest using champagne instead of sparkling grape juice to get the same effect.

We’ll definitely be enjoying this drink on NYE. Stay tuned for some fun activities you can do with your child this year.

Here’s some we did last year:


Do you make fun mocktails for NYE? Let me know your drink choice in the comments.

Easy Reindeer Pretzel Bites

Christmas and baking go hand-in-hand. Cookies are great, but these Reindeer Pretzel Bites are easy into make and oh so tasty!

You only need three ingredients and I’ll guarantee Santa will be happy on Christmas Eve.

I actually made these Reindeer Pretzel Bites for Mila’s preschool class. They’re a perfect snack! I only had three reindeer bites per student and filled the rest of the bag with pretzels. It’s great since the kids don’t get all the sugar if they had a bag full of these.

Anyways, here’s all you need for this recipe:

  • Mini pretzels
  • Rollos
  • Red and brown m&m’s

These are a lot of fun to make and Mila got to help a lot!

First, preheat your oven to 250 F.

I would suggest taking the foil off of all the rollos before baking. When I was doing this, Mila picked out the red and brown m&m’s. This small activity that helped me was great for her motor skills and talking about all the colors.

Once the foil was off and colors were separated, we lined as many pretzels as we could on a lined baking sheet.

Then, put rollos on top of the pretzels and bake them for two minutes.

Once they’ve been in there for two minutes, press the m&m’s into them. This is a little tricky. I would suggest holding the pretzels while pushing them down.

Then, place the baking sheet in the freezer for 5 minutes to set them.

These were a lot of fun to make and were pretty tasty too. I stole a few of them after I knew her classmates were covered.

To make these super cute, I added a Christmas tag to the bag and sent them on their way.

I would definitely suggest making these and would be perfect for a holiday party. You could put them in a big bowl and they’d be a hit.


What do you leave out for Santa on Christmas Eve? Or what’s your favorite holiday dessert?

The BEST and EASIEST Jiffy Corn Casserole

Thanksgiving wouldn’t be Thanksgiving without tasty sides. Even though I love all the classics like stuffing and green bean casserole, this Jiffy Corn Casserole is a staple for our family’s Turkey Day!

Like the title of this post says, it’s so easy to make and will be the BEST Jiffy Corn Casserole you’ll ever have.

Intrigued to try? Here’s all you need to make it:

  • 1 can of corn
  • 1 can of creamed corn
  • 2 large eggs
  • 1 box of Jiffy corn muffin mix
  • 1 stick of butter
  • 8 ounces of sour cream
  • 1/4 cup of sugar

First, preheat your oven to 350 degrees Fahrenheit.

Then, in a large bowl or your greased/nonstick sprayed casserole dish, mix in all the ingredients. Just mix until it’s all together, minus the corn!

Afterwards, stick the uncovered casserole dish in the oven for 45-50 minutes and you’re done.

The first time I ever made this recipe, I was shocked! It tasted so good. It’s almost like corn bread, but softer and better? I’m unsure how to explain it. My best comparison is to Chi-Chi’s corn side.

Hello to that Chi-Chi’s throwback!

If you don’t like corn casserole sweet, just take out the sugar and you can still make it. My family usually likes cheese on top of it too. If I decide to make the casserole with cheese, I’ll sprinkle shredded cheese on, then put it in the over to melt it.

It just makes it even tastier!

Mila usually helps me mix everything together, but it doesn’t take any time at all. It’s so easy and tasty that your family and/or friends will ask you to make it for all your get-togethers!


What’s your go to side to make for Thanksgiving or any other type of gathering?

Pumpkin Pie Crescent Rolls

Want to know my favorite part of Thanksgiving dinner? The desserts! I think it’s a lot of people’s favorite part too. Pumpkin pie, in my opinion, is the best pie of the day.

This year, I’ve taken this classic dessert and out a little twist to it and made: Pumpkin Pie Crescent Rolls.

Even though I love pumpkin pie, these Pumpkin Pie Crescent Rolls taste even better!

Here what you’ll need to make them:

  • 2 crescent roll tubes
  • 1 cup of pumpkin purée
  • 2 egg yolks
  • 1/4 cup packed brown sugar
  • 1/4 cup granulated sugar
  • 1 tablespoon pumpkin spice
  • 1 teaspoon vanilla

First, preheat your oven to 375 F. Then you can line your baking sheet with parchment paper or spray your sheet with nonstick spray.

I used nonstick spray and they turned out great.

Then, mix the pumpkin purée, sugar, brown sugar, egg yolks, pumpkin spice, and vanilla in a bowl.

Next, unroll your crescent rolls. You can cut them in half, but I just went with how they were packaged instead of making smaller rolls.

After unrolling the rolls, spoon one tablespoon (or make your best judgment) of pumpkin pie filling on to the crescent roll. I liked putting a little extra so some of the filling came out.

Next, put them in the oven for 10-12 minutes and they’re done!

I ended up putting sugar and pumpkin spice on them when they were finished. It just made the flavoring pop more.

And who doesn’t love extra pumpkin spice.

Although we ate them as is, I think they’d be delicious with whipped cream or ice cream. Maybe even some caramel drizzle over them too! Either way, you’ll want to take these to your Thanksgiving dinner!


What’s your favorite Thanksgiving dessert?

Thanksgiving Treat: Rice Krispie Turkeys

The holiday season goes so quick! I’ve been thinking of Thanksgiving Treats and how to make them festive. Eventually, I came up with these Rice Krispie Turkeys.

All made from leftover Halloween candy, these turkeys are cute and perfect for Thanksgiving.

All I used to make these turkeys are:

  • Rice Krispies
  • Candy corn
  • Eye sprinkles
  • Twizzlers
  • Feathers

As I mentioned above, everything I used to make these came from Mila’s candy stash. We got a ton of mini Rice Krispie treats and this seemed like a fun way to use them. There was always an abundance of candy corn left from the Fall Scarecrow Snack Mix.

I ended up cutting little slices of a twizzler to make the turkey’s wattle. Yes, that’s what it’s called.

Then, of course, we used eye sprinkles to complete the look.

To assemble, you simple just press everything into the Rice Krispie. It’s not too difficult. One tip I’d give you is to use your hands to hold the shape of the Rice Krispie while pressing everything else in.

That way none of the ‘feathers’ or eyes fall out.

To complete the look, I added a craft feather to the back. I think it looked adorable. I’d suggest wrapping washi tape around the feather so it doesn’t stick to the Rice Krispie.

Another added bonus of this fun Thanksgiving treat is that Mila loved helping make the faces too! This could end up being a really fun activity for Thanksgiving day with the family. Im always looking for kids activities to keep them busy and smiling.

Either way, these Rice Krispie Turkeys are tasty, easy to make, and will be perfect for your Thanksgiving Day.


What foods or treats do you make for Thanksgiving or Friendsgiving? Let me know in the comments.

Fall Scarecrow Snack Mix

This week was my first time ever sending in a preschool snack with Mila. It was an exciting mom moment for me! Of course, I made sure it was a nut free mix that everyone would enjoy. Then we came up with the Fall Scarecrow Snack Mix.

Here’s everything I used to make this nut free Scarecrow Snack Mix:

  • Pretzels
  • Chex Cereal
  • Caramel Corn
  • m&m’s
  • Candy Corn
  • Candy Pumpkins
  • Rollos

The best part of this mix is it’s super easy to put together. All you have to do is find a big bowl and pour everything in.

Unfortunately, my big bowls weren’t big enough, so I had to keep making the mix over and over again. Good thing it’s easy and doesn’t take a lot of time to do it!

One thing I wish I would have gotten more of was the caramel corn. When I went to Target, they were almost sold out of the ‘monster mix.’ The monster mix just have chocolate drizzle and sprinkles. Some of the other caramel corn had pecans and other nuts. Obviously, I didn’t want to send any type of nuts to a preschool classroom in case of allergies.

Mila loved this mix, but she was definitely picking out all of the chocolate and Chex cereal!

I loved making this Fall Scarecrow Mix for Mila’s preschool party… and keeping the extras at home for us to share too. Here’s the little Tik Tok video I made to show how I made it all. Even though it’s pretty self explanatory, I loved how it all came together.

The end result is beautiful too!


What is your favorite snack or food item to share at classroom parties? I’d love some Christmas suggestions.