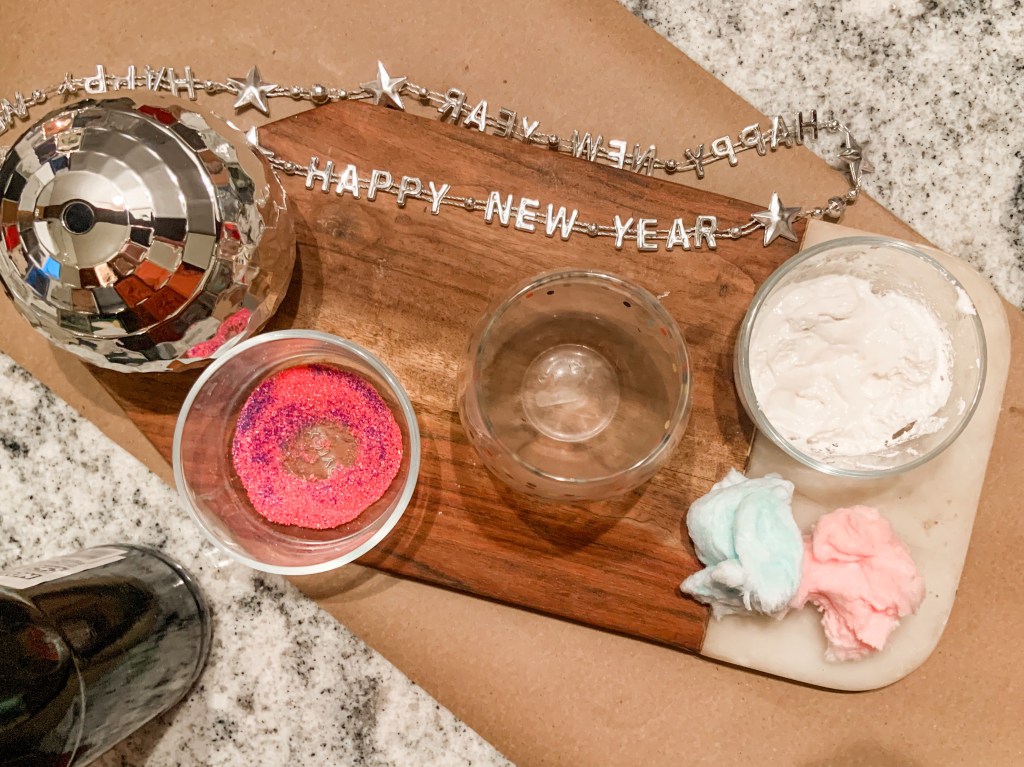
New Years Eve is traditionally has drinks all around. If you have kids or don’t drink, you HAVE to try this Sparkling Cotton Candy Mocktail.
Not only is it pretty and tasty, it’s easy to make with only four ingredients. Trust me, when the ball drops into 2022, you’ll want to be holding this drink in your hand.
I’m always on the look out for fun things to make Mila. When I was browsing Instagram a few days ago, I came across this fun cotton candy drink from @hecticmomlifestyle. Instantly I knew Mila would love it.
So I went and bought everything to test for NYE. Spoiler alert: she and I both loved it so I had to share @hecticmomlifestyle’s recipe!
Here’s what you need to make your NYE sparkle:
Sparkling grape juice
Cotton candy
Marshmallow creme
Sugar sprinkles
This drink is simple to make and Mila was amazed by the magic behind it.
First, dip your glass and cover the rim with marshmallow creme. I’ll admit, I made a huge mess on this part and gave it a thick coating. Mila still loved it.
Then, layer sugar sprinkles on the marshmallow creme rim. I suggest using a small plate or bowl.
Here’s the fun and interactive part for kids… or adults… put some cotton candy in the cup. We put a decent amount in since Mila loves the flavor. That’s up to whoever is making it though!
Then, pour in the sparkling grape juice. Of course the cotton candy disappears and your juice will slightly change colors.
After, I garnished her cup with another piece of cotton candy and let her enjoy.
I ended up tasting this drink, before she ate the entire bag of cotton candy. It was surprisingly not overly sugary. If you’d want this mocktail to be a cocktail, I’d suggest using champagne instead of sparkling grape juice to get the same effect.
We’ll definitely be enjoying this drink on NYE. Stay tuned for some fun activities you can do with your child this year.
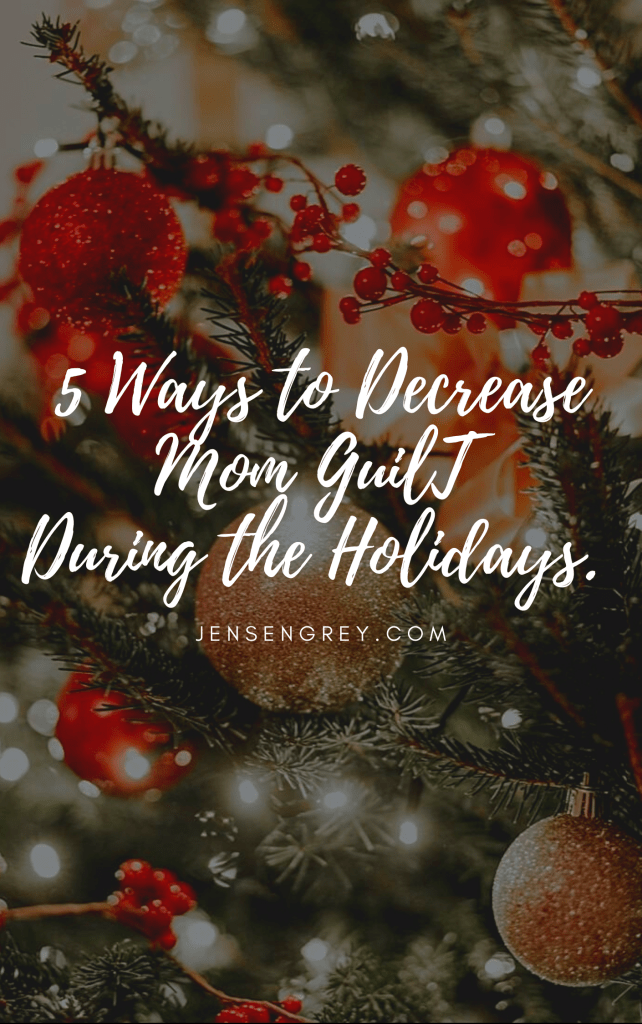
Christmas is almost here and mom guilt is in full effect. There’s presents to be wrapped, the kids asked for a new toy from Santa, and the cookies haven’t been baked yet. All while you still have to parent, work, and everything else too.
Not thinking you can get everything off your Christmas Bucket List done or making the holiday season as magical as it can be, it makes you feel bad.
In efforts to be nice to myself, I wanted to share some ways to I decrease mom guilt during the holidays with you.
Take a Deep Breath
Whenever I feel myself spiraling into mom guilt, I try to calm myself. Usually, I just need to take a deep breath and realize my thoughts and emotions are getting the best of me.
Believe me, I get it. There’s a ton to do, but if you can calm yourself with a deep breath and taking things one step at a time, it will help. In that moment you can realize what’s really important and what you can handle in the next five minutes, hour, or day.
You are one person and it feels like the world is on your shoulders. Don’t forget to breathe and remember you’re doing your best.
Buy Premade Crafts/Baked Goods
I have a love/hate relationship with Instagram. It makes me feel creative and show other parents easy activities to do with your kids.
On the other hand, there are times I have NO idea how everyone’s getting things done… and so beautifully! It can make me feel guilty about where I am with the holidays or coming up with unique crafts or baking all kinds of cookies from scratch.
My big tip… buy premade crafts and baked goods. They don’t even need to be all the way done.
If you walk into Joann Fabrics or any craft store (even the dollar store), there are a ton of different fun Christmas crafts and activities. Mila and I have done quite a few this year and it was just as fun… with just as cute outcomes.
Plus, I am all for buying cake boxes so I don’t have to think about all the ingredients. Or they had premade cut outs that all you had to do was bake and decorate.
This is such a time saver for me while still giving me that feeling of doing jolly holiday activities.
Involve Your Child
Kids are seriously magical. They want to help whenever they can and what they do always turns out so precious… or hilarious.
Mila helps me out with so many different things during the holiday season:
The root of the holidays and making traditions are the kids… so make them the center of it.
Cookies, presents, and all the other home things do not have to be perfect; especially during the holidays. I think it’s more special knowing a child helped with all of these things. It teaches them and helps you out too.
Another part of mom guilt and worry during the holidays is money. Mila and I always try to make gifts and they’re usually the ones most loved.
Involving children in the holiday hustle can really help with mom guilt and making memories too.
Take Care of You
If you’re anything like me, I put myself on the back burner. I constantly try to put others ahead of me and make sure the ones I love have everything they need… even if I don’t.
Whenever I’m in a bad mental place, I feel like my mom guilt is worse. I’m not at my best (or nicest) to Mila. It makes stressful times like the holidays way more intense. Not only do I feel bad on the inside, everyone else can feel it too.
Even when you have a million things to do, make space for you.
I know it’s hard, but you need and deserve it.
Personally, I love wrapping presents. It’s really relaxing to me and I make sure to put one of my favorite movies on with a big cup of peppermint hot chocolate. Honestly, it’s not much, but it gives myself space and takes care of my needs.
I would also suggest trying to get a babysitter so you can do things like that OR a self care day during this time.
The biggest message I’m trying to convey is to not forget about yourself. You are important and need to be taken care of just like everyone else, no matter the time of year.
Live in the Moment
Through the craziness of the holidays and trying to plan everything out, try to live in the moment.
Whenever I get so busy and planned out, I feel myself slip into autopilot or going through the motions. Honestly, the best parts of this past month is the moments not planned.
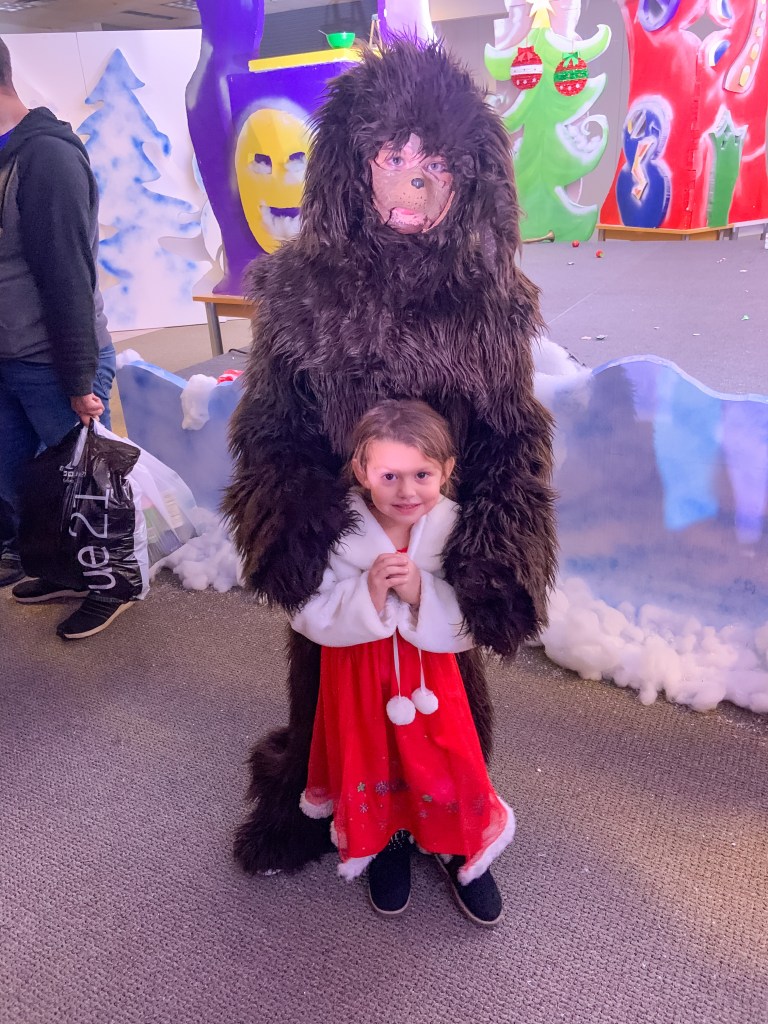
Mila and I went to the Akron Zoo’s Wild Lights on a whim. It wasn’t planned and we had so much fun. Another time, we were asked to go watch a play of The Grinch a couple hours before it started. Again, it was so much fun.
It’s easy to fall into checking things off your list, b it you can’t forget to live either.
Whenever I feel guilty as Mila watches a show while I’m rushing around, we hop in the car and go look at Christmas decorations and lights. It’s simple, but puts a smile on both of our faces.
Life is way too short to feel guilt and not soak up all these moments.
No matter what you need to do during this holiday season, remember you are doing your best. There’s no need to feel guilty. You are the best mom and parent to your child.
I promise they see your hard work and love you so much for it and for you just being their parent.
What ways do you decrease mom guilt during the holidays? Let us know in the comments.
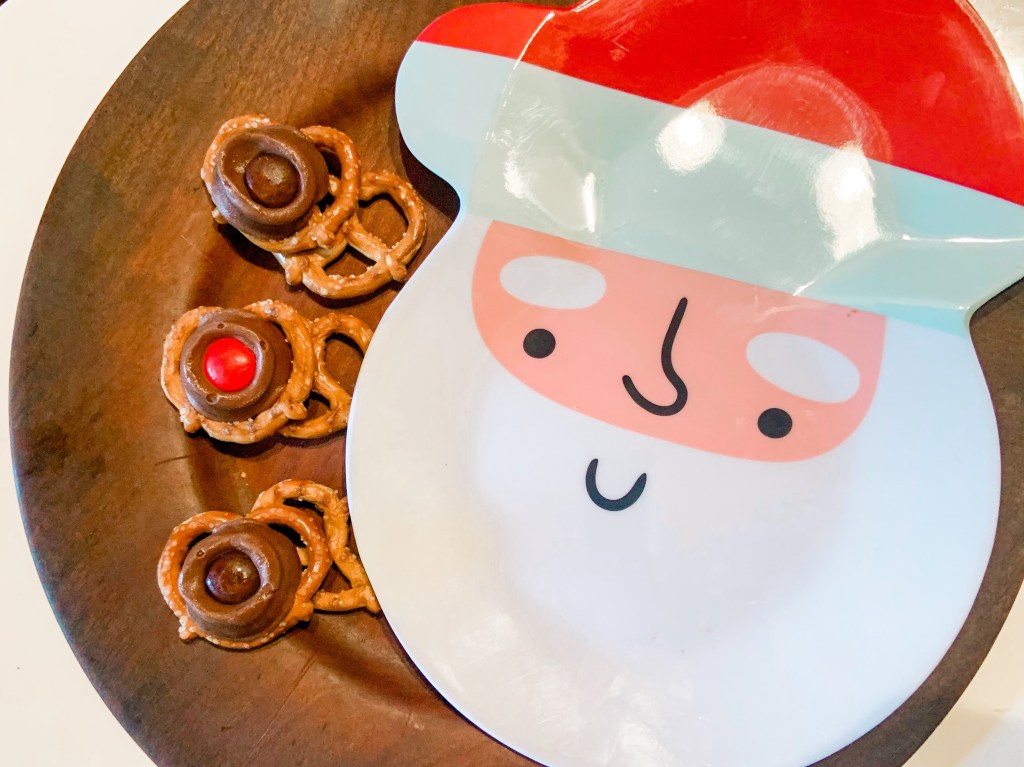
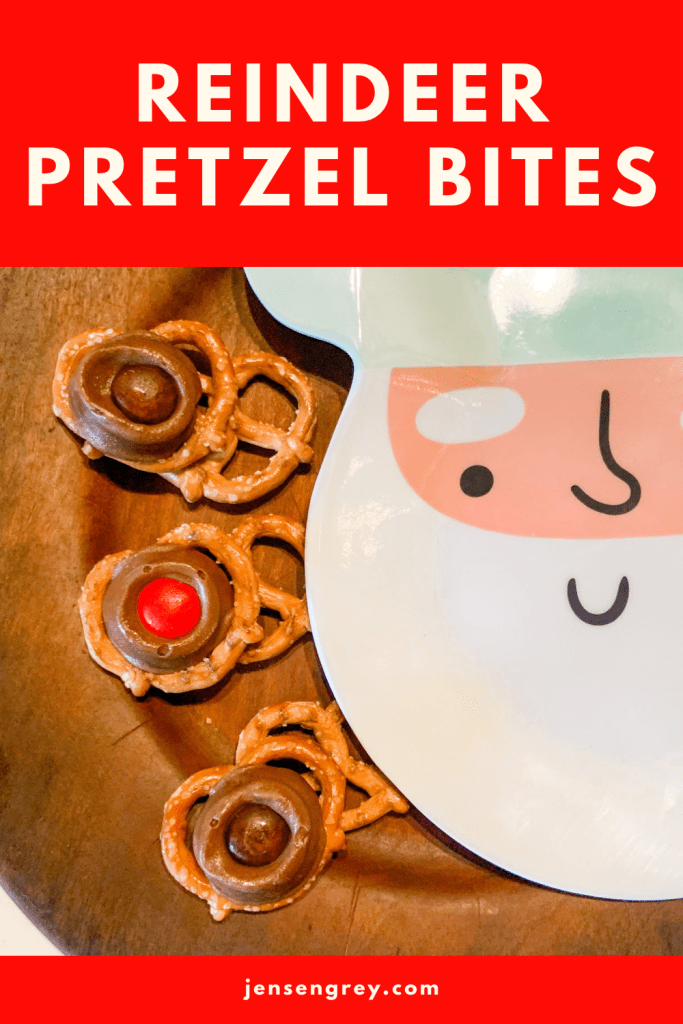
Christmas and baking go hand-in-hand. Cookies are great, but these Reindeer Pretzel Bites are easy into make and oh so tasty!
You only need three ingredients and I’ll guarantee Santa will be happy on Christmas Eve.
I actually made these Reindeer Pretzel Bites for Mila’s preschool class. They’re a perfect snack! I only had three reindeer bites per student and filled the rest of the bag with pretzels. It’s great since the kids don’t get all the sugar if they had a bag full of these.
Anyways, here’s all you need for this recipe:
Mini pretzels
Rollos
Red and brown m&m’s
These are a lot of fun to make and Mila got to help a lot!
First, preheat your oven to 250 F.
I would suggest taking the foil off of all the rollos before baking. When I was doing this, Mila picked out the red and brown m&m’s. This small activity that helped me was great for her motor skills and talking about all the colors.
Once the foil was off and colors were separated, we lined as many pretzels as we could on a lined baking sheet.
Then, put rollos on top of the pretzels and bake them for two minutes.
Once they’ve been in there for two minutes, press the m&m’s into them. This is a little tricky. I would suggest holding the pretzels while pushing them down.
Then, place the baking sheet in the freezer for 5 minutes to set them.
These were a lot of fun to make and were pretty tasty too. I stole a few of them after I knew her classmates were covered.
To make these super cute, I added a Christmas tag to the bag and sent them on their way.
I would definitely suggest making these and would be perfect for a holiday party. You could put them in a big bowl and they’d be a hit.
What do you leave out for Santa on Christmas Eve? Or what’s your favorite holiday dessert?
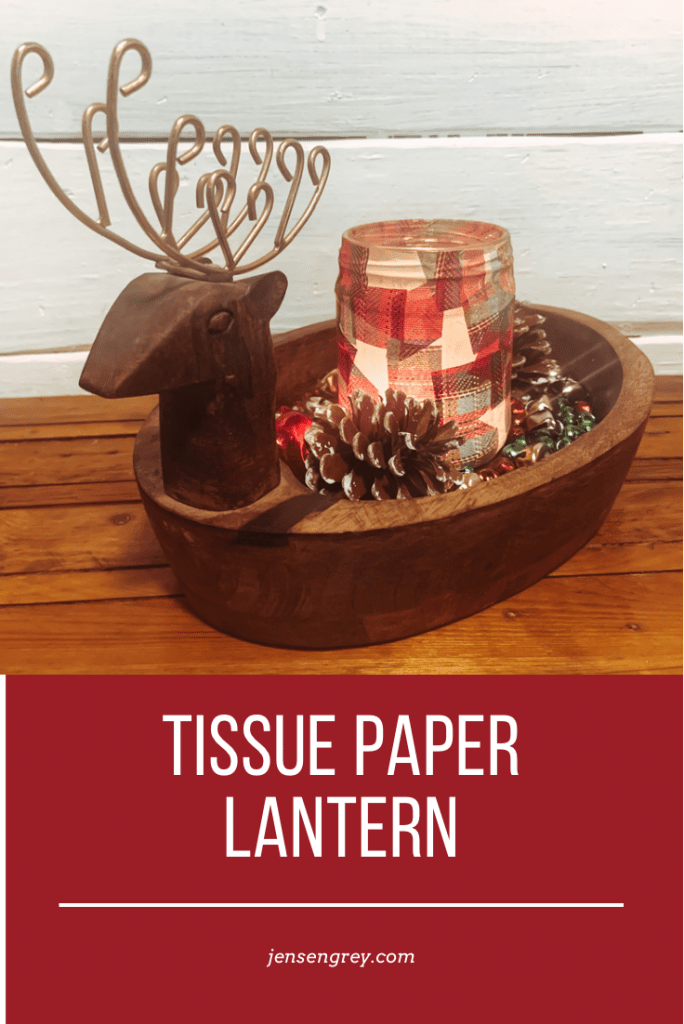
We love fun traditions in our house. Any time I can be transformed back into childhood, I’m all for it. Especially when I get to pass it on to Mila. One of my favorites crafts in elementary school were Tissue Paper Lanterns, so we made a Christmas themed one.
There are a ton of different skills in this DIY for Mila and now we have another tradition we can do every year.
Another part of this DIY that I love is it’s an upcycle project! Here’s what you’ll need:
Mason Jar or Recycled Glass Jar
Tissue Paper
Modge Podge or DIY Modge Podge (Glue and Water)
Paint or Foam Brush
To start off, I had Mila cut pieces of tissue paper into squares or smaller pieces. We’re always trying to work on scissor skills and she really enjoys it too. With a little help from me, we had more than enough pieces of tissue paper.
Then, we took our DIY modge podge to put it all together. To make DIY modge podge, just use regular, white glue and add water into it. It should mix into a modge podge consistency. You can see a picture of it down below too. It’s just a more watered down glue consistency that’s easy to spread with a paintbrush.
Mila and I worked in sections. We’d put paint on, then put a layer of tissue paper over top. After it was glued down, we put another thin layer of DIY modge podge on top.
After you fill in all the sections, just let it fully dry. It doesn’t take too long at all.
Once it’s dried, you can put a small candle in it and the light shines through beautifully. I absolutely loved how it turned out and it was easy to do with Mila. Hopefully we can keep making them every year with different patterned tissue paper. Just make sure to add the year on the lantern somewhere.
I ended up putting it as a centerpiece on our dining room table. It looks so cute and I love showcasing all her DIYs and crafts.
Do you ever make a craft over snd over again? If so, what do you make?
DIY’ing and Christmas go hand-in-hand. So, we’re adding a little sparkle and pink to this season with this DIY Christmas Ornament Garland.
Mila and I love glitter and all things girly. This garland felt like it belonged in our home.
The best part of this DIY is you can personalize a DIY Christmas Ornament Garland to your style and it’ll be just as cute! Plus, I spent around $25 dollars for everything you see here. I think that’s a great deal for something that was easy to make and perfect for our family.
Everything you see here (minus the first ornament on the left) comes from Target. It consists of:
Ornaments
Flocked Garland
Tree Pick (Christmas Tree Filler)
Yarn/Ribbon
On Black Friday, I found most of these items at Target. They had most of their ornaments for $3, which are so cute! We love pink and have a ton of it in our home, so I knew it was a good purchase. The selection Target had was perfect. There were inclusive pieces and different textures that had to go home with us.
The flocked garland is probably 5 foot long. I wrapped it through these hooks and folded it back to make it look thicker. Then I put in the metallic tree pick for a fuller look too.
After it was up and placed how I liked it, I just started adding ornaments. To make some of them look longer, I used ribbon or yarn.
I love the layered look and how everything meshes together.
Not only do I love how it turned out, it only took me twenty minutes to make. It’s a simple, statement piece that I’m proud to have in my home.
I know that any person can something similar with ornaments that they love.
How do you decorate for Christmas? Classic reds or green? Or do you have your own style with it?
Happy Thanksgiving everyone! This year, I’m trying to start a new tradition with my family: a DIY Thanksgiving Gratitude Sign.
Since there’s been so many events, people, and things in general that have happened in our family, I thought it’d be special for everyone to write it all out. It’ll be a snapshot of gratitude.
Who doesn’t need a little dose of that?
Like this year’s Christmas Bucket List, our DIY Gratitude Sign only uses craft paper and markers. To make it a little more special, I used some left overs fall elements from a centerpiece.
Then, just add tape to the back and it’s ready to go.
I added the first three items to the list: family, health, and laughter.
After looking at it, I decided to add my name to the sign too. Hopefully all my family will so we can all see what everyone says.
I think this will be a beautiful tradition for my family. It’s something I want to do with Mila as she gets older. Even if she’s not in a positive space, I want her to know that I’m always thankful for her. Plus, sometimes the things you’re most thankful for are ‘small.’
This simple and easy to make gratitude sign will make a big impact on Thanksgiving Day.
I hope everyone has a Happy Thanksgiving and holds their loved ones close this year and for as long as they can.
With that, I know so many people grieving through the holidays. They are so hard. I miss Jensen everyday and am so thankful that he was in my life. No matter if you can’t think of anything else to be thankful for, I know a name can be powerful. Write and say your loved ones names.
I know anytime I hear Jensen’s name, I’m so thankful others are thinking of him. I’ll never be able to thank him and Mila for choosing me to be their mom.
How do you talk about gratitude during the holidays? Do you have a tradition like this? Let me know in the comments.
Quirky Turkeys don’t always have feathers, sometimes they have spots. At least that’s what Mila says. This easy craft is perfect if you run out of feathers or just want to give your child a simple turkey craft.
Plus, It turns out really abstract, which makes this one of my favorite turkeys of the year!
As I’ve said over and over again, I try to find crafts and activities that are easy for Mila to do by herself. This gives me time to clean or cook a dish for Thanksgiving. It also promotes her being independent and in turn it helps her with her confidence. Little ones need all the confidence to get by in the world.
For this activity, we only used a few things. That means it was SUPER simple to set up for her… and me!
To start off, I made a turkey head and face. I used cardboard from a box, googly eyes, and random scrapbook/construction paper that I had leftover. Your child could have also made a turkey face too.
Then, I unscrewed the tops of the bingo markers and told her to make the turkey’s feathers with them.
I actually love using bingo markers in crafts and activities. They aren’t very messy, unless your child goes wld with them. They also are pretty cheap. I found these at the dollar store and we’ve had them for quite a while. Plus, there’s a lot of different colors you can find!
The only other thing I instructed Mila to do was to fill up the background. You could also have your kids sort the colors or do different numbers of dots for more learning.
When I look at her last quirky turkey of the year, I keep seeing a rainbow in the background. I don’t think she meant to do it like this, it just feels really symbolic. All her turkeys this year have been so great. As always, I’m just so proud of her.
This is another activity you can easily do before Thanksgiving or on Thanksgiving Day. I hope if you do, your child loves it as much as Mila did!
What are your favorite turkey or Thanksgiving inspired crafts? If you have any links, please feel free to post them in the comments. I’d love to share and maybe do them next year too!
If you’re looking for more crafts that Mila and I have done for Thanksgiving, here they are:
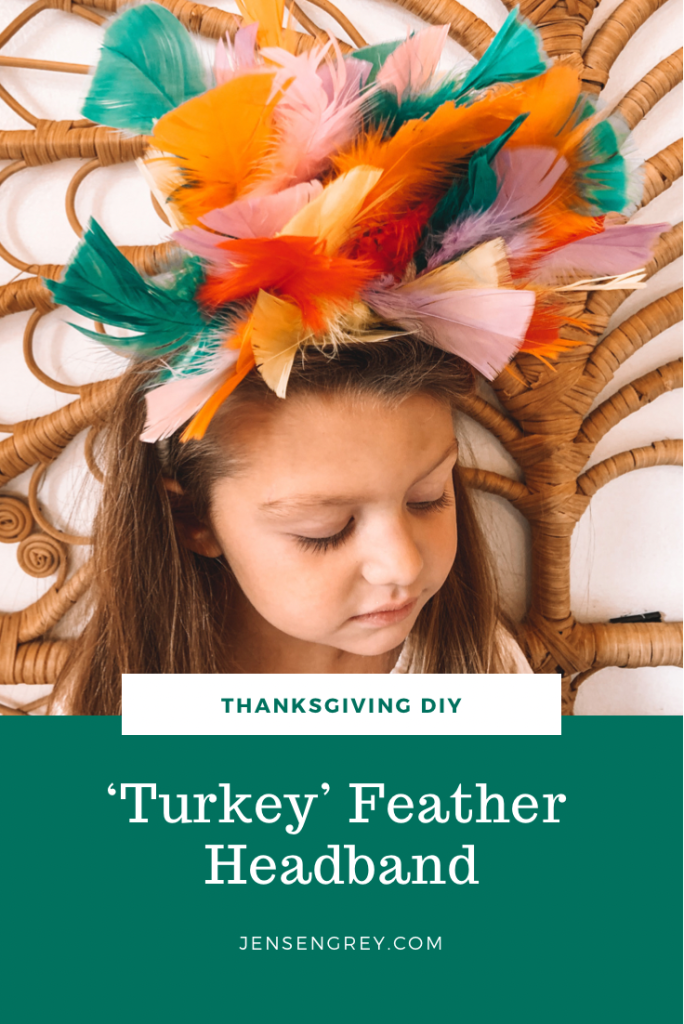
Since Mila loved her Googly Eye Headband at Halloween, I knew she needed the perfect hair accessory for Thanksgiving.
With a little imagination and a lot of feathers, I came up with a Turkey Feather Headband.
I’ve said it once and I’ll say it again here, feathers are to Thanksgiving as eyes are to Halloween. They make all Thanksgiving crafts and activities just a little more special. The best part of each… they can both be found at dollar stores!
Another similarity… I got almost all of the items to make this headband at the dollar store too. Everything besides the yarn!
Feathers
Fluffy kitty headband
Hot glue/gun
Yarn
To start, I took off the ears of the kitty headband and hot glued them back on. I put them bottom on the band and close together. This way the feathers stick up.
Then I wrapped the band and the ears with yarn. This took a little bit of time, but make sure to use hot glue where the yarn starts and stops. I didn’t have to hot glue the entire time. Thankfully because that would have burnt my fingers.
After it’s covered in yarn, I stuck feathers in by the ear part through the yarn. I made sure to add a little hot glue so the feathers didn’t fall out.
I ended up using a ton of feathers, especially since I covered the front end back of the headband. At first I just had the front done, but I think having both made it more complete and full looking.
When Mila saw it, she instantly fell in love! Of course she wants to wear it to preschool one day this coming week!
I’ll try to make a clip with a few feathers too.
Maybe now she’ll want to dress up for Thanksgiving Day. We usually take a cute outfit AND something comfortable to wear. Especially after eating all the turkey!
No matter what, I think this Turkey Feather Headband will be making an appearance.
Let me know in the comments whether you dress up or down for Thanksgiving. I’ll let you know what Mila ends up deciding to do.
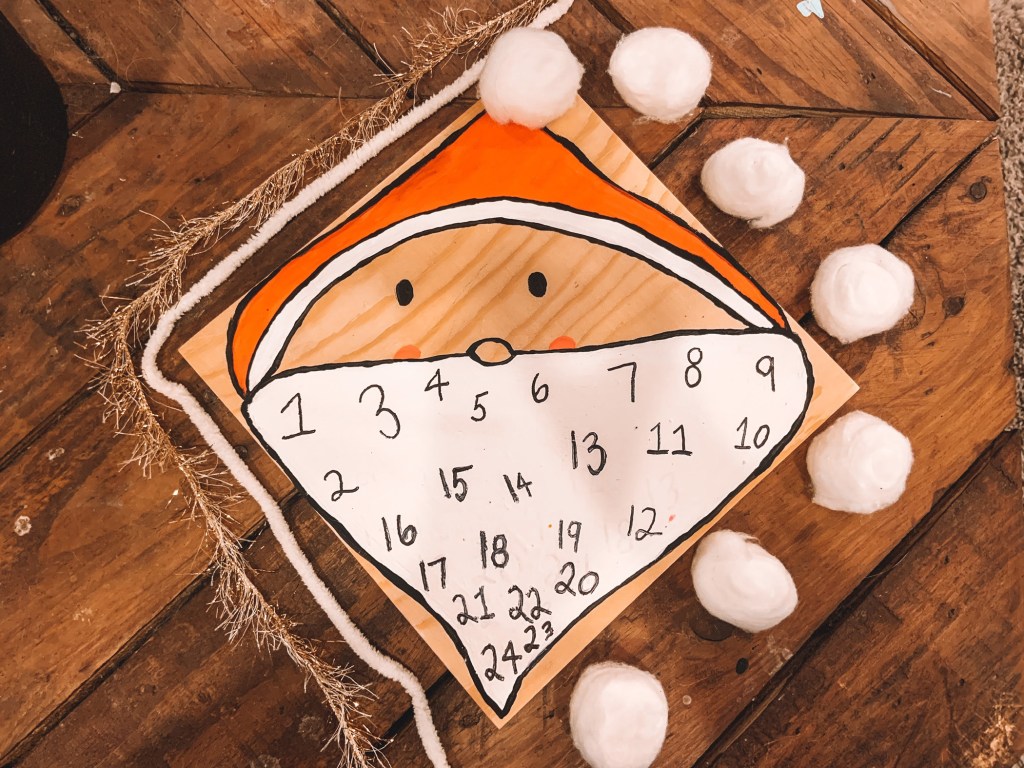
There’s thirty-six days left until Christmas! We’re getting so close to advent season and counting down to Christmas everyday.
Although we have our normal candy one, this year I thought Mila and I should make another.
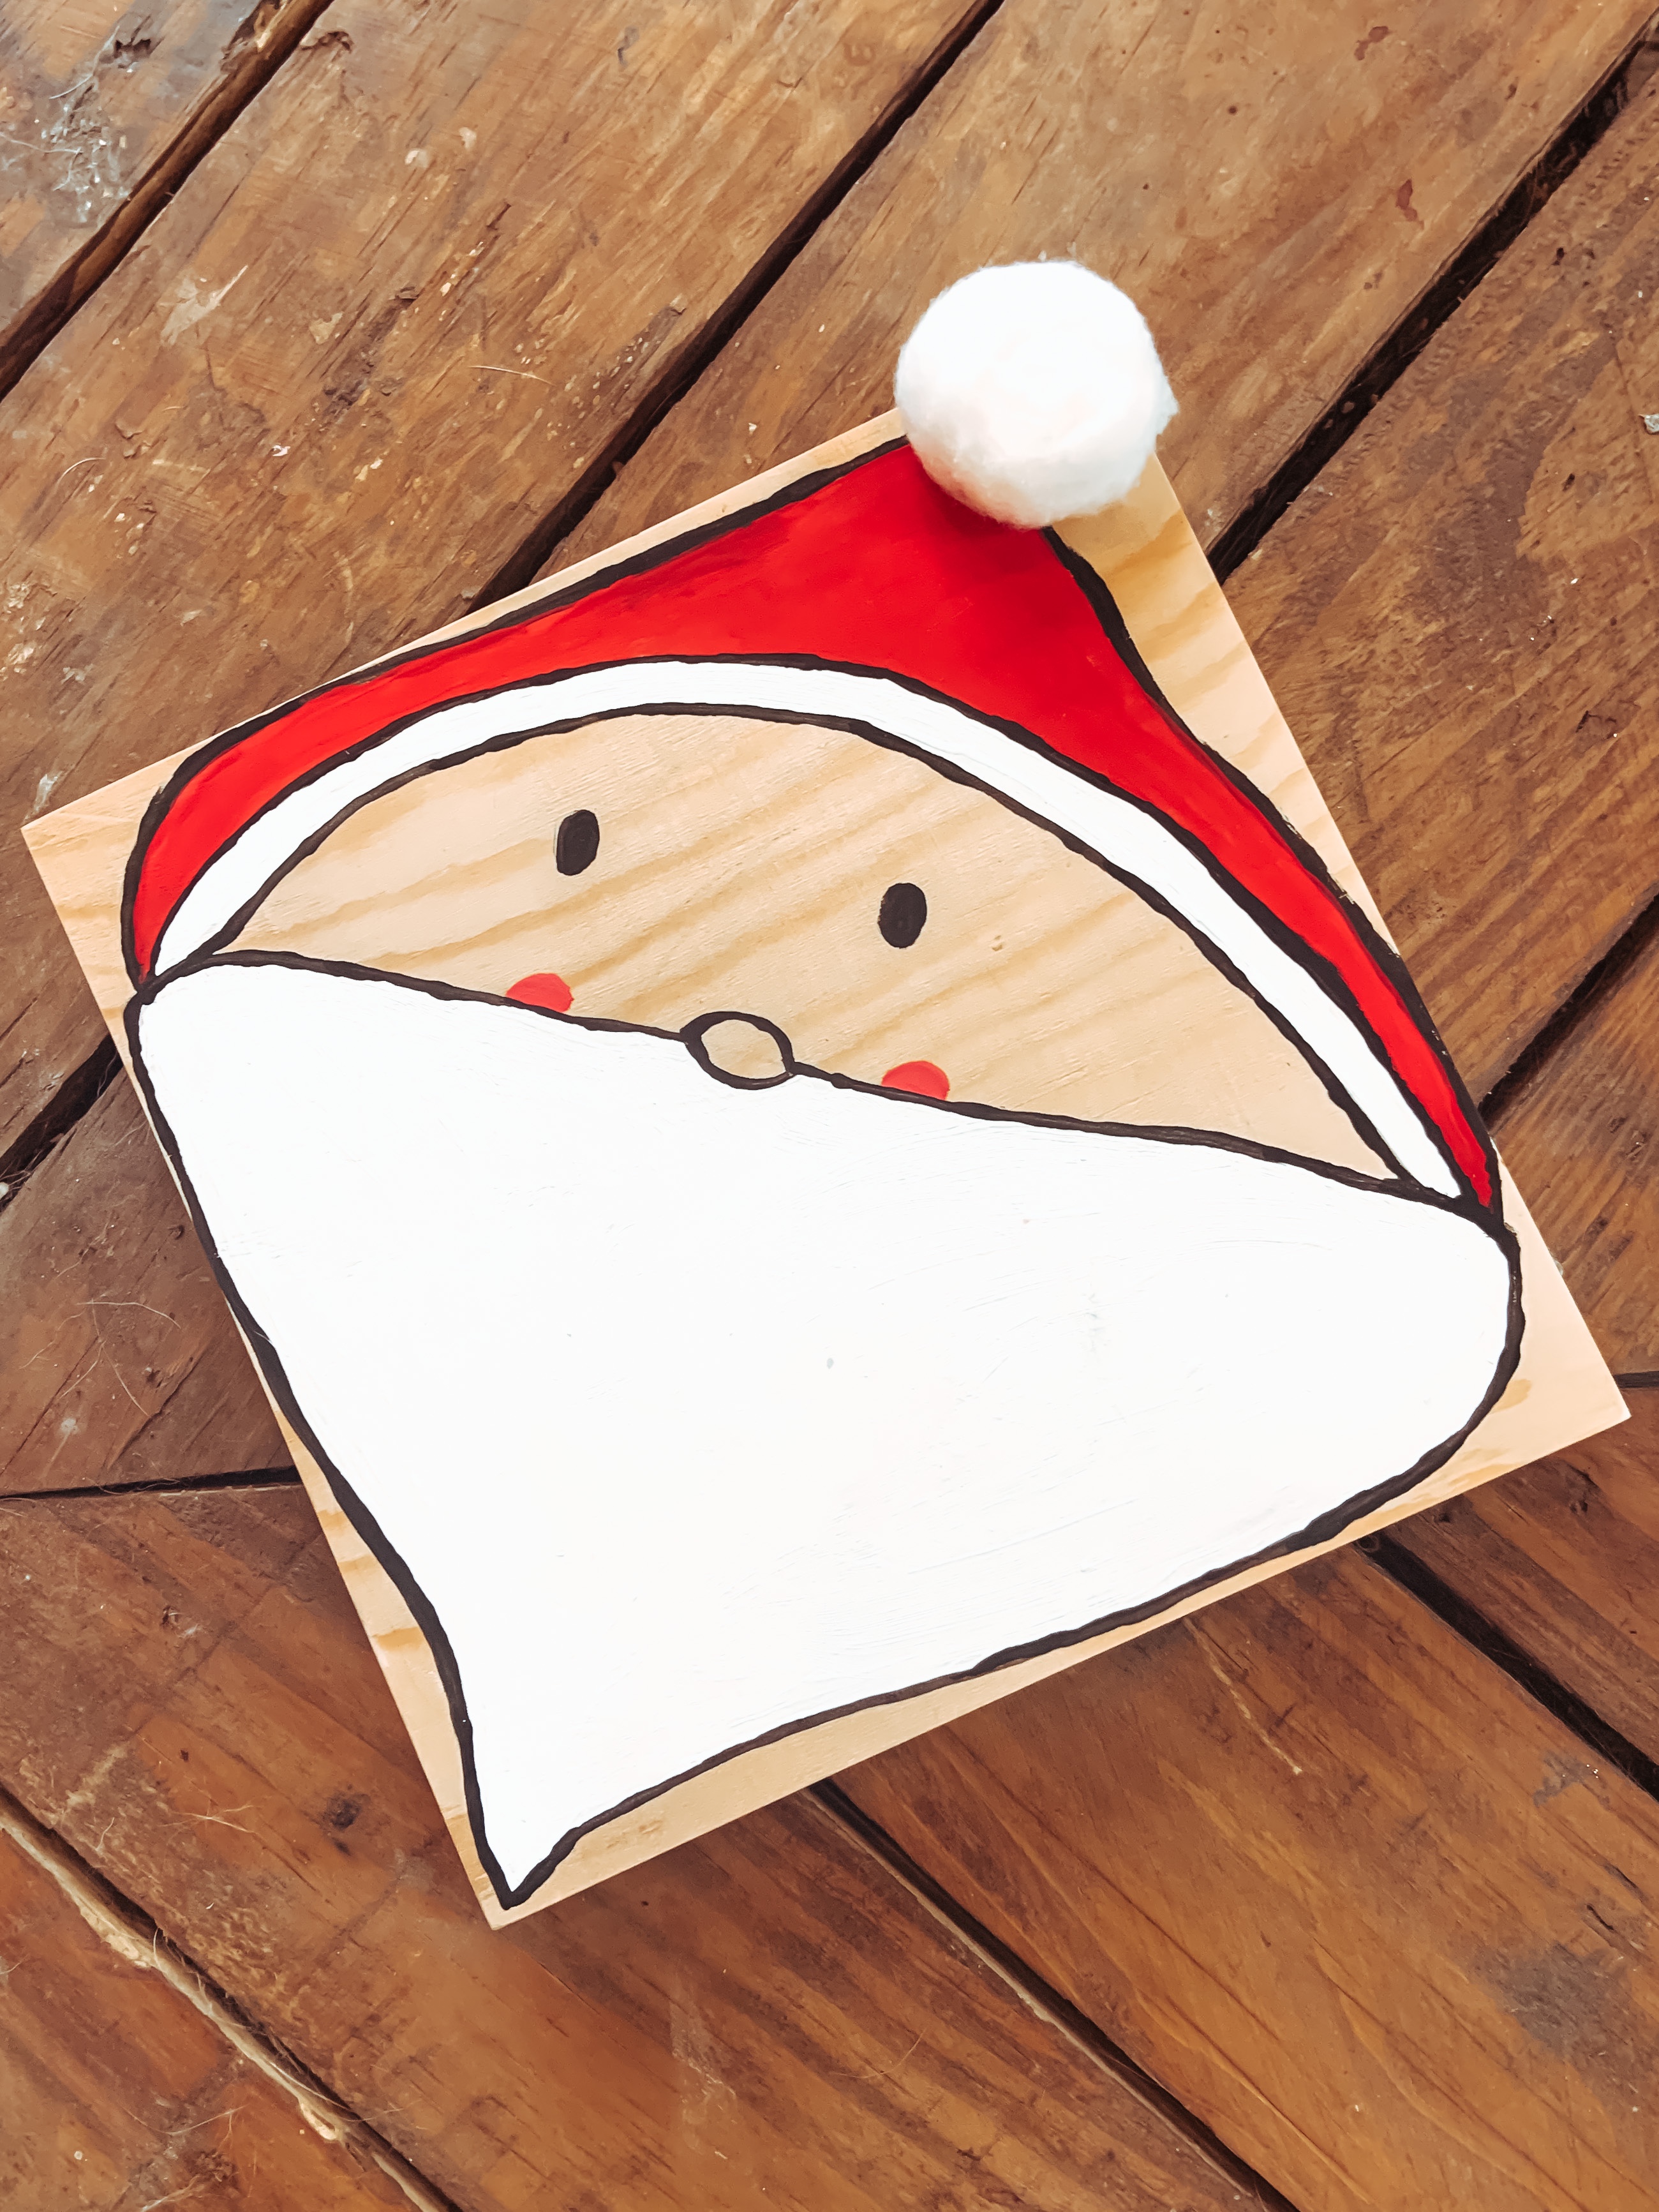
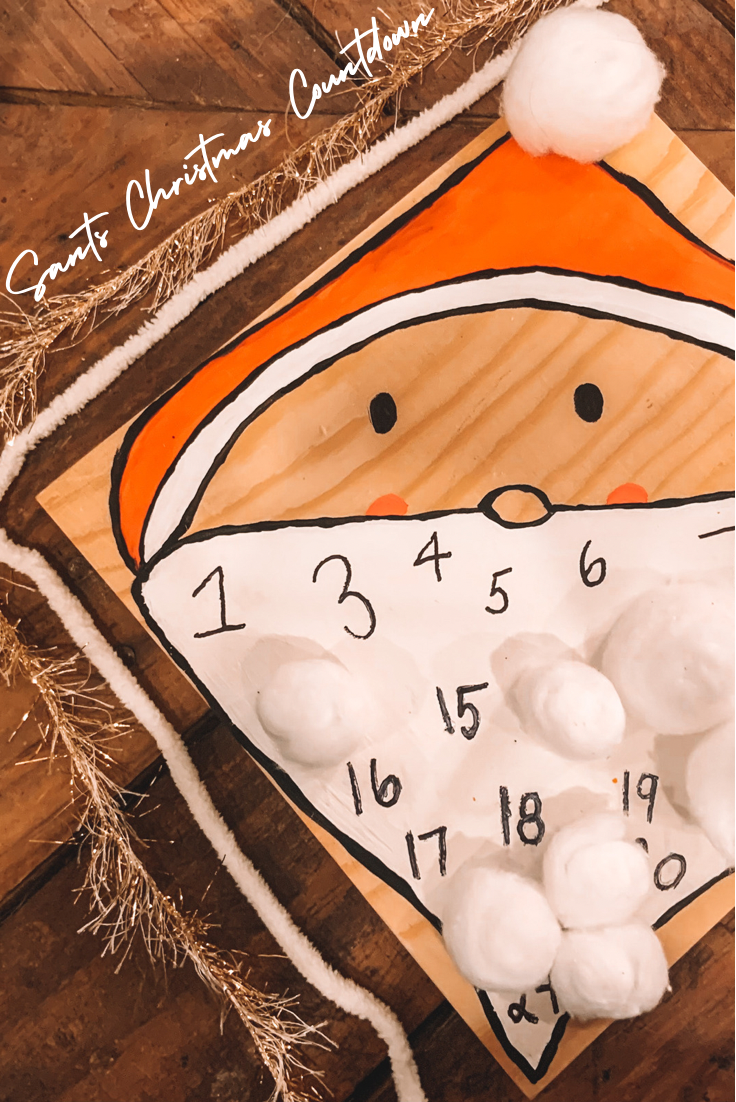
Say hello to the Santa Christmas Countdown.
With a square wood piece and a little paint, this Santa Christmas Countdown came to life.
The transformation of this piece is adorable. It started with just paint, then numbers, and each day it’ll be filled with cotton balls.
After filling it up, it becomes Christmas decor for years to come!
I love how easy it is and that Mila loves the idea of filling his beard in. Although I’ll just have her use regular glue for the beard, I’ll go back in and add hot glue so it stays on there.
Didn’t it turn out amazing? I love each step of it, but the cotton balls are my favorite. The added texture just makes it so much warmer and jolly. Just like Saint Nick!
You could DIY this Santa Christmas Countdown OR you could just have me make it for you.
I have a Santa Christmas Countdown listing ready to go on my Etsy shop or you could message me too. Either way, I love this piece so much that I wanted to share it all with you!
Let me know in the comments… Do you have an advent calendar every year? If so, what how do you countdown to Christmas?
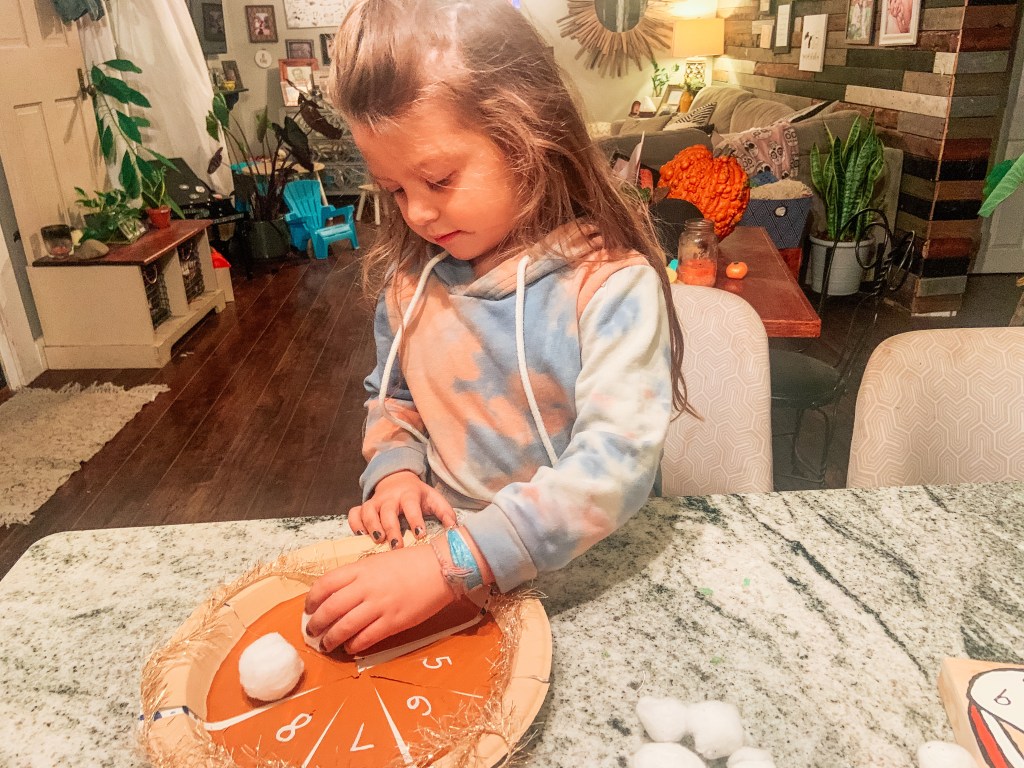
In this house, playing with your food is encouraged; especially when it helps with learning!
This Pumpkin Pie Counting Paper Plate Activity is perfect to help kids get excited about Thanksgiving, number recognition, and counting. All in one activity.
Last week I got Mila’s first preschool assessment. Overall, she did amazing! Sometimes I forgot that she’s only three and a half because she’s so smart and social. It makes me so proud to be her mom.
These assessments also gave me an idea of what we need to be working on at home.
One thing I’m not good at are numbers. Math definitely wasn’t my favorite subject in school, so sometimes I forget to add it into our play.
In her assessment, she counted to fifteen and only recognized a few numbers. I know she can count to 20, but I honestly didn’t know about her letter recognition skills. So, that’s what we’re going to try snd do more of.
Since the holidays are right around the corner and we’re excited for pies, I thought this activity would be perfect.
All you need for it is:
Paper plate
Orange, white, and tan paint
Scissors
Cotton balls
To make the pumpkin pie paper plate, you first need to paint it. I used tan paint for the crust and orange for the filling.
The orange took me two coats of paint and three for the tan.
Next, I cut the plate into eight slices and wrote the corresponding numbers on them with white paint.
After it was all dry, I added some decoration to make it more sparkly for Mila and gave her cotton balls to count with.
She had a lot of fun counting the cotton balls, but I saw her work out the different numbers in her head too.
It was amazing to see that even if she didn’t know the number at first, she would count around to figure it out. Hopefully the more she sees them, the more she’ll know!
Either way, we had fun pretending it was a pie and eating it too. I love how fun learning is with her.
What are some ways to help kids with number recognition?