DIY Hand Shaped Flower Bouquet

If you’re looking for a fun Mother’s Day DIY, this Hand Shaped Flower Bouquet is easy to make and will last a lifetime. The moms in your life will love them!

Plus, I was able to reuse products around the house to make it Earth friendly too!

I love when Mila makes me things. Maybe a little too much. I don’t think I’ve ever thrown any artwork or drawing she’s made me. She’s so proud of herself for it too.

For Mother’s Day, it’s always fun to see what kids come up with. Mila loves gifting flowers. When I saw this on Pinterest, I knew I had to recreate it with Mila! She loved how they turned out and it’ll be perfect to add to the bouquet as she grows.

As I stated above, I reused everything for this. Here’s all I used:

  • Scrapbook Paper
  • Stapler
  • Paper Straws
  • Hot Glue

These were super simple to make.

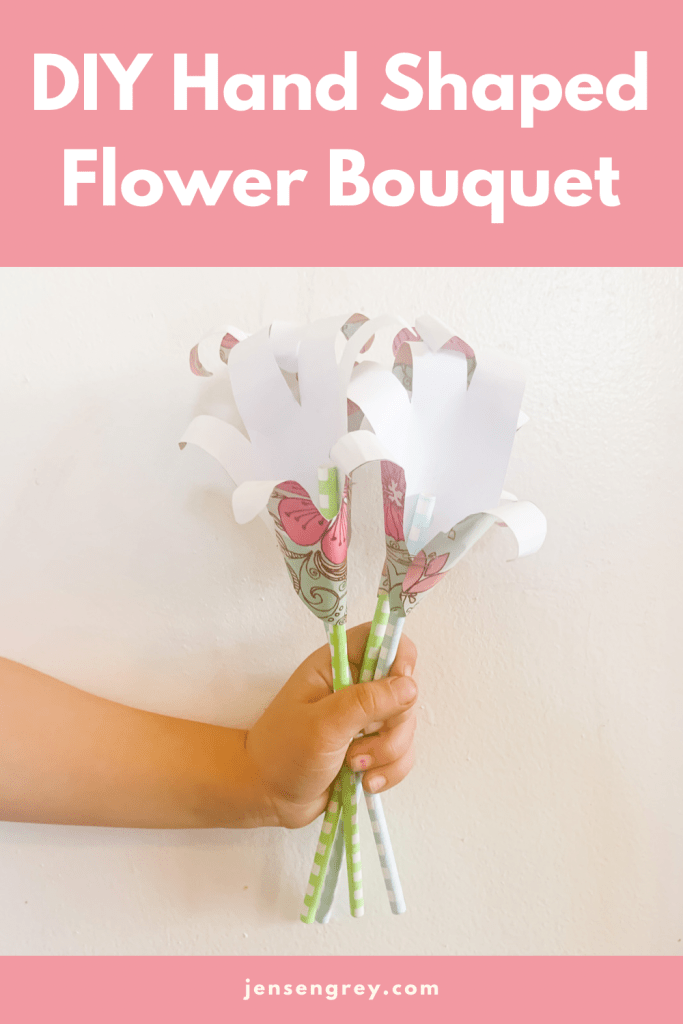
I traced Mila’s hand on thick paper to make a stencil. Then cut it out to trace it on scrapbook paper. Although I only traced four for the picture, we’ll be making more for different family members.

You can make how many you’d like and with different types of scrapbook paper.

Then, cut the hands out. Next, I stapled the two sides together with the print side facing out.

When they’re cut and stapled, spiral the hands so they flutter out. You can make them as curly as you want!

After the flower was made, I hot the paper straws inside to make it look like a stem.

To display, I put them in a glass jar. They look really beautiful. I love that I’ll have a little piece of her at four forever. It’s a lovely Mother’s Day gift I’ll always love.


What is your favorite DIY Mother’s Day gift you’ve ever made or received?

Advertisement

Toddler Activity: Fruit Flower Art

Two of our favorite parts of spring are the flowers and fresh fruit! Since we love playing with our food, we were inspired to paint our favorite spring things.

Mila has painted with different foods before. It’s always fun watching her experiment with how the paint works with random objects. Even more fun, is how it all turns out at the end.

For this project, we ate a fruit salad for breakfast and then used the tops for her artwork. It was a way to reduce waste and be creative all in one.

Try saving some of your fruit scraps and try this flower painting out.

Here’s all you’ll need:

This activity is really simple to set up.

All you need to do is prep your fruits, get a painting space, and pour paint. Your child will figure out the rest as they paint.

For Mila, I asked her if she wanted to paint flowers and we looked at the ones in our yard.

Since we practiced the parts of flowers, she kept telling me which part of the flower she was painting. It’s amazing how much little ones remember! She also kept telling me the apples made bigger flowers and the strawberries made smaller ones.

I absolutely love watching the world Thats in her head come alive on a canvas. She’s always telling a story when she paints too.

We make sure to ‘sign’ and date the back of every painting she does. One day I’ll need to get a huge storage box for all of her paintings. For now, they’re decorated all throughout my house.

With these paintings, you can have your child paint whatever they’d like. Mila just loves flowers and it’s perfect for springtime.

I think she did an amazing job!

What’s the craziest thing you’ve ever painted with and what do you think Mila and I should try next?

If you’re into playing with your food, but just prefer eating it, check out these recipes from other mamas. I’m sure you’ll love them!

Toddler Activity: DIY Seed Bombs

With Earth Day coming up quickly, Mila and I have been making Earth friendly DIYs. Our favorite is seed bombs! They are messy and fun to make, but they lead to a summer of beautiful flowers.

Since we love picking flowers, this is a win all around!

This recipe comes from the Kids Art Box, which is an amazing subscription service that has activities curated for your child with all the supplies.

Here’s what you’ll need to make seed bombs:

As I said before, this can get quite messy, but toddlers love it!

Mila was able to help with every part of the activity. It’s a great way to help them with their motor and life skills by pouring and mixing. Plus, we counted everything we could. This is also a great time to talk about Earth Day and how we need to protect our Earth.

Anyways, back to how to make the seed bombs!

First, mix the dirt, flower, and water up until you get a sticky concoction. Once it starts sticking to the spoon and forming together, add the two packets of seeds too. Mix them evenly in the mixture.

Then either use cookie cutter to form shapes or make little balls.

Let them dry out. I would definitely recommend waiting two days for them to dry out and then plant.

It’s really that simple!

Mila loved helping out with this project. It was a great way to talk to her about how plants and flowers grow. Actually seeing the seeds helped her understand where plants came from. In our “Identifying Parts of Flowers” activity, seeds were the biggest confusion for her. This DIY helped cross that bridge!

Another great idea to use with seed bombs is to give to family members. With Mother’s Day here, they’re a great DIY present for aunts, grandmas, and other motherly figures!

If you try this activity out or have any suggestions to make these seed bombs better, let me know in the comments.