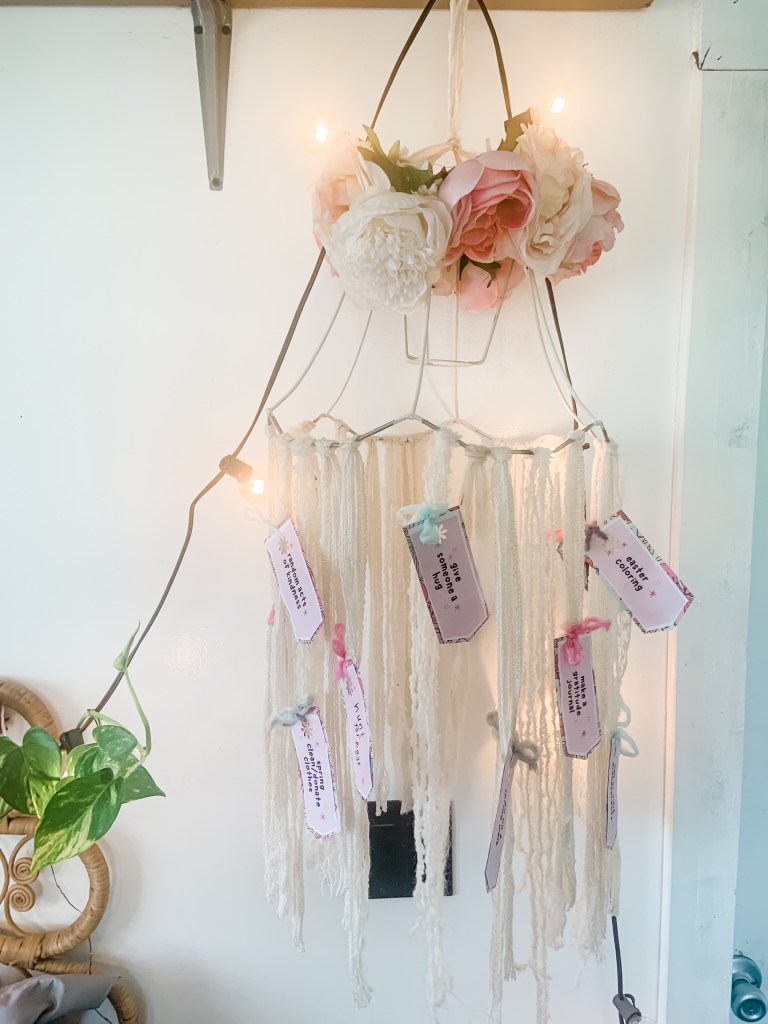
If you’re wanting to help plan on getting the most out of spring this year, this DIY Spring Bucket List can help! Not only will it motivate you to get everything you want done, it’ll look great in your home.
We usually just make ours out of craft paper, but when I saw the tags from The Letter Vee, I wanted to do something a little different. I used an existing floral mobile I had and gave it another use!
Wall hanging (message me if you’d like me to make you one)
First things first… it’s time for a family meeting. Have a talk with your family about what you would all like to do this spring. This will look different for every family.
Once you figure this out, it’s time to print.
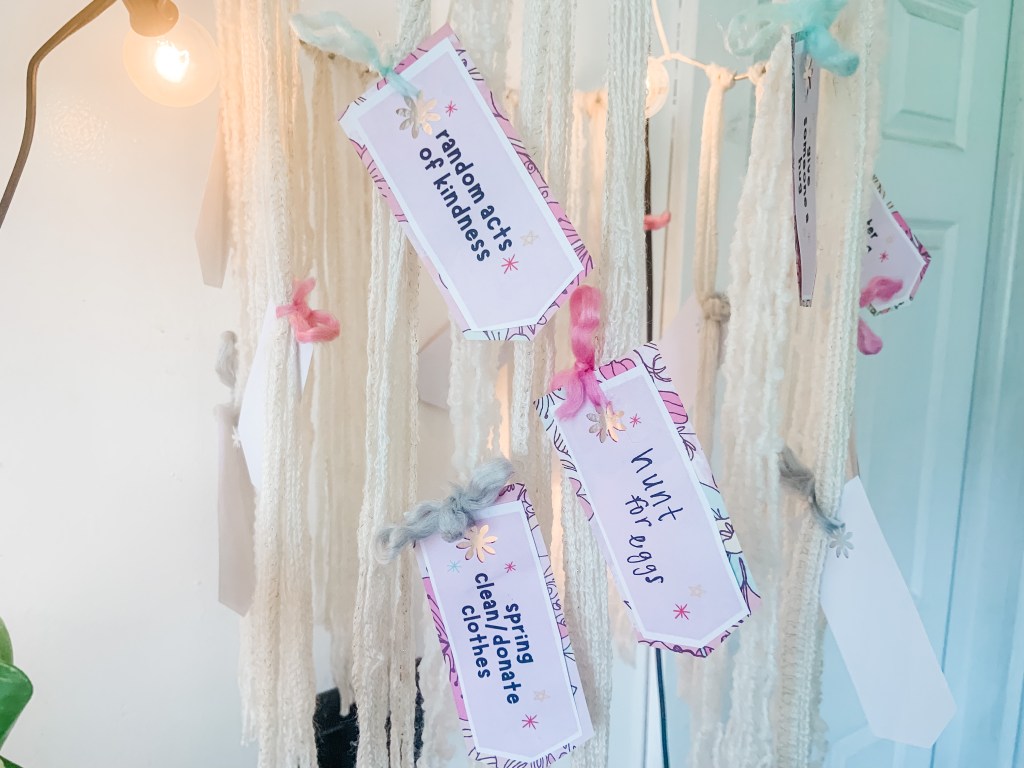
The Letter Vee has some bucket list items already on their site, but also gives blank cards too! This way you can easily write down what you’d like. For our ‘other’ items, I just used a normal pen and you could easily see my writing.
Next cut them out and use a hole puncher for each tag.
I actually taped the tags on spring scrapbook paper to give it an extra pop and used a daisy hole punch. The extra details made it so cute.
We also decided to use pink, grey, purple, and light blue yarn to connect our tags.
All you have to do is a light tie on a piece of the yarn or ribbon on your wall hanging. I just shuffled them around so we could easily see them.
You can add as many bucket list items you’d like.
Our plan is to take pictures with each bucket list item. When we do it, we’ll pull it off and make a little scrapbook of our spring.
It’ll be a fun way to record what we do and reflect on it at the end of the year.
Either way, we’re super ready for springtime and to start pulling items off of our bucket list. We can wait to keep you all updated.
In the comments, let me know what’s on your spring bucket list.
Are you looking for a little luck until next St. Patricks’s Day? Then it’s time to make a DIY Leprechaun Trap.
This fun trap was made out of items around the house and printables from Whimsically Wonderful. It also was fun to creatively collaborate with Mila and keep the magic of St. Patrick’s Day going.
If there was a classified ad for this DIY Leprechaun Trap, I think it would read something like this…
If you’re a weary leprechaun looking for a comfy place to rest for the night… or next year…You have to stay at The Rainbow Hotel!
Filled with a comfy bed, free gold, and magical decor, you’ll love your stay. You won’t miss The Rainbow Hotel because all you have to do is follow the rainbow exterior and the shamrock on the door.
Plus, it’ll only cost you a little luck.
Honestly, I’d want to stay in The Rainbow Hotel too. I just don’t have too much luck to give.
Anyways, here’s what we used for our DIY Leprechaun Trap:
Recycled Box and smiley face from Moravian Trail Co (seriously the best candles)
Putting this together was really easy, but took some time.
It was a lot of cutting, gluing, and making sure everything looked cute in the right place.
It took us about an hour to cut and glue everything on, but it looked so cute. The best part of making leprechaun traps is everyone’s is going to look different and unique. I think this one celebrates how Mila and I are and view life.
Now it’s time to catch our leprechaun. You can only catch them on St. Patrick’s Day, so make sure you have yours ready!
Do you ever make leprechaun traps? If you do let me know how you made the next day special in the comments.
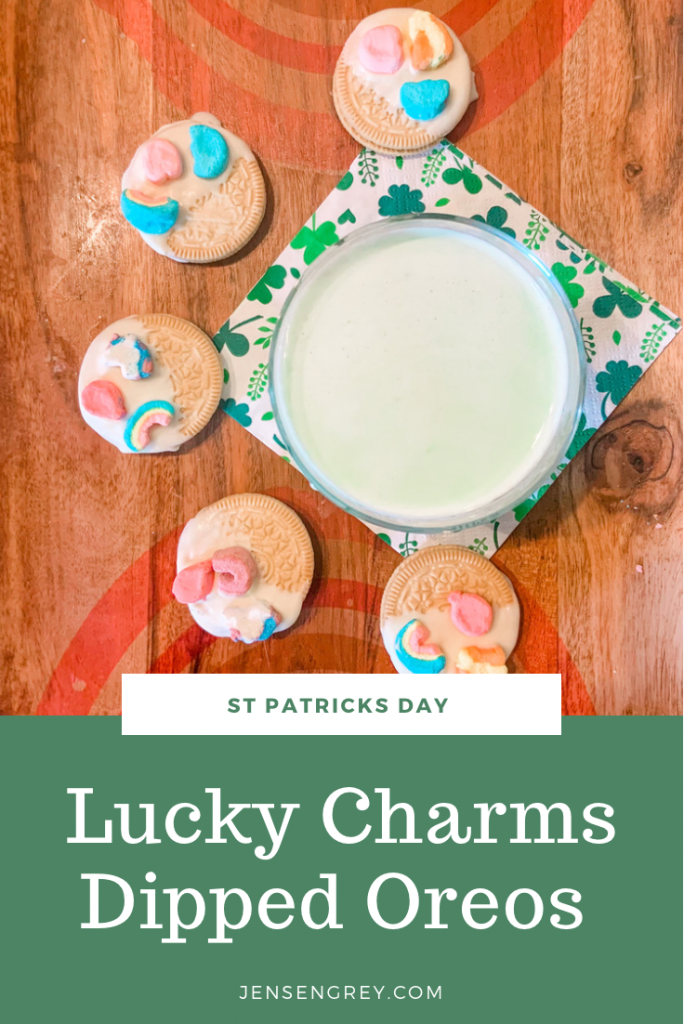
What’s better than regular gold? Gold you can eat and you’ll love the taste of these Lucky Charms Dipped Oreos.
This simple recipe can easily be done for an after school snack or whenever you have a quick five minutes to make some magic. You can even enjoy it with yummy leprechaun milk, which your kids will love even more.
Mila and I have still not saw the leprechaun playing tricks in our house. Our Pete the Cat book told us the only day you can catch one is on St. Patrick’s Day so we’re getting all our leprechaun bait ready.
We’re working on our leprechaun trap to set out the night before St. Patrick’s Day too! Hopefully that’ll do the trick.
This little recipe here was supposed to be leprechaun bait, but Mila decided it would be better suited for little girls. So, she just ate them instead. I can’t say I blame her!
For another magically delicious treat, you’ll need:
Golden Oreos
Lucky Charms
White Chocolate
The first thing you need to do is melt your white chocolate. I used the microwaveable kind because it’s way easier and quicker for us. Just make sure you microwave in small increments and stir frequently.
After it’s all melted, dip your Golden Oreos in the white chocolate and set them on wax paper.
Before the chocolate is cooled, place Lucky Charms on them. I did it randomly and in between coating the Oreos. The chocolate seemed to cool off pretty quickly!
While you wait, you can make some leprechaun milk to enjoy with your Lucky Charms Dipped Oreos.
All you need to do is add some green food coloring to milk and enjoy!
Mila was very pleased with these and did not seem to want to share with the leprechaun in our house. It was a fun little snack that only took a few minutes to make.
What has been your favorite St. Patrick’s Day recipe I’ve shared so far?
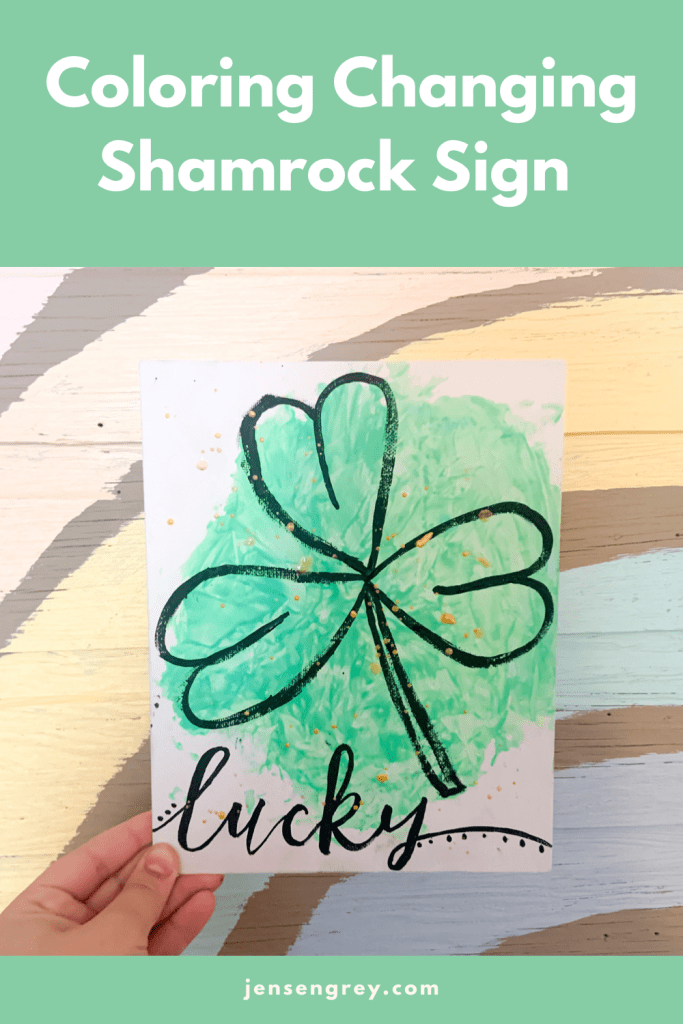
The magic of St. Patrick’s Day keeps flowing, especially with this DIY Coloring Changing Shamrock Sign.
Littles will be amazed watching blue and yellow make green! You can also use this sign to help trap those pesky leprechauns. They’ll be attracted to the magic.
Mila has been super curious in two different things: leprechauns and how to make colors.
To be able to give her both in one day, we did a magical craft that we’ll use to bait leprechauns. It’s really been fun to hear all her ideas of how to catch a leprechaun. She had fun making magic like them!
Plus, we love an activity with a simple set up! This one gives you just that with some leprechaun magic too! Here’s what you’ll need:
Blue Paint
Yellow Paint
Black Paint
Gold Paint
Canvas
Plastic Wrap
All you need to do is pour some blue and yellow paint on a blank canvas. I actually had the canvas in a sensory bin to keep the mess at bay.
Then, I had Mila place plastic wrap on top and told her to mix all the colors.
For that part, I really had to tell her it was okay to get messy. She was really moving the plastic wrap around which mixed it up quicker. At first I think she was afraid of the messy paint!
Once it’s combined, take the plastic wrap off and let it dry.
To add a little more magic, I painted on a shamrock, ‘lucky,’ and splattered gold paint. I think it turned out as magical as a leprechaun would like.
What’s your favorite St. Patrick’s Day saying to put on signs?
If there’s one toy purchase I’m happy to have made, it’s this Wooden Rainbow Stacker. Not only is it colorful and meaningful to us, it’s a lot of fun for Mila to play with.
Packed with so many different ways to play, Mila spends hours with this toy.
I discovered this Wooden Rainbow Stacker in 2019. That was when I started buying more wooden toys instead of plastic ones. They’re so much better for our environment and they’ll last for generations.
When researching these toys, I found out so many different benefits to having kids just use their imaginations when playing. Since plain rainbow arches don’t give specific directions of how to play, kids can come up with their own ideas. Parents can also help guide play.
It’s also so beautiful. When Mila isn’t playing with it, it makes a perfect decoration in our playroom. Rainbows are so symbolic for us, so it has many purposes.
I figured I’d let you all know how we play with ours!
Learning Colors
When Mila was little, we used these arches to learn the different colors. It was nice that she could actually pick up the colors of the rainbow when she didn’t have the right words. We sang the Mickey Mouse Clubhouse rainbow song with this so many times to learn the colors. It was always a ton of fun.
As she grew older, I would have her find different objects that were the same color. She really liked this idea! It became a little scavenger hunt around the house for her.
We also would do matching or patterns with the arches too. Since there’s two of every color it made it fun to show her a combination, then she repeated!
Imaginative Play
Since these arches are so big, they make fabulous houses. Mila is always playing with her little dolls on these. I think it’s so cute to listen and see how her brain makes these wonderful play scenarios.
She also makes different shapes with them. It’s incredible to see what she comes up with and how she explains it.
One of my favorite times she used imaginative play is with her unicorns. They all raced through the different arches and even on top of them. It was like Mila came up with her own little world just out of this toy and her My Little Pony’s.
This is what’s so amazing about these plain play items; your child’s imagination will make them what they need to be at that time.
Stacking
Stacking is probably our favorite activity to do with this rainbow stacker now.
As I stated above, we LOVE to make different shapes with our rainbow. Mila loves to do ‘hearts.’ This is where we stack out rainbow like the picture below. We see how far they can balance until they all fall down.
It also is really cool (as an adult) to see how they fall too. It’s really satisfying to har the nose as they go down and just watching it too.
There are so many different shapes kids can make with this. While they’re figuring it out, they’re able to learn! It takes Mila a few times to stack up the shape just as she likes it, but she’s always proud of herself when she finally does it!
Extended Learning
Lately, Mila is at the age where she is learning how to spell her name and simple words. We use resin letters to balance her words on top of the rainbow.
We do little challenges of who can place the most letters on the rainbow arches or who can get their words to stay up the longest. It really helps Mila learn while she’s having fun. That’s really all that it’s about too!
I’m sure as she gets older there will be more and more ways to play with this stacker. It truly has been an investment in her future.
Do you have a rainbow stacker? What games does your kiddo like playing with it?
If your child (or you) love to paint and want to try a cool new way to do so, try this DIY Ice Cube Painting.
Mila paints all the time. Usually with acrylic paints on canvas, but a switch was needed. With a little prep, this ice cube painting activity was a morning full of fun and creativity.
Prepping for this activity was really easy. All I did was pick out a few of her go to colors. Then I painted them inside the resin mold.
I tried my best to get a lot in there. It’s be easier if it was squeezable paint bottle.
Before you put water in the mold, set on a baking sheet to freeze. It is near impossible to move a mold full of water without spilling it. This won’t be an issue if you’re using and ice cube tray.
When all the letters are painted, pour water in each of them. I would suggest using something that isn’t going to overflow the mold easy and mix colors. Honestly, I reused an old Starbucks iced coffee glass to pour.
Then, when they’re all filled, place it in the freezer.
When they’re done, you can place them in a tray for your child to paint. We personally used thick stock paper for this painting.
To warm up the ice, Mila dipped her brush in salt. Not only is this activity creative, she learned a little science as well. I just explained to her that salt melts ice and she thought it was so much fun.
The best part of this activity was it was easy to clean up.
I just threw the left over letters back in the tray. Then I put them in the freezer so we can use as after school activities this week! That means I only had to prep once for days of fun!
Using frozen letter cubes is a fun way to introduce more learning too. I used ‘lucky one’ since St. Patrick’s Day is coming. BUT you can spell out whatever to help them learn.
I’ll use the letters in her name to give her some more practice seeing and writing it.
This activity would be perfect in the summer too. You can battle the heat and see if the sun or your child ends up getting done with the ice first.
Either way, this Ice Cube Painting activity is a cool way to create.
What are some fun spring activities your child likes to do? Let me know in the comments.
Is there anything more nostalgic than a school Valentine’s Day Party? The rush of having a cute card box and picking out the perfect Valentine’s Day card for your friends. They’re little reminders to show your friends that they are loved.
Since this is Mila’s first year at school for the big event, we decided to make a DIY Valentine’s Day Cards.
It’s been so much fun creating for Valentine’s Day. If we hadn’t had so many snow days, I’m unsure whether or not DIY cards would be in the picture, but I’m happy they are.
Mila and I talked about different Valentine’s Day cards and gifts. We decided we liked the phrase, “You Color My World.” Mostly because I pushed it really hard because I was already thinking about crayons
A lot of the elements in these Valentine’s Day cards should look familiar!
On the front of the cards, if you can remember to a few blog posts ago, Mila had already painted the tops of her cards. All I did was take the dry pages and cut them out into small rectangles. Then, I wrote “You Color My World” with glitter markers over it.
For the back, I cut the same size rectangle with white card stock and taped them together. If the back of the painted paper wasn’t messy, I would have skipped this step.
Next, I wrote “to” and the name of Mila’s classmate. Then, I had Mila write her name under the “from.” I think it’s important she keeps writing her name and actively participates in helping with these DIYs.
On the back of the card, I made space either on the side of their names or above for a little gift. Since we were doing “You Color My World,” we had to make personalized crayons.
Pinks, hearts, and love all around. Valentine’s Day is the perfect holiday to craft and create. To start off the fun, we played around with Valentine’s Day Painting Activities that will be helpful for our crafts all February long.
Even if you’re not ‘crafty,’ you’ll love these easy painting ideas and your kids will have fun with it too.
I think it’s a little obvious that Mila (and I) love painting and being creative. Usually Mila’s go-to colors are pinks and purples, so it just makes Valentine’s Day prep a little more fun.
Since we’ve had a lot of snow days lately, we’ve been experimenting with different ideas of how to express ourselves. All of these listed are simple, BUT they can get really messy. I just like to state that beforehand. I highly suggest putting something down underneath your painting area and putting old clothes on your kids.
That way everything stays safe and clean.
We used four different types of painting styles and I’m going to save our favorite for last. Here’s all the supplies we used for the entire day:
Stock paper
Paint
Bubble wrap
Cotton Balls
Toilet paper rolls
Shaving cream
Kraft paper
Tray
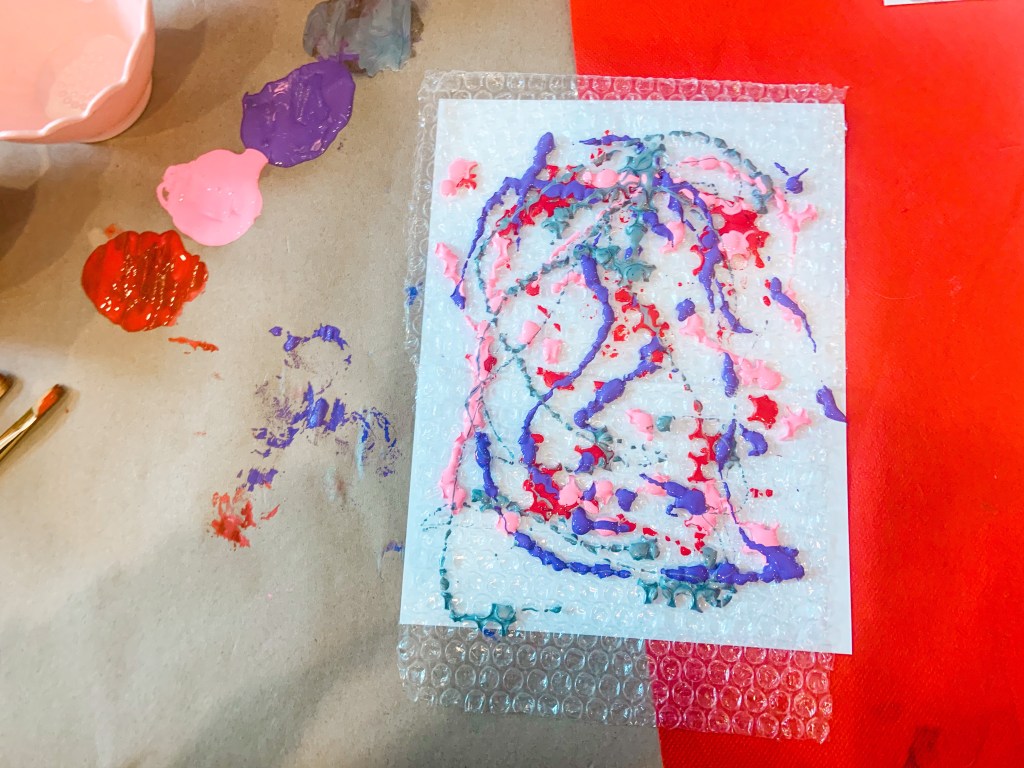
Bubble Wrap Painting
One fun way to add texture in painting is to use different supplies. Mila and I used bubble wrap last year for a heart garland, so we wanted to redo it again. I actually loved the little dots it creates. It sort of reminds me of honeycombs.
This year, we used WAY too much paint and didn’t get the honeycomb effect. I love the way it did turn out though.We also popped the bubbles too, which was fun for Mila. It made the paint explode out, so beware of that. I think it just looks like a big swirl, but we had the most fun using this method.
With the extra paint, I put it on another piece of craft paper. We’ll use that for wrapping paper.
It’s also a great way to reuse bubble wrap instead of just throwing it away. Always looking for ways to reuse, reduce, and recycle.
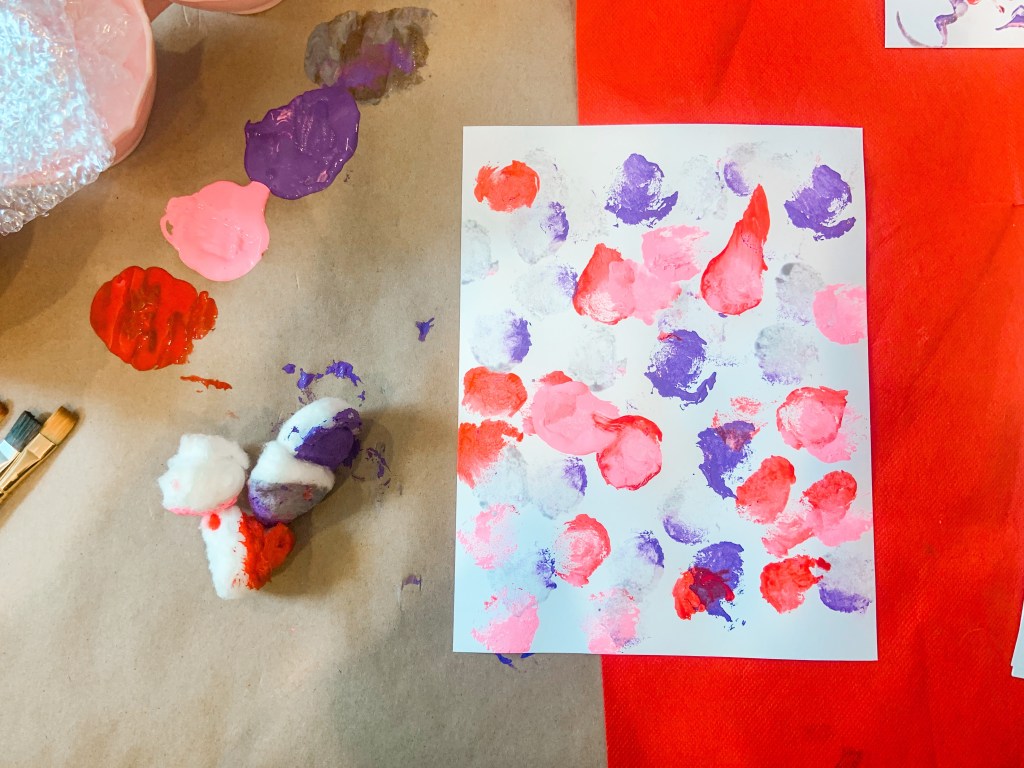
Cotton Ball Painting
With toddlers and preschoolers, using anything but paint brushes makes painting way more fun. Cotton balls are a perfect stepping stone for them. Although Mila just used her hands, you can easily add them on clips to make it less messy and easier for kids to grab.
This one seems a little typical to add, but I want to share the reasons I love using cotton balls for painting.
The circle shape is so cute and stays consistent. Mila talked the entire time how she was making circles and was very proud of them. It also holds the paint really neat. It soaks it up and if you mix colors, it gives a cool ombre pattern. Usually I don’t let Mila mix her paint to avoid making brown, but you can do it with cotton balls. You can tell which colors she mixed together.
Even though this is simple, kids activities do not have to be extravagant to get a cute outcome filled with fun.
Toilet Paper Roll Stamp
I promise I won’t go on and on about reusing things around the house, but here’s another example of it. Most people have empty rolls so they’re accessible to use for Valentine’s Day crafts.
The best part, you can easily shape them into little hearts. All you have to do is push down in the middle to get the indent in the top of the heart and press the sides in. It’s super simple to do! I think they’re the cutest little hearts as well.
This was definitely Mila’s favorite painting. She’s obsessed with hearts and draws them constantly. Being able to paint them just made it a little sweeter.
One issue that we ran into is the heart not being even when you press down. If you don’t get them just right, you have to show your child how to get the stamp fully down. For us this time, we just had to rock it from the bottom point then tilt it to the top arches. I only had to show Mila one time how to get a complete heart and then she was all over it.
We’ll 100% be using this technique for a future craft. I’ll make sure to share and link back here just in case you’d like to keep up and see.
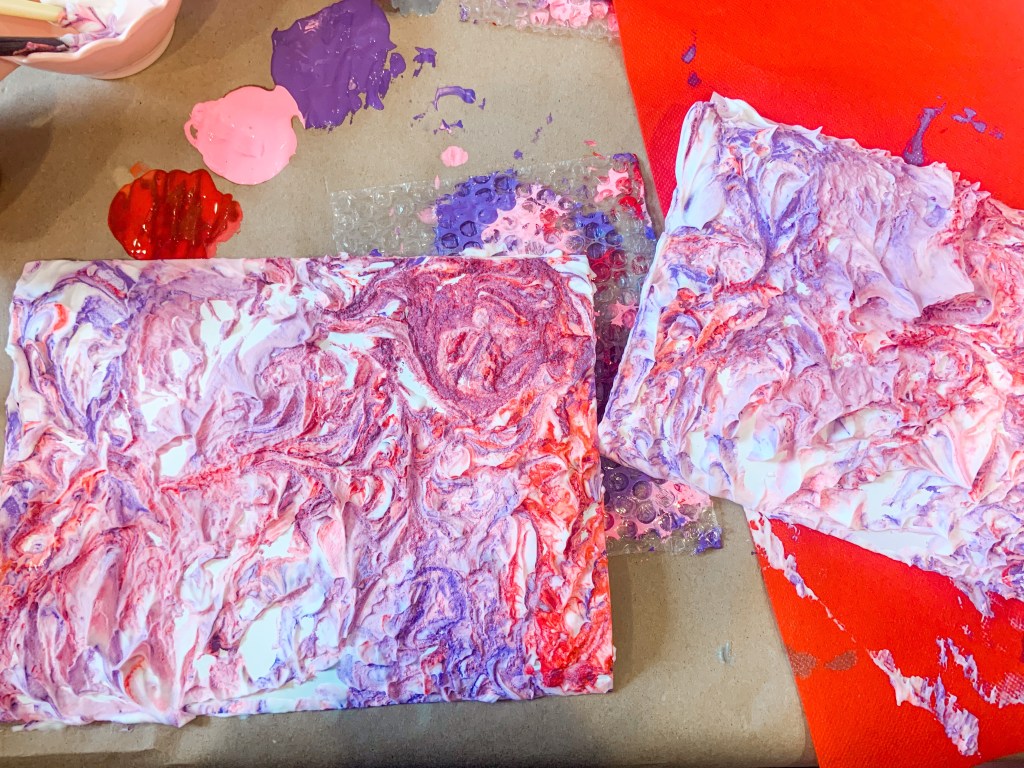
Shaving Cream Marbling Art
Out of all of these methods, this is the only one we’ve done for the first time. I’ve been eyeing this technique for a long time, but didn’t think Mila was ready for it. Now we have peaked in our painting. The outcome of this is my favorite, but it was the messiest of the bunch.
For this, all you have to do is put shaving cream in a tray. I used Mila’s sensory one. Then, Mila poured acrylic paint on top of the shaving cream and mixed it around with a paint brush. She might have swirled it a little too much, but the pattern was perfect no matter how she did it. After you have it the way you like, you push the paper in it. Make sure all of it is covered or you’ll have blank spaces. Peel it off the top and use a popsicle stick or old card to scrape off the remaining shaving cream on top. After, let it dry.
We ended up using the same pattern for three sheets of paper and could have easily done more! It was the quickest way to paint and is so unique.
I personally got a ton of shaving cream and paint on my hands through this. Mila saw how messy it was and dipped pretty quick. I would just suggest having wipes close to you or doing this technique by the sink.
Painting with these different styles was a lot of fun and gives us so many opportunities for future projects too. I can’t wait for you all to see what we’re making with these sheets too! Try to guess in the comments what you think we’re making.
Also, I want to say I know I’ve been a little quiet on the blog this month. I’ve been posting more on Instagram and Facebook the last few weeks, but it’s been nice to have a little writing break. We have a ton of fun recipes, activities, and crafts for the rest of this month and February to bring you though! One of them is about our trip to Florida and DISNEY! Let’s just say Mila keeps asking to go back.
For now, I’d love to hear what your favorite crafts and activities you do for Valentine’s Day are in the comments… and again, let me know what you think we’re doing with these sheets too.
Looking for other fun Valentine’s Day activities? Check these out:
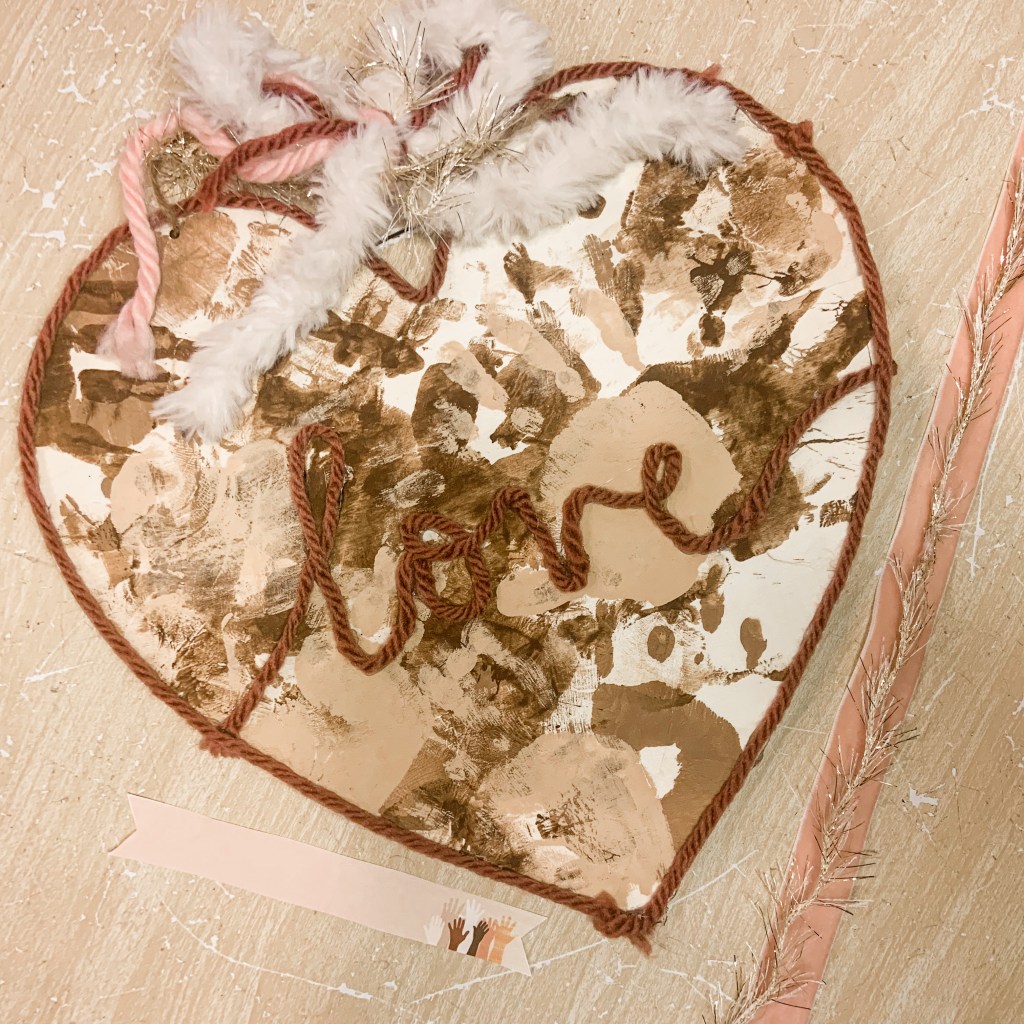
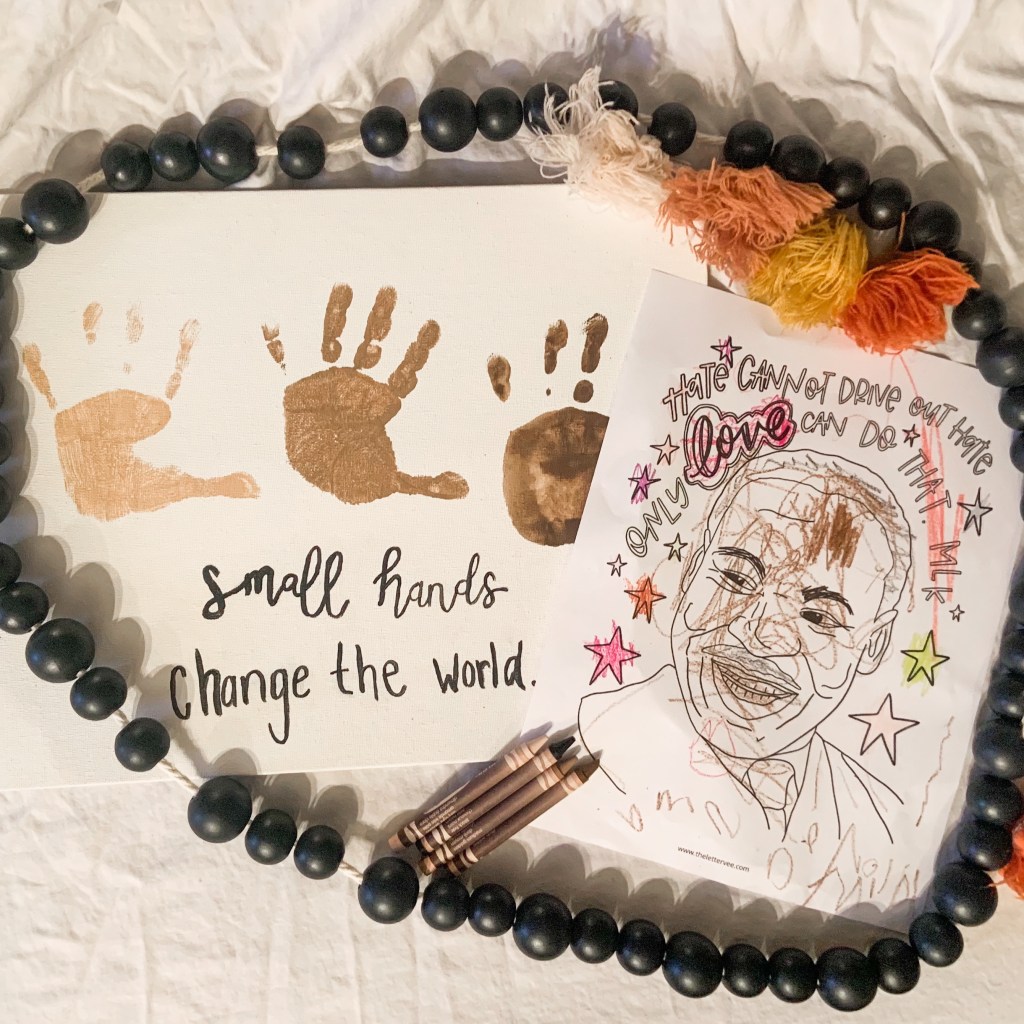
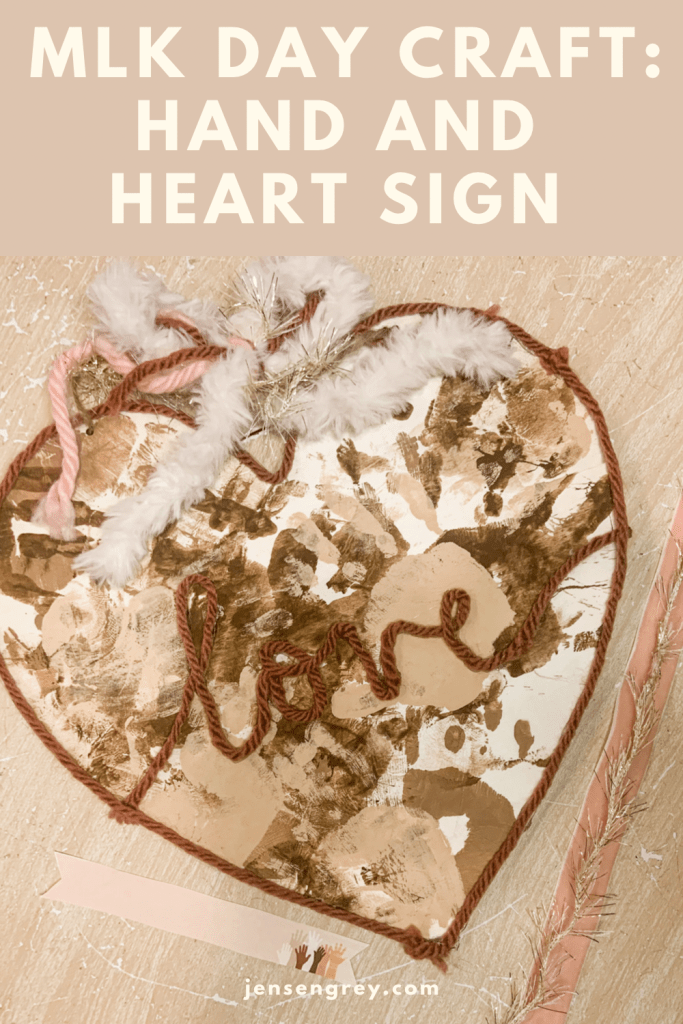
It’s Martin Luther King Jr. Day and we created a Hand and Heart Sign to celebrate this great man.
This MLK Day craft also gave Mila and me the time to sit and talk about the importance of MLK’s mission. We’re always in the lookout to talk about diversity, antiracism, and love.
With my parenting, I make it a point to talk about big issues with Mila. Civil rights for everyone no matter their race, gender, or socioeconomic standing is something I believe Mila should grow up understanding. Making sure I keep the conversation age appropriate is just as important too.
To begin our conversation this year about MLK, I had her watch MLK’s ‘I have a dream’ speech. She loved watching him talk and it gave her a sense of knowing him.
Then she did a MLK coloring page from The Letter Vee. She had a picture of him up while she colored it in.
Then, we talked about what word describes MLK’s message and overall feeling. Mila said, “LOVE!” I’m so glad she picked up on that while listening and talking about him.
“If you are seeking the highest good, I think you can find it through love.”
MLK
This year, I wanted to combine aspects from last years artwork and the word love. Here’s what we used to create this adorable piece.
Heart sign (from the dollar store!)
Skin toned paints
Yarn
Hot glue
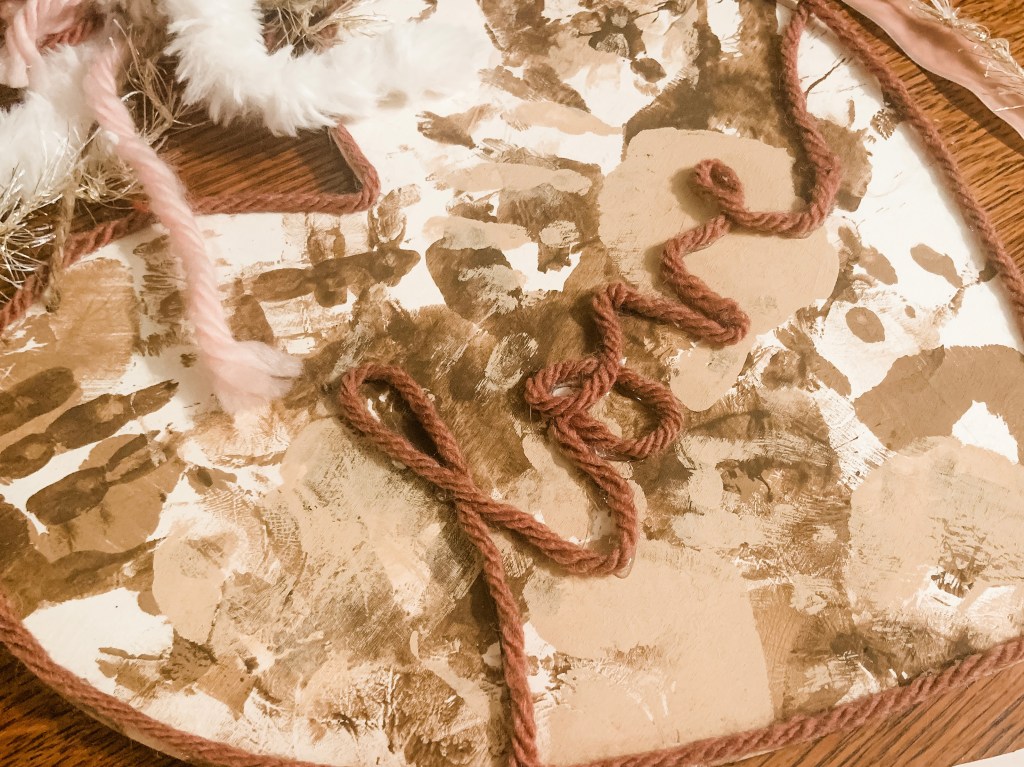
With Mila’s help, I painted her hand with the skin toned paint and had her put her hand wherever she wanted to on the sign. We let the paint dry in between colors so it didn’t get muddled.
After it was all dry, I wrote ‘love’ in the middle. Next, I used my hot glue gun to trace the word and around the heart. Carefully, I tapped the yarn on the glue so it’d stick.
For the bow on top, I took different colored yarn and tied it on the top.
I actually love how it turned out. To me it says, we need everyone to work together and create love for humans to move forward.
It’s also one of those crafts that can stay in your house way beyond MLK Day too.
Again, I forgot to take pictures during the making of this piece, but I did video. I promise I’ll start doing better with this! The videos are cute, but I feel like pictures work better on here.
I hope you enjoyed Mila’s creation for MLK Day. I’d totally recommend showing your child some speeches by him or even talking about MLK. There’s so many beautiful quotes that are so meaningful too.
Here’s some other ways Mila and I have talked about MLK and antiracism.
There’s so much magic when a person gets to shake a snow globe. It’s a whole work in your hands. Snow Globe Sensory Bins are even more magical and fun to explore.
If your child loves snow globes, they’re going to love this play idea.
Mila has a slight obsession with snow globes.
On her first Christmas, she got multiple ones from different people. We still have all (but one), that are all set up in her room. My parents also get her snow globes from every place they visit. To say we have a mini snow globe collection is an understatement.
No matter the time of the year, she loves to shake and look at them. To continue that love, I thought this sensory bin would be a perfect fit.
I was right!
As with a lot of my sensory bins and play ideas, I used elements I had around the house or from past bins. Here’s what we used for this one:
Fake snow
Sensory bin
Rainbow bottle brush trees
Different sized jars
Extra accessories
Spoon or mini shovel
This sensory bin is full of fun activities. All I did was set it up like this and Mila made it her own.
She filled up the jars with snow and saw how many trees she could fit in each jar. I watched her make the snow globes pretty too.
We talked about the colors of the tree, had them count, and we did small to big comparisons with the jars. Learning has no boundaries. You can talk about whatever with your child. They’ll soak up all that information.
Even though I originally just set up the mini trees, Mila brought in mini toys to play with and put in the snow globes too.
I can easily see opening up play with her by making the snow globes more themed or adding different seasonal elements in the future. Again, the opportunities are endless when it comes to sensory bins!
Hopefully you and your child enjoy this sensory bin as much as we did. We want to make snow globes sometime this winter and need all the tips we can get! I’ll update when we make them.
Have you ever made a snow globe before? What liquid do you use for the inside?
Then… check out these other fun indoor winter activities too!