Valentine’s Day LOVE Basket

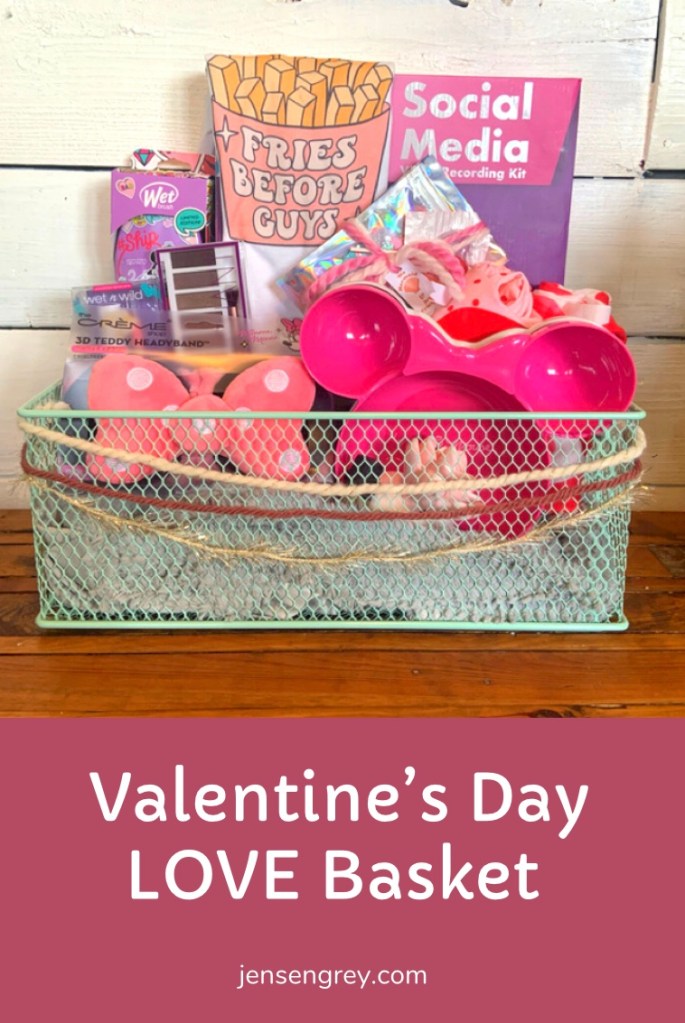
I only have heart eyes for Mila… and her Valentine’s Day LOVE Basket this year!

Happy February everyone. I can’t believe we’re already in the second month of 2022. It’s already flying by and I have a feeling February is going to go just as fast too. To celebrate this holiday and to just show Mila how much I appreciate her, I put together this little basket.

It’s always nice to share some of our purchases and these just scream Mila. She’s already opened this and has already started using them.


Love Baskets could either be opened on Valentine’s Day or I love doing it the night before February or on February first. Either way, I know kids loving getting surprises and if you can swing a few Valentine’s Day items like pajamas, candy, or a little toy, they’ll be thrilled to open it up.

Clothes

If you haven’t noticed, Mila likes to dress up… a lot. We have a ton of clothes at our house, but a girl needs options, right?! It’s so much fun to buy themed items. Although it seems like themed items can only be wore during one time of year, I try to buy items that can be worn whenever.


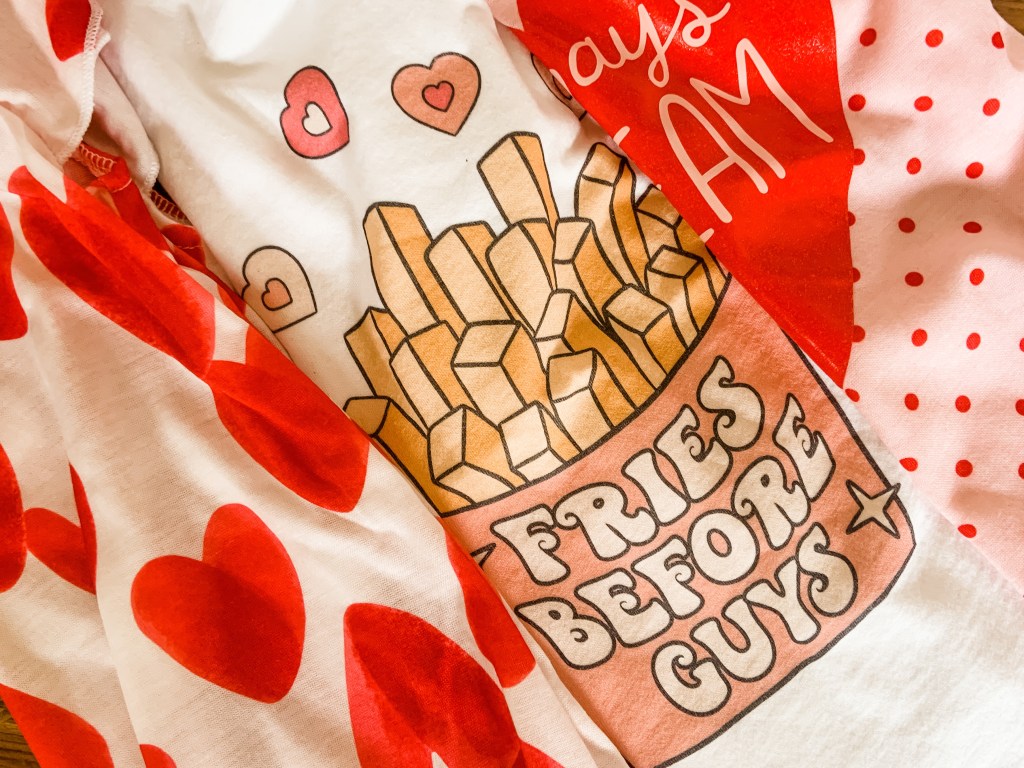
Valentine’s Day definitely makes this easy for Mila. She LOVES hearts and all things pink. So, these three little items will be worn over and over again.

The “fries before guys” shirt is from Adelynn Mae. Mila reps for them and we’re always buying goodies from their website. We also got another Valentine’s Day tee (I’m a sucker for you) that I posted on social media last week. She’s obsessed with both of them and will be wearing these to her school’s Valentine’s Day party! I cannot wait to see her all done up in both of these outfits.

Another Adelynn Mae plug… she has St. Patrick’s Day shirts for sale and they’re ADORABLE. If you’re looking for whatever holiday shirt, go to their website and make sure to use MILA10 for 10% off!

There are also the cutest heart nightgowns here too. I got them from Carter’s and they’re the sweetest little nightgowns. Anytime we can find nightgowns, I buy them. Mila prefers them over anything, besides her fuzzy onesies on cold nights! Anyways, these are adorable and I know they’ll definitely be in the pajama rotation for quite a while.

Here’s some other cute Valentine’s Day pajamas on Amazon that you can get in time for the big day:

Girly Accessories

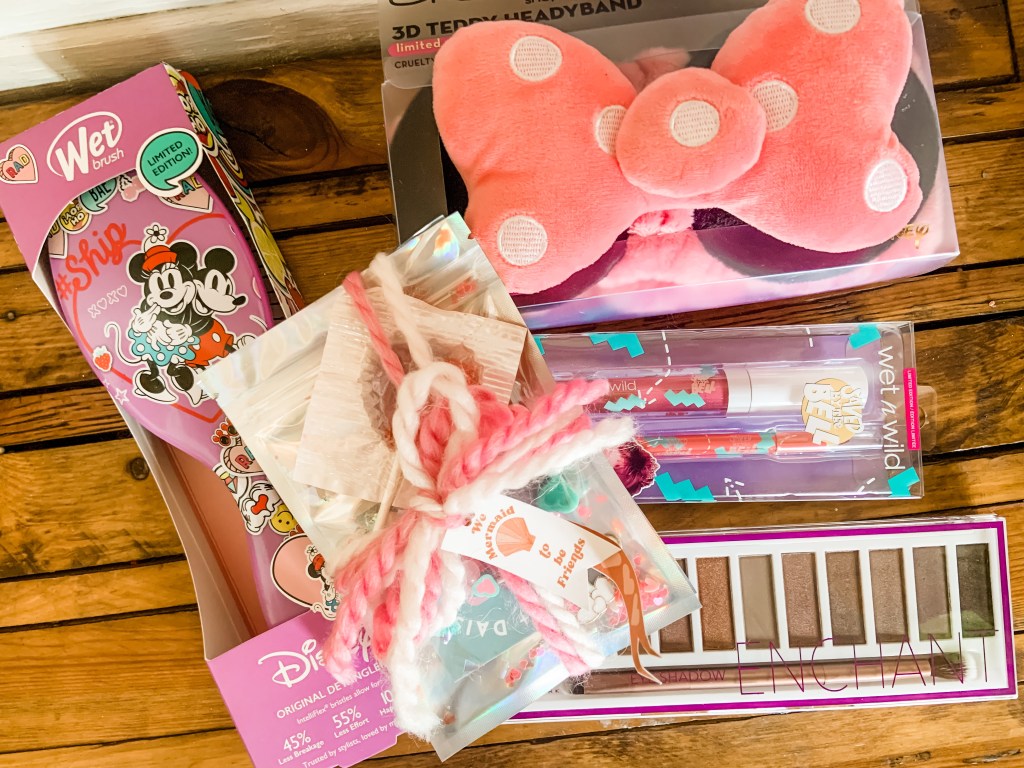
Right now, Mila just wants to make makeup videos when we’re home. I swear she’s going to be turn into a mini-influencer and I’m all for it. She has been telling me she wants different make up and I just had to surprise her with new lip gloss, eye shadow, a Minnie Mouse makeup headband, and a new Minnie and Mickey hairbrush.

Honestly, I bought all of this off the clearance shelf at Marshalls. They had a ton of goodies. When I want to buy makeup for Mila, I make sure it’s real and for a good price. I don’ think I spent more than $5 on any product here.

Why don’t I give her ‘fake’ or ‘kids’ makeup? Well, it’s not tested or as safe as real makeup. There’s a lot less chemicals and she know that there’s a difference between the two too. I want her to feel like she’s appreciated and supported as well as being safe when getting all those Tik Tok fans when she’s allowed to have it (way in the future).

If you’re curious to see a makeup tutorial she did, check it out here.

She also received the CUTEST bracelets from our favorite Etsy shop: Sloane and Daisy. We have purchased so many of their bracelets and necklaces and are obsessed. Of course we had to have one in our LOVE Basket.

Mila also reps for Sloane and Daisy and you can use GREYSKIES15 to get your little (or you) a bracelet of your dreams.

Social Media Kit

To further feed her love for social media, I surprised her with this video recording kit!

It comes with different lights to get the perfect video. We didn’t put the tape lights up, but she’s in love with her ring light. Then thinks it’s so cool when I put the mini one on my phone to record her that way too.

I think I’ll end up giving her an old phone without anything but the camera to record herself. She truly enjoys it and it’s harmless. I guess it’ll give her the skills to use technology too.

We’re always looking for learning experiences.


Mila loved everything in her LOVE Basket and I was so happy to give them to her. We’re excited to enter February and get this month under way!


Do you get your littles anything special for Valentine’s Day? Let me know in the comments.

Valentine’s Day Painting Activities

Pinks, hearts, and love all around. Valentine’s Day is the perfect holiday to craft and create. To start off the fun, we played around with Valentine’s Day Painting Activities that will be helpful for our crafts all February long.

Even if you’re not ‘crafty,’ you’ll love these easy painting ideas and your kids will have fun with it too.

I think it’s a little obvious that Mila (and I) love painting and being creative. Usually Mila’s go-to colors are pinks and purples, so it just makes Valentine’s Day prep a little more fun.

Since we’ve had a lot of snow days lately, we’ve been experimenting with different ideas of how to express ourselves. All of these listed are simple, BUT they can get really messy. I just like to state that beforehand. I highly suggest putting something down underneath your painting area and putting old clothes on your kids.

That way everything stays safe and clean.

We used four different types of painting styles and I’m going to save our favorite for last. Here’s all the supplies we used for the entire day:

  • Stock paper
  • Paint
  • Bubble wrap
  • Cotton Balls
  • Toilet paper rolls
  • Shaving cream
  • Kraft paper
  • Tray

Bubble Wrap Painting

One fun way to add texture in painting is to use different supplies. Mila and I used bubble wrap last year for a heart garland, so we wanted to redo it again. I actually loved the little dots it creates. It sort of reminds me of honeycombs.

This year, we used WAY too much paint and didn’t get the honeycomb effect. I love the way it did turn out though.We also popped the bubbles too, which was fun for Mila. It made the paint explode out, so beware of that. I think it just looks like a big swirl, but we had the most fun using this method.

With the extra paint, I put it on another piece of craft paper. We’ll use that for wrapping paper.

It’s also a great way to reuse bubble wrap instead of just throwing it away. Always looking for ways to reuse, reduce, and recycle.

Cotton Ball Painting

With toddlers and preschoolers, using anything but paint brushes makes painting way more fun. Cotton balls are a perfect stepping stone for them. Although Mila just used her hands, you can easily add them on clips to make it less messy and easier for kids to grab.

This one seems a little typical to add, but I want to share the reasons I love using cotton balls for painting.

The circle shape is so cute and stays consistent. Mila talked the entire time how she was making circles and was very proud of them. It also holds the paint really neat. It soaks it up and if you mix colors, it gives a cool ombre pattern. Usually I don’t let Mila mix her paint to avoid making brown, but you can do it with cotton balls. You can tell which colors she mixed together.

Even though this is simple, kids activities do not have to be extravagant to get a cute outcome filled with fun.

Toilet Paper Roll Stamp

I promise I won’t go on and on about reusing things around the house, but here’s another example of it. Most people have empty rolls so they’re accessible to use for Valentine’s Day crafts.

The best part, you can easily shape them into little hearts. All you have to do is push down in the middle to get the indent in the top of the heart and press the sides in. It’s super simple to do! I think they’re the cutest little hearts as well.

This was definitely Mila’s favorite painting. She’s obsessed with hearts and draws them constantly. Being able to paint them just made it a little sweeter.

One issue that we ran into is the heart not being even when you press down. If you don’t get them just right, you have to show your child how to get the stamp fully down. For us this time, we just had to rock it from the bottom point then tilt it to the top arches. I only had to show Mila one time how to get a complete heart and then she was all over it.

We’ll 100% be using this technique for a future craft. I’ll make sure to share and link back here just in case you’d like to keep up and see.

Shaving Cream Marbling Art

Out of all of these methods, this is the only one we’ve done for the first time. I’ve been eyeing this technique for a long time, but didn’t think Mila was ready for it. Now we have peaked in our painting. The outcome of this is my favorite, but it was the messiest of the bunch.

For this, all you have to do is put shaving cream in a tray. I used Mila’s sensory one. Then, Mila poured acrylic paint on top of the shaving cream and mixed it around with a paint brush. She might have swirled it a little too much, but the pattern was perfect no matter how she did it. After you have it the way you like, you push the paper in it. Make sure all of it is covered or you’ll have blank spaces. Peel it off the top and use a popsicle stick or old card to scrape off the remaining shaving cream on top. After, let it dry.

We ended up using the same pattern for three sheets of paper and could have easily done more! It was the quickest way to paint and is so unique.

I personally got a ton of shaving cream and paint on my hands through this. Mila saw how messy it was and dipped pretty quick. I would just suggest having wipes close to you or doing this technique by the sink.


Painting with these different styles was a lot of fun and gives us so many opportunities for future projects too. I can’t wait for you all to see what we’re making with these sheets too! Try to guess in the comments what you think we’re making.

Also, I want to say I know I’ve been a little quiet on the blog this month. I’ve been posting more on Instagram and Facebook the last few weeks, but it’s been nice to have a little writing break. We have a ton of fun recipes, activities, and crafts for the rest of this month and February to bring you though! One of them is about our trip to Florida and DISNEY! Let’s just say Mila keeps asking to go back.

For now, I’d love to hear what your favorite crafts and activities you do for Valentine’s Day are in the comments… and again, let me know what you think we’re doing with these sheets too.

Looking for other fun Valentine’s Day activities? Check these out:

Winter Craft: Popsicle Stick Snowflakes

Winter is here and for us, it’s time to stay inside when the temps are so low. To bring the magic of snow inside, we created these adorable Popsicle Stick Snowflakes

They’re easy for toddlers and preschoolers to create and make for an adorable craft as well.

If you’ve read any of my recent posts, you can tell I’m trying to get better at taking videos. They’re fun to make and post as reels too. It gives people who don’t have a lot of time to read a quick glimpse into the crafts and activities we do.

With that said, I forgot to take pictures while making this craft… oops. No fear though, I posted the video below.

Here’s what you’ll need to make these adorable glitter snowflakes.

  • Popsicle sticks
  • Paint
  • Glitter
  • Modge Podge )you can DIY this with glue and water)
  • Hot glue

For the first part of this craft, snowflake assembly is required. I would suggest an adult to do this. Personally, I used hot glue for this to be sure the snowflake will stick together. You could use other glue, but I’m unsure how it would hold up in the long run. If your child is comfortable using a hot glue gun, then they can go for it.

The actual snowflake uses four popsicle sticks. Just keep layering them so you can see the ends of the popsicle sticks. The video shows this really well.

After the glue is dried, your child can paint the snowflakes.

Mila chose the colors of her snowflakes. Of course she went for pink, light blue, and silver. She wishes that there were pink snowflakes. Wouldn’t that just be magical?

While they’re painting, I put a little tray underneath so nothing got on our countertop. These snowflakes get a little messy, so protect your area if you need! Mila couldn’t really hold and paint, so her brush kept going on the tray. Just a little heads up.

Now on to the best part: GLITTER!

Before the paint dries, sprinkle glitter over top of the snowflake. This way it gets stuck in the paint. If the paint dries beforehand, you can use modge podge to get it to stick too. I think it takes away an extra step just putting the glitter on the paint. You get similar results.

After the paint and the glitter is dry, use modge podge to seal in the paint and the glitter. If you don’t seal it, you’ll have glitter everywhere.

Once everything is dry, you have your beautiful, popsicle stick snowflakes!

They’re a lot of fun to do and easy to assemble. As you saw in the first picture, I attached them a shelf, but we want to make more to create a snowflake garland. You can potentially make and show these off in a variety of ways.

I also think they’d look cute as a car mirror decoration, but we’re definitely doing garland!


What ways would you show off these Popsicle Stick Snowflakes? Or let me know what snow or winter inspired crafts and activities you do during winter in the comments.

DIY NYE Time Capsule

What’s more fun than reflecting on the last year? Going back to that year ten years down the road with a DIY NYE Time Capsule.

In my DIY Mini Cardboard Memory Book post, I shared that I was going to do something special with it. I’ve decided to make another new NYE tradition by doing a time capsule every year. We’re gong to fill it up with a lot of things that made the last year so special. Then, in ten years, we’ll open it up and walk down memory road.

Sometimes I can’t believe how fast time has went since Mila has been born. She is ALWAYS asking what she was like when she was a baby. I feel like she just was a baby and I blinked and there’s a little girl in front of me. Plus, this year has seemed like the fastest yet. She has grown so much and I want to treasure how little she is with what goes in our NYE time capsule. Hopefully she won’t be too embarrassed by her answers when she’s thirteen… let’s get real, she’ll be annoyed with everything then.

Almost everything was easy to put together and I found the worksheets online! Everything else is easy to make at home and it’ll bring up fun conversations amongst your family.

Here’s what we’ll be seeing on NYE 2031!

Year in Review Worksheets

I found the worksheets we used in our time capsule at @whimsicallywonderful on Instagram. Her printables are adorable (and free). I’m pretty sure I’ve shared them on the blog before. Anyways, I was planning on making our own sheets to write on, until I saw the ones I printed off.

Even though these sheets are girly, she also has ones with blues and greens in them. They’re so cute, just a different color scheme. You can find them at Whimsically Wonderful under the Whimsical Prints. It’s the last section on the page. Trust me, if you’re planning on doing a time capsule, these are such a great option!

I printed off:

  • My Magical Year
  • Top 5 Best Moments
  • My Feelings about 2021

There are more options on there too; like handprints and a letter to a future self.

Mila Drawings and Glitter Handprint

Mila loves to draw and always draws our family. Remember the person she drew and I got a tattoo of it earlier this year? So, I definitely asked her to do a drawing of all of us and labeled it too. I think this will be precious to see in ten years. Her drawing skills might be a little better then, but I think these will always be my favorite.

She also chose to do a glitter handprint. We made a little craft with her hand being the 0 in 2022. We traced it out, added glue, and then a bunch of glitter! It’s still drying after twelve hours, but I’ll make sure to update about it on one of my socials.

If it never dries, she also traced her hand on the back of the family drawing too!

A Letter from Mama to Mila

Letter writing is so therapeutic and if you’ve followed my story for a little while, you know I write a lot of them (you can search letters if you’re interested). I actually used to write letters to Jensen every day when I was pregnant with him up until Mila was born. So, it sort of makes sense that I would include a letter in here too.

Honestly, one of my biggest fears is something happening to me and her being without a mom. I want to make sure she knows how much she means to me and maybe I can throw some wisdom in there too. It sounds cheesy, but maybe it’s the last letter or words she would ever get to me. That thought alone makes it important to me to write about this year and how much her at three or in 2021 meant to me.

Again, we’re also going to be opening this up when she turns thirteen, I may need that extra support… I’m joking.

If you do do a time capsule, this would make a precious memory for your child.

Ribbon Height

On Mila’s papers, it asks to write her weight and height. Even though I can easily write that down, I want to be able to visually see it.

Although I’m not going to add bags of rice in her memory box, we collected her height in a ribbon. I just placed one end of the ribbon on her head and then cut it at her feet. Then, I made a little tag saying what the ribbon was for and connected it with a clip.

I love this idea because I can unravel it and actually see how tall she was.

Again, this is a super simple and easy idea you could do too! It wouldn’t even have to be a ribbon, yard or string work well too!

Pictures and Miscellaneous

Since we take thousands of pictures each year, we had to add a few in the time capsule.

The DIY Mini Cardboard Memory Book is snuggled tightly in there. I’m still obsessed with how it turned out. We’ll also be taking Instax pictures on NYE to add to the capsule as well. Maybe I’ll even let her take whatever pictures she wants. This way we can check out how her photography skills have changed too.

Some other items we’re adding are a New Years necklace, a craft, and maybe a toy or trinket. I haven’t totally nailed that last part down.

When we open it, I just want to be blasted back to 2021 and have this magical feeling.

As pretty as everything is out of the time capsule, it’s perfect inside too. We added a ‘Do NOT Open Until NYE 2031’ on the lid too. Just in case I need some motivation to wait!

Even though I bought a pretty jar for this time capsule, you can easily upcycle items you have around the house. I’m thinking mason jars, pringle cans, or even old tupperware containers you don’t know what to do with anymore. You could be as creative as you want to be and even make this a fun part of you time capsule too. For some reason, I’m thinking of a VHS or DVD case. It would have been so clever 30 and 20 years ago.

Anyways, I’m really happy to be starting this tradition with Mila and see how it evolve over the next few years. I hope you enjoyed it too and maybe want to start this with your family.

If you do this tradition or plan to, let me know what other things Mila and I should add.

DIY Mini Cardboard Memory Book

With the year coming to an end, it’s a fun time to look back on our favorite memories. To keep and showcase them, we made a DIY Mini Cardboard Memory Book. Ours is perfectly pink and full of all the pictures we loved from the last twelve months.

The plus side, this easy craft is fun to make and you can personalize it however you’d like.

Here’s what you’ll need to capture your memories of the year:

  • Scrap Cardboard Pieces
  • Glue
  • Tape
  • Stickers
  • Pipe cleaners
  • Paint
  • Pictures
  • Scissors

Honestly, this took me a little while to make, but I’m glad I did it. A little hard work goes a long way!

First, I cut out seven, small cardboard squares to make the pages. You could easily make these bigger, I just want to use this book for another project I’m sharing this week. Then I made little holes on one side of them. I couldn’t find my hole puncher, but I made them with scissors.

After, I painted a little area on the squares pink and let them dry.

While it was drying, Mila and I picked out one picture from each month, besides two months… you’ll see why. Then, I just printed them on stock paper I had at my house. When they were all printed, I just cut the pictures out.

Once that was done, I pulled out MIla and I’s favorite stickers, some glitter markers, and got to work!

Like any type of scrapbooking or picture books, it just takes time. I had a lot of fun looking back at all our favorite memories from the year. With every page, I made sure to write the month out and add relevant stickers. I think they all captured the feeling and emotions of every month. Mila had fun helping me with the stickers as well.

On the back cover page, I had her write down her name with little hearts. Just so I always have her writing. She draws hearts on everything to show love. Just something I always want to remember.

Just to share our pages incase you need some inspo, here’s ours and why we chose them for the month.

January and February

In January, MIla did a fun glitter shoot and they’re one of my favorite pictures of her! She seriously looks magical. Then in February, we made one of my favorite DIYs: I love you frame. It’s one of the pictures from that day and always makes me smile.

March and April

Last March held Easter. I laughed so hard when Mila took off after getting one ‘good’ picture with the Easter Bunny. The running shot is hilarious and I had to add it. April is our big birthday month. Jensen’s is on the fifth and Mila’s the fourteenth. We picked a picture from the day she turned three.

May and June

One month that we look forward to every year is May. We get to go on vacation AND school is usually out too. That means summer! This picture is of her in Myrtle Beach in her yellow polka dot bikini. In June, we went to our local waterpark so many times. I had to capture one of those moments.

July and August

In July, Mila and her friends won the Fourth of July talent show in our town. It was a big moment for them (and us moms). I’ll never forget that day and will always tell Mila the story of what she did after… I’ll make sure to share one day on here. At the end of August, we got Toby! Mila chose this picture since she loves her puppies so much!

September and October

September was a huge change for the both of us. Mila started preschool and has been learning so many new things. Believe me, she tells me all about it. It was also the start of me posting a picture every day of Mila’s outfits. Since we’re obsessed with Halloween for all of October, Mila requested that I added all of this year’s costumes.

November and December

Of course we had to celebrate the holiday season with these last two pages. We still love her turkey headband from Thanksgiving and that Santa picture showcased how December felt all month long.

Back Cover Page

Like I said above, I had Mila add this page. I think it’s a sweet touch to wrap the entire year and how she’s growing up. Makes my heart smile.


I really feel like this will be a yearly tradition from now on. It’s such a cute and quick way to reflect on all the years. Plus, when you see my next NYE activity, you’ll think it’s even more perfect for the mini version. Stay tuned to see.


What are some ways you like to reflect on the year during New Years? Or do you have any NYE traditions you’d like to share? Let me know in the comments.

Christmas Activity: Tissue Paper Lantern

We love fun traditions in our house. Any time I can be transformed back into childhood, I’m all for it. Especially when I get to pass it on to Mila. One of my favorites crafts in elementary school were Tissue Paper Lanterns, so we made a Christmas themed one.

There are a ton of different skills in this DIY for Mila and now we have another tradition we can do every year.

Another part of this DIY that I love is it’s an upcycle project! Here’s what you’ll need:

  • Mason Jar or Recycled Glass Jar
  • Tissue Paper
  • Modge Podge or DIY Modge Podge (Glue and Water)
  • Paint or Foam Brush

To start off, I had Mila cut pieces of tissue paper into squares or smaller pieces. We’re always trying to work on scissor skills and she really enjoys it too. With a little help from me, we had more than enough pieces of tissue paper.

Then, we took our DIY modge podge to put it all together. To make DIY modge podge, just use regular, white glue and add water into it. It should mix into a modge podge consistency. You can see a picture of it down below too. It’s just a more watered down glue consistency that’s easy to spread with a paintbrush.

Mila and I worked in sections. We’d put paint on, then put a layer of tissue paper over top. After it was glued down, we put another thin layer of DIY modge podge on top.

After you fill in all the sections, just let it fully dry. It doesn’t take too long at all.

Once it’s dried, you can put a small candle in it and the light shines through beautifully. I absolutely loved how it turned out and it was easy to do with Mila. Hopefully we can keep making them every year with different patterned tissue paper. Just make sure to add the year on the lantern somewhere.

I ended up putting it as a centerpiece on our dining room table. It looks so cute and I love showcasing all her DIYs and crafts.


Do you ever make a craft over snd over again? If so, what do you make?

DIY Christmas Ornament Garland

DIY’ing and Christmas go hand-in-hand. So, we’re adding a little sparkle and pink to this season with this DIY Christmas Ornament Garland.

Mila and I love glitter and all things girly. This garland felt like it belonged in our home.

The best part of this DIY is you can personalize a DIY Christmas Ornament Garland to your style and it’ll be just as cute! Plus, I spent around $25 dollars for everything you see here. I think that’s a great deal for something that was easy to make and perfect for our family.

Everything you see here (minus the first ornament on the left) comes from Target. It consists of:

  • Ornaments
  • Flocked Garland
  • Tree Pick (Christmas Tree Filler)
  • Yarn/Ribbon

On Black Friday, I found most of these items at Target. They had most of their ornaments for $3, which are so cute! We love pink and have a ton of it in our home, so I knew it was a good purchase. The selection Target had was perfect. There were inclusive pieces and different textures that had to go home with us.

The flocked garland is probably 5 foot long. I wrapped it through these hooks and folded it back to make it look thicker. Then I put in the metallic tree pick for a fuller look too.

After it was up and placed how I liked it, I just started adding ornaments. To make some of them look longer, I used ribbon or yarn.

I love the layered look and how everything meshes together.

Not only do I love how it turned out, it only took me twenty minutes to make. It’s a simple, statement piece that I’m proud to have in my home.

I know that any person can something similar with ornaments that they love.


How do you decorate for Christmas? Classic reds or green? Or do you have your own style with it?

Thanksgiving DIY: “Turkey” Feather Headband

Since Mila loved her Googly Eye Headband at Halloween, I knew she needed the perfect hair accessory for Thanksgiving.

With a little imagination and a lot of feathers, I came up with a Turkey Feather Headband.

I’ve said it once and I’ll say it again here, feathers are to Thanksgiving as eyes are to Halloween. They make all Thanksgiving crafts and activities just a little more special. The best part of each… they can both be found at dollar stores!

Another similarity… I got almost all of the items to make this headband at the dollar store too. Everything besides the yarn!

  • Feathers
  • Fluffy kitty headband
  • Hot glue/gun
  • Yarn

To start, I took off the ears of the kitty headband and hot glued them back on. I put them bottom on the band and close together. This way the feathers stick up.

Then I wrapped the band and the ears with yarn. This took a little bit of time, but make sure to use hot glue where the yarn starts and stops. I didn’t have to hot glue the entire time. Thankfully because that would have burnt my fingers.

After it’s covered in yarn, I stuck feathers in by the ear part through the yarn. I made sure to add a little hot glue so the feathers didn’t fall out.

I ended up using a ton of feathers, especially since I covered the front end back of the headband. At first I just had the front done, but I think having both made it more complete and full looking.

When Mila saw it, she instantly fell in love! Of course she wants to wear it to preschool one day this coming week!

I’ll try to make a clip with a few feathers too.

Maybe now she’ll want to dress up for Thanksgiving Day. We usually take a cute outfit AND something comfortable to wear. Especially after eating all the turkey!

No matter what, I think this Turkey Feather Headband will be making an appearance.


Let me know in the comments whether you dress up or down for Thanksgiving. I’ll let you know what Mila ends up deciding to do.

Santa Christmas Countdown

There’s thirty-six days left until Christmas! We’re getting so close to advent season and counting down to Christmas everyday.

Although we have our normal candy one, this year I thought Mila and I should make another.

Say hello to the Santa Christmas Countdown.

With a square wood piece and a little paint, this Santa Christmas Countdown came to life.

The transformation of this piece is adorable. It started with just paint, then numbers, and each day it’ll be filled with cotton balls.

After filling it up, it becomes Christmas decor for years to come!

I love how easy it is and that Mila loves the idea of filling his beard in. Although I’ll just have her use regular glue for the beard, I’ll go back in and add hot glue so it stays on there.

Didn’t it turn out amazing? I love each step of it, but the cotton balls are my favorite. The added texture just makes it so much warmer and jolly. Just like Saint Nick!

You could DIY this Santa Christmas Countdown OR you could just have me make it for you.

I have a Santa Christmas Countdown listing ready to go on my Etsy shop or you could message me too. Either way, I love this piece so much that I wanted to share it all with you!


Let me know in the comments… Do you have an advent calendar every year? If so, what how do you countdown to Christmas?

DIY Halloween Costume: Minnie Mouse

It’s not secret, Mila and I LOVE Halloween. The one year, we went to a ton of trick or treats and had to be creative with different costumes every time. One of my favorites that we did was this DIY Halloween Costume of Minnie Mouse.

The best part about this DIY Halloween Costume was we had everything at home. BUT if you want to duplicate it, everything can be found on Amazon… which you can get in before Halloween!

SCORE!

We did this costume mostly because Mila was OBSESSED with Mickey Mouse Clubhouse. When she figured out what she looked like, she was so happy. I’d love to dress her up as Daisy one year because she has the attitude to accompany it.

There’s only five key pieces you really need to transform your little into Minnie or Mickey Mouse.

We didn’t buy any ears because I did space buns on Mila. I think it made it extra cute. PLUS… she couldn’t rip them off. That’s so important on Halloween nights, when you don’t really want to loose anything. Bows are easy enough to lose!

If we were to do this specific costume this year, I’d definitely do the black nose and maybe red lips too.

I love doing DIY costumes and finding cheaper options than just buying a specific one. For Mila’s costume this year, I bought EVERYTHING from Amazon. It turned out cuter than other options and she’s obsessed. Plus, we can reuse specific aspects of the costume too.

If you’re interested in more DIY or last minute costumes, let me know and I’ll do a few more.


What is your favorite DIY costume you’ve made? Let me know in the comments.