Preschool Book Pairing Activity: Room on the Broom Handprint Art

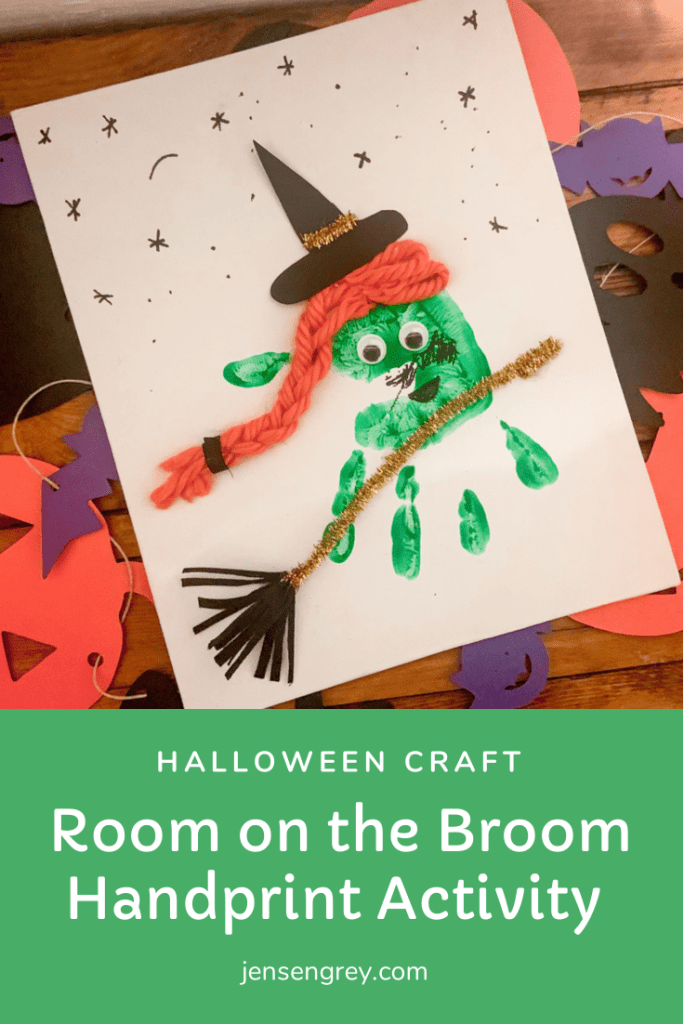
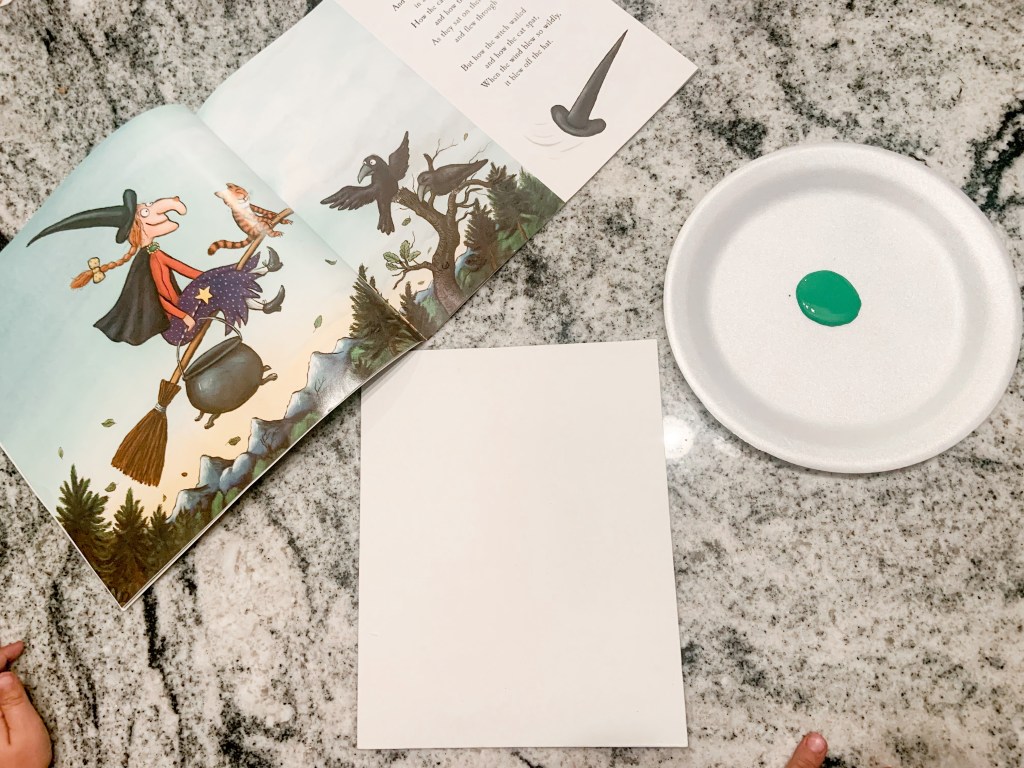
The best way to learn is through books! To introduce Mila to Halloween concepts, we’ve been reading a ton of different ones. Lately, Mila’s favorite has been Room on the Broom. We extended her learning by pairing the book with an activity to make handprint art.

Again, it’s another decoration that Mila and I will be able to look at in the future and remember our times when she was little!

All we used for this craft was…

I want to start off by saying, I most definitely helped Mila with this craft. Older kids could probably do this alone. But, I used hot glue, cut out the hat, and made the broom. Everything else she had a hand in making… literally.

First, I painted her hand with green paint. Then let her press it on the canvas to make the witch.

While it was drying, I assembled the broom and hat. For the broom I used this cute gold pipe cleaner for the base. Then I cut up ribbon to make the straw part of the broom. I combined them by making a loop with the pipe cleaner and twisting it off.

The hat was easy to make. All I did was cut out a witches hat on black paper and hot glued leftover pipe cleaner for the base of the hat.

When the green paint was dried, I hot glued down the broom and the eyes.

Next, we made the hair. I took a few pieces of orange yarn and braided it to look like the witch in the book. Mila loved helping cut out the pieces and was very impressed with how much it looked like the original witch. She’s finally impressed by my skills!

After that, we glued down the hat and added facial details and the night sky with a permanent marker.

Mila absolutely insisted on drawing the witch’s nose and the moon.

I absolutely love how this turned out… with all of Mila and I’s crafts. It’s festive and we put a lot of hard work into it. Doing a book pairing activity with her also underlines the importance of reading and teaching her that reading is fun and valuable.

Hopefully she’ll want to continue reading and extending upon those lessons in the future.


What’s your favorite Halloween book that we need to get next year?

DIY Halloween Costume: Minnie Mouse

It’s not secret, Mila and I LOVE Halloween. The one year, we went to a ton of trick or treats and had to be creative with different costumes every time. One of my favorites that we did was this DIY Halloween Costume of Minnie Mouse.

The best part about this DIY Halloween Costume was we had everything at home. BUT if you want to duplicate it, everything can be found on Amazon… which you can get in before Halloween!

SCORE!

We did this costume mostly because Mila was OBSESSED with Mickey Mouse Clubhouse. When she figured out what she looked like, she was so happy. I’d love to dress her up as Daisy one year because she has the attitude to accompany it.

There’s only five key pieces you really need to transform your little into Minnie or Mickey Mouse.

We didn’t buy any ears because I did space buns on Mila. I think it made it extra cute. PLUS… she couldn’t rip them off. That’s so important on Halloween nights, when you don’t really want to loose anything. Bows are easy enough to lose!

If we were to do this specific costume this year, I’d definitely do the black nose and maybe red lips too.

I love doing DIY costumes and finding cheaper options than just buying a specific one. For Mila’s costume this year, I bought EVERYTHING from Amazon. It turned out cuter than other options and she’s obsessed. Plus, we can reuse specific aspects of the costume too.

If you’re interested in more DIY or last minute costumes, let me know and I’ll do a few more.


What is your favorite DIY costume you’ve made? Let me know in the comments.

Halloween Craft: Fluffy Ghost Bow Holder

We’re back with another Halloween Craft. Since Mila has a ton of Halloween bows, I thought it’d be fun to make a Fluffy Ghost Bow Holder! Not only is it a festive craft, it’s useful too.

Mila and I both made one of these. Mine became the bow holder and Mila’s became a cute, green ghost. Each of them are so cute and they make me smile each time I see them. This is just a reminder to parents that their kid’s crafts do not need to be ‘perfect.’ They’re so creative as is and what they create is them doing their best!

Without any more introductions, here’s what you’ll need:

First, get a ghost cut out. I found a pack of four ghosts at the dollar store for one dollar. You could also easily find one of these online to print out or with a Cricut. That’s completely up to you.

Or you can order them here from Amazon.

Then, glue cotton balls down with regular glue. Mila was able to do this, so just use your discretions of your child’s ability. The best part is… it doesn’t have to be perfect.

After it’s completely filled, cut out eyes and a mouth with the black construction paper. You can show whatever kind of expression you want your ghost to have. Mine and Mila’s ghosts have completely different expressions. They’re both so cute though!

At this point, Mila was done with this craft. She decorated the rest of hers with green glitter. It makes me smile to see. We’ll eventually add some ribbon on to hers too.

If you continue on with this craft to make it a bow holder, you need to first make sure the front is dried.

While it’s drying, cut out different pieces of yarn and ribbon. I used both and chose neutral colors, but you can obviously use whatever works best for your space. Mila has asked to use pink for her when we get to it!

Once everything on the front is secure, flip it over and hot glue the ribbons on the ghost. Even though I measured all the ribbons before I glued them down, I had to trim them up since they were on an uneven surface. It didn’t take too long, but I think it made it more clean looking.

To be able to hang the ghost, I also hot glued a piece of ribbon at the top to make a hanger.

I absolutely LOVE how this turned out. All her Halloween bows look so cute on here too. They haven’t pulled any of the ribbons off, so it withstands them too. We’re hanging it on her bedroom door to make our morning bow grab easier. Plus it spooks up our little hallway.

This will be another craft (both Mila and I’s) that we’ll hang up year after year!


Do you decorate your entire house for Halloween or just small places? I feel like we’ll end up decorating every room in the next few years with all our crafts!

Fall Charcuterie Board

One of my favorite fall activities are watching scary movies under a ton of blankets on the couch with a fall charcuterie board. It makes for a perfect date night or just a fun night with Mila.

I mean, who doesn’t love a charcuterie board?

To amp up our normal grazing boards, I incorporated fall colors and tastes. It turned out so moody and tasted delicious too.

Here’s everything I added to this Fall Charcuterie Board:

  • Apple Cider
  • Munster cheese
  • Ritz Crackers
  • Mini cupcakes
  • Chocolate covered pretzels (that tasted like pumpkin spice)

Not pictured were raspberry jalapeño jam to put with the crackers and cheese. Jams are the best addition to charcuterie boards. I also usually try to add some type of meat like salami, but I didn’t have room to add it on here either.

To make it a little more festive, I added the white pumpkin and the extras from my DIY Fall Wreath.

Of course, I took a video to show you all the whole process.

I can’t wait to make a more Halloween inspired charcuterie board for Mila’s Halloween party. Stay tuned to check it out!


What’s your go to items for charcuterie boards? Let me know in the comments.

Halloween Craft: Googly Eyed Monsters

Halloween crafts and activities do not have to be complex. My preschooler’s favorite Halloween Craft are these Googly Eyed Monsters! Not only did she have a spook-tacular time making them, she loves making sure everyone sees them when they come in our home.

The best part about these monsters, you only really need to go buy googly eyes. Everything else are pretty common household items.

It looks pretty simple right? Here’s all we used:

To set up this craft for Mila, I cut some squares from old cardboard boxes. We love to upcycle and reuse items. If we can make memories by doing that, I’m all for it!

Then, I put out the colors of paint she wanted to use. I tried to persuade her to use more Halloween colors. She insisted on blue though, but I think it turned out super cute even though it’s not a traditional color.

I let her free paint and do whatever she wanted. They didn’t start off as monsters, just as big blobs.

If you have older kids, they’ll be able to do this next part on their own. I went in and drew outlines of monsters with her blobs. She might be able to do it now, but I just follow her interest and patience level with these types of activities. There’s no right or wrong ways to outline them. Just let their artwork speak to you!

When the monsters were finished and dried, Mila put the eyes where she wanted them to be. Let your child pick out how many eyes and the eye color they think they need. It’s so cute to see how they end up seeing their monsters.

Then, you can hot glue a pipe cleaner on the back of the cardboard pieces to hand them. This is an optional step, but I love it.

I love this little progression picture. This activity came out so adorable and I’ll definitely be hanging these up throughout future Halloweens. At first, Mila was afraid of some of her pictures. Now she thinks they’re cute. She’s really getting in the spooky mood!


Which is your favorite monster that she made?

Halloween DIY: Skeleton Animal Glow Ups

My entire house is fully prepped for Halloween! It’s been so fun to see the transformation. Our latest spooky DIY are these Skeleton Animal Glow Ups.

I have been back and forth with sharing these. They’re so creepy, but Mila loves them. Honestly, they’re sort of like a creepy Elf on a Shelf.

They were so easy to make and they fit our Halloween aesthetic. I found them at the Dollar Store for a dollar a piece. Not a bad price in my eyes; especially because it was a craft for both of us and they look so cute.

Cute as in… creepy. They can be both, right?

I will say, Mila had fun painting them, but it was a little tricky. She did them for a while, but I ended up finishing them.

If you do paint them and your kiddo wants to carry them around, I would suggest spraying them with a clear coat. It just helps the paint hold up a little longer. If you’re keeping them out of their hands, it should be okay!

Originally, I had them all on our dining room table. Like I said though, they’ve become our unofficial Halloween Elves on a Shelf.

I actually love how they turned out and will keep them for the years ahead.

Somehow they mesh really well with the white pumpkins and the general feel of my house. We like random things, so they make me smile.

Your Halloween decorations don’t have to be grand to make a statement. Sometimes all it takes is a little paint and a animal skeletons from the dollar store!


What’s your favorite way to decorate for this holiday: scary or pretty? Let me know in the comments.

Pumpkin Washing Sensory Bin.

Another day, another fall activity! Today’s play is a Pumpkin Washing Sensory Bin.

We love sensory play for so many reasons. To summarize all of its benefits, it helps children’s brains in a ton of ways! It also gives me a minute to do a chore or task that needs done around the house too.

Now that it’s spooky season, I’m finally letting Mila pick pumpkins from our pumpkin patch on the side of our house. It led straight to this activity.

Before we paint or decorate these pumpkins, I thought they needed to be cleaned off. Instead of me just doing it, I thought it would be so much fun for Mila… and I was right. All I had to do was set up this station.

The only materials I used were:

The only thing I told Mila was that the pumpkins needed cleaning and she could use more water and soap if she needed.

Let’s just say… she went to work right away!

This activity is so simple and Mila had came up with a big story of why they needed washed. She pretended they came from a different farm and not just outside our home. I always love listening to how her mind works.

That’s what makes sensory play so fun for everyone.

I actually left this activity out for the next day and she kept on playing. Lets hope painting or carving pumpkins goes this smoothly too.


Do you paint or carve pumpkins?

I’ve done both, but I’m thinking Mila may like painting more than carving this year. I’ll keep you all updated when it happens!

DIY Halloween Paper Chain Countdown Calendar

Looking for a fun way to count the days until Halloween? Try this cute Halloween Paper Chain Countdown Calendar.

Mila is SO excited for Halloween and keeps asking when it’s going to be. To show her how many days we have to wait to dress up, I thought this paper chain would be an amazing visual representation for her.

It’s filled with spooky and cute Halloween colors that would be perfect in any home. The graphics aren’t too scary either!

All you have to do is print the countdown, cut it out, and then staple it together.

Our little Halloween station is right by our front door. The Halloween Paper Chain Countdown Calendar made a boo-tiful addition to our spot.

I hope you like this little freebie. Make sure to take a picture and tag me in it on Instagram (@greyskies.rainbowhighs). It’d make me so happy to see it in your spot!

Again, click this for the Halloween Paper Chain Countdown Calendar.

Halloween Treats: Monster Rolls

Happy Spooky Season everyone!

Today we’re celebrating October with Monster Rolls for a fun boo brunch. It’s not really a DIY recipe, but a way to make food festive for Halloween. Either way, you’ll love it.

Even though I’m SHOCKED it’s October, I’m so excited to bring you fun activities, crafts, and treats all month long. I absolutely love Halloween and everything that goes along with it. Let’s just say, Mila and I have a lot planned for you.

These Monster Rolls are really simple, which are perfect for fall mornings.

Here’s all you’ll need:

  • Cinnamon rolls and icing (I used Pillsbury)
  • Food coloring
  • Eye sprinkles
  • Colored sugar

First, cook the cinnamon rolls as directed. Since everyone has their own different recipes or favorite brands, I’ll just leave this up to you!

Next, divide icing in different bowls. Add food coloring and mix. Mila absolutely loved helping with this step. As always, you can make it educational by talking about colors and it’s a great way to work on motor skills.

Then, set out the eye sprinkles and sugar to decorate.

Once the cinnamon rolls are done, I suggest dipping them into icing instead of spreading. It’s less messy and just is was easier in my opinion. Mila also helped with this step too!

After they’re all iced, it’s time to be creative.

I promise you eye sprinkles are a MUST for spooky season. They make any food or treat extra special for halloween. Mila loves them too and I think all kids would think they’re fun too. The ones I bought actually taste pretty good too.

Anyways, I just put the eyes in a little bowl and let her use the sugar dispenser. I let her know we were making monsters and she just went for it!

They were so fun to make… and eat too! I loved how quick they were to bake and that it gave Mila some creative time in the morning. We’ll be making these again this month because we both enjoyed them so much.


What did you think of our Monster Rolls? Do you have any Halloween classic breakfast foods, snacks, or treats that you make every year?

DIY Pumpkin Spice Latte

One of my favorite parts about fall is a good Pumpkin Spice Latte. Not only does it warm me up, it tastes delicious too. Since we don’t live super close to a Starbucks, I love making my own DIY Pumpkin Spice Latte.

In this blog post, I’ve decided to show you all my two go to options. One’s more a weekend at home recipe and the other is a quick morning recipe.

Both taste amazing!

The first recipe is the one I make on slow mornings. It makes the house smell amazing and really sets the tone for the rest of the day.

Here’s what you’ll need for it:

For this Pumpkin Spice Latte DIY, you’ll need to warm the pumpkin puree, milk, pumpkin spice mix, sugar, and salt in a pot. Keep stirring these ingredients together until they’re simmering. While this is happening, you can make your coffee or espresso.

Then, add the coffee into the pumpkin spice mix and mix both of them together until frothed. You can also use a blender to speed up this process.

After, pour into your favorite mug, add whipped cream and pumpkin spice, and then enjoy your tasty drink.

If you think that was simple. You’ll love this even more.

Our mornings are BUSY. Getting myself, Mila, and the dogs ready for the day gets chaotic. I feel like we’re constantly running around. When I finally get to school, I need a pick me up. So, before the craziness, I make sure to make this easy drink to get me through the day.

All you need for a quick DIY Pumpkin Spice Latte is Javy Coffee and Pumpkin Spice Latte Creamer (I use Starbucks!).

Javy Coffee is SO easy to use. It’s coffee concentrate where you fill your cup up with milk or water, then one to two teaspoons of Jacy too! It can made both hot and cold. I change it up depending on my mood (and how it feels outside). Afterwards, add your creamer and take it to go!

Both of these recipes are perfect for parents on calm and busy mornings.


Do you ever try copy cat recipes at home? If so, let me know which ones or the recipes in the comments below.

If you, what’s your go to coffee order?