Christmas Activity: DIY Wrapping Paper

Looking for a different way to make your Christmas gifts even more special? Try this DIY Wrapping Paper. I promise your family and friends will love getting their gifts wrapped in paper that’s made with love. And… your kids will be really proud of themselves when they show it off to them too.

Making our own wrapping paper is a big Christmas Bucket List item for us. We did it her first Christmas and now it’s become a fun tradition. I know my parents always look forward to seeing her wrapping paper. This year, she made it for her friends at preschool. I’m sure we’ll be doing this Christmas Activity more than once this year.

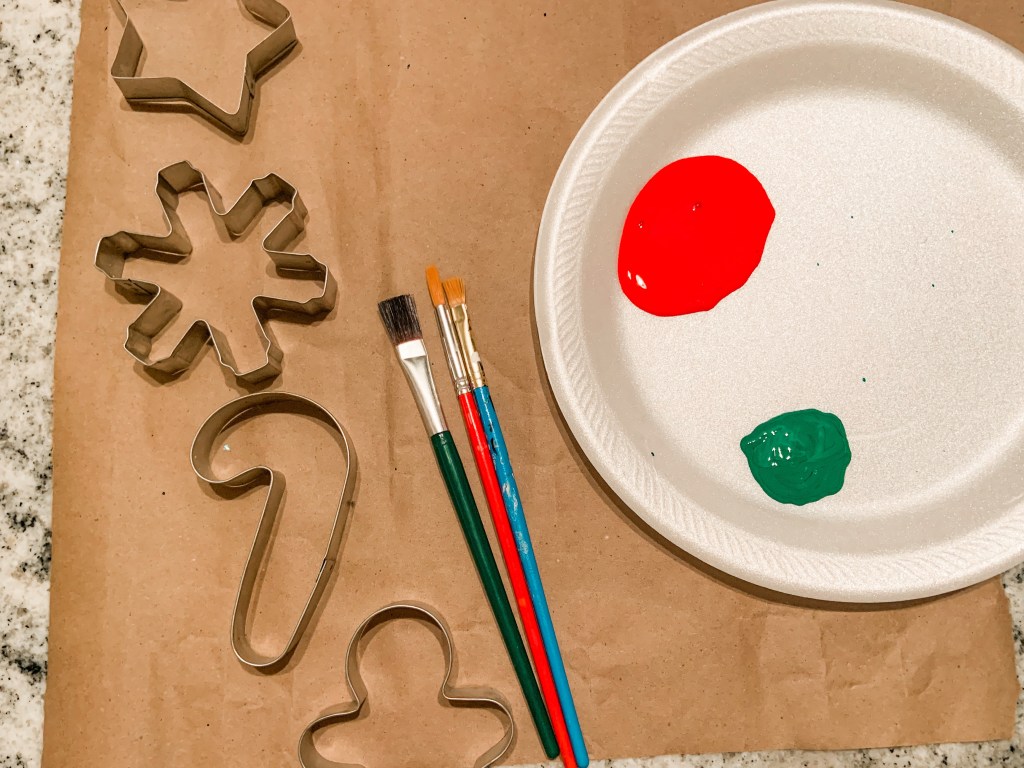
Maybe this can become a fun tradition for your family too! Here’s what you’ll need to make your own wrapping paper:

  • Brown craft paper
  • Paint
  • Paint brushes
  • Cookie cutters

This activity is super simple in the best way. You get to let your child be as creative as they want to be. PLUS, they get to be messy too! I think all kids like that aspect of that.

To set up, all I did was lay out brown kraft paper, pour paint on a separate paper plate, and laid out her tools (paint brushes, cookie cutters, bingo daubers). She did everything else all by herself. I would also suggest laying trash bags down if you want to keep your surface clean.

I played Christmas music and had Mila explain to me what she was drawing. The one section was a whole scene with people. It’s fun to hear their thought process.

After they’re done creating, just let your wrapping paper dry.

Then, just wrap your presents like normal. I tried to get Mila to paint more in the middle so you could see the design. We also love to add yarn and ribbon to make presents even more special.

Mila was super proud of her wrapping paper. It’s so unique. We’ve done it every year and each year it looks so different. It’s a great way to capture her growth. It also feels like a present within a present when you give to others. I love gifting her artwork and this is a fun way to do that while being useful too!

Even though we normally do this for Christmas, I’d love to do it for different birthdays or holidays.


Let me know in the comments…

Have you ever made your own wrapping paper? OR what recycled products do you use for wrapping paper?

Preschool Activity: Nativity Popsicle Stick Craft

The Nativity is a story a lot of people know and learn about around Christmas time. If you’d like your toddler or preschool to know this story, doing this Nativity Popsicle Stick Craft is a way to help them remember it and make it fun too.

As you might know if you’ve been following along with our story is that Mila is in preschool. Her preschool talks a lot about Bible stories.

I don’t necessarily talk about one religion at home. We talk about how people believe in all kinds of different things and none of it is wrong. My personal beliefs stem from different religions and readings, I’ve written about them in previous posts.

No matter what I believe, I want Mila to be able to make her own decisions. Right now, she’s asked a lot of questions about Jesus and Bible stories. So, we’re reading and doing activities with what she’s curious about.

Mila loves baby Jesus. Every time she sees a Nativity set up she says, ‘awww. Look at the baby.’ Then she names everyone.

It definitely made me want to do this activity with her even more. After a trip to the store, we got everything to create our interpretation of her favorite scene.

Here’s what you’ll need to create this book and craft pairing.

To start this activity off, we read the book with each other. She let me know she knew all the characters and that Jesus was born in a manger.

After reading, it was time to start making the scene.

We first wanted to make the manger. All we used was popsicle sticks and glue. We ended up using big popsicle and it took five across for the base. We used a smaller popsicle stick to connect it together.

Then for the floor of the manger, we used one big popsicle stick across it on the bottom. For the roof, we just crisscrossed them on the top.

Next we made Mary, Joseph, and Baby Jesus.

Again, we used popsicle sticks. For Mary and Joseph we decided to use big ones and for Jesus we used a small one. To get the correct length, we just cut them with scissors.

To make them look like they had clothes, hair, and accessories, we used yarn. You could use any color, I think ours turned out really cute.

Then, glue them down on the manger.

After that, make a star out of pipe cleaner and attach with glue.

You could stop here, but we decided to make this an ornament. To do this, we just glued on another piece of yarn so we could hang it.

Mila was SO proud of her hard work on this piece. She loved seeing this family together and talking about what she learned at preschool. I am so happy she can always let me know what she’s learning about.

This craft is so much fun for kids of all ages. I hope if you make it, you have as much fun as we did!


What’s your favorite Christmas book or story to read? Let me know in the comments.

Also, if you make this craft/ornament, tag me on Instagram or Facebook (@greyskies.rainbowhighs).

Preschool Craft: Christmas Process Art

Don’t get your tinsel in a tangle!

Christmas crafts don’t always have to be ‘perfect’ to be adorable. Toddlers and preschoolers love to learn by using the things around them, especially through art. This Christmas Process Art Mila created was a great reminder of that!

There’s a huge pressure to have the most perfect crafts online. It seems kids have to follow instructions step-by-step to create the best craft. When you give them the power to create on their own, they can create something even more spectacular.

I’m not going to say Mila and I haven’t been doing specific crafts together, but she needed this free project to showcase her creativity.

All we used to create this beautiful piece of art was from other Christmas items we had at home:

  • Canvas
  • Red and Green Washable Paint
  • Gold Acrylic Paint
  • Craft Pinecones
  • Bells
  • Fake Pine

To set up this activity, all I did was pour the paint and tell Mila to use these objects to paint.

She did ask for a paint brush and I did let her use it to push the bells around. Then she used it to paint after trying all the objects. She really went to work when she could use the brush at the end!

As much as it was a process art activity, I did not want to put a limit to her creativity. I think she had fun feeling the different textures and she loved shaking the bells too. It puzzles her why the items don’t paint as well as the brush… but that’s what it’s all about!

When she was finished, we talked about what her artwork symbolized and what we wanted to title it. She said it was just about Christmas and it didn’t need a name. So, it’s left untitled, but I did have her sign it and I dated it. I told her it reminded me of a Christmas tree, just REALLY close up. It honestly just makes me smile, like all of her artwork does.


We love making art as Christmas gifts… and will probably do it again this year! Let me know in the comments… What’s the best Christmas or holiday present you’ve received? Handmade or store bought?

Christmas Sensory Bin

Happy December!

A new month means there’s new things to explore and discover. This month, we’re doing a Christmas Sensory Play. The most fun part of this sensory bin is everything is bought from the dollar store!

We love Christmas and all the joy it brings to us. I think Mila is mostly excited for snow and Santa to bring presents. To combine that happiness and interest, I thought this Christmas Sensory Play idea was the best of both worlds!

This sensory bin is filled with:

  • Different types of fake snow
  • Jingle bells
  • Chocolate Kisses
  • Santa stickers
  • Refrigerator organizer

As I said before, I got this entire bin at the dollar store! Everything was pretty cheap and easy to put together. All I did was dump the three different types of fake snow in the refrigerator organizer.

If I could give one fake snow suggestion, I’d tell everyone not to get the small foam balls. They get EVERYWHERE and stick to everything. We could have done with just the glitter snow and the medium sized foam balls. It would have worked just as well.

Anyways, then I hid chocolate kisses underneath so Mila could find surprises.

The next things I added were the jingle bells. I had a ton of different sized and colored bells. This is important for one of the activities that I’ll explain.

To make it a little more festive, I added five, felt Santa stickers. They’re so cute!

There’s seriously a ton of activities you can do with this Christmas Sensory Bin.

The first is just letting your child explore the sensory bin. There they can find the chocolate kisses, feel the different types of snow, or use their imaginations. Mila loves when I don’t give her directions and she just does whatever.

One activity that I directed her in was sorting the bells. You could have them sort by color or size. This provide a ton of different skills.

I also had her count the Santas too. There’s a ton of math that kids can do that will help!

In all, this Christmas Sensory Bin is festive and educational. Kids will love it and you’ll love that they’re learning and having fun.


Do you have any suggestions of Christmas play? I have a few, but I’m definitely up for more ideas. Also, what are you most excited for this Christmas season?

Christmas Activity: Letter to Santa

It’s officially time to start getting festive. Our Christmas tree is up and indoor decorations are done. With all these bucket list items getting crossed off, we had to do another… write a letter to Santa.

I mean.. there’s less than a month until Christmas, we HAD to make sure he knew what Mila wanted this year.

The letter to Santa is very important in the eyes of kids who believe in him. When Mila realized that Santa was going to see her letter, she had that look Ralphie did in A Christmas Story.

It was all very official business.

After brainstorming her thoughts for the letter out loud, she decided it was time to write. Since Mila only knows how to spell her name at the moment, I got to help her out a little in the writing and spelling part of this.

Her letter to Santa states:

“Dear Santa,

How do you do? Thank you for giving me Christmas presents. I would like a big doctor thing.

Thanks, Mila”

She’s a lady that knows what she want! Hopefully she’ll actually become a doctor one day since that’s the only thing she wants at the moment. Besides becoming a mommy like me… her words.

Marking an item off her bucket list.

Anyways, I wanted to share this big moment because there’s a lot of learning going on in this simple letter.

Not only did she practice her writing skills and can prove she can remember and write her name, she drafted and wrote a letter! That’s pretty big for a three year old. Just because she didn’t physically write it, doesn’t mean there wasn’t any thought or work put into it.

It also showed her emotional intelligence with the thank you’s and asking Santa how he was doing.

These are all social skills that are all important to learn… simply by just writing a fun letter to Santa! Learning really is everywhere you look.

Fingers crossed Santa gets her letter in time. She used special stamps to help it travel quickly.

I’ll keep you all updated on if he does.


You can find the ‘Letter to Santa’ template at The Letter Vee. Some of the other stamps come from Three Little Crumbsnatchers, she also has the cutest Christmas activities you can print out for free. I’ll be posting them this December, so keep your eyes peeled.


Does your child or did they write letters to Santa? I’m thinking of recording Mila too. I think it would be cute to look back on. Let me know in the comments if you think that’s a fun idea or not.

Bingo Marker Turkey Craft

Quirky Turkeys don’t always have feathers, sometimes they have spots. At least that’s what Mila says. This easy craft is perfect if you run out of feathers or just want to give your child a simple turkey craft.

Plus, It turns out really abstract, which makes this one of my favorite turkeys of the year!

As I’ve said over and over again, I try to find crafts and activities that are easy for Mila to do by herself. This gives me time to clean or cook a dish for Thanksgiving. It also promotes her being independent and in turn it helps her with her confidence. Little ones need all the confidence to get by in the world.

For this activity, we only used a few things. That means it was SUPER simple to set up for her… and me!

Here’s the things we used:

To start off, I made a turkey head and face. I used cardboard from a box, googly eyes, and random scrapbook/construction paper that I had leftover. Your child could have also made a turkey face too.

Then, I unscrewed the tops of the bingo markers and told her to make the turkey’s feathers with them.

I actually love using bingo markers in crafts and activities. They aren’t very messy, unless your child goes wld with them. They also are pretty cheap. I found these at the dollar store and we’ve had them for quite a while. Plus, there’s a lot of different colors you can find!

The only other thing I instructed Mila to do was to fill up the background. You could also have your kids sort the colors or do different numbers of dots for more learning.

When I look at her last quirky turkey of the year, I keep seeing a rainbow in the background. I don’t think she meant to do it like this, it just feels really symbolic. All her turkeys this year have been so great. As always, I’m just so proud of her.

This is another activity you can easily do before Thanksgiving or on Thanksgiving Day. I hope if you do, your child loves it as much as Mila did!


What are your favorite turkey or Thanksgiving inspired crafts? If you have any links, please feel free to post them in the comments. I’d love to share and maybe do them next year too!

If you’re looking for more crafts that Mila and I have done for Thanksgiving, here they are:

As always, I hope everyone has a Happy Thanksgiving and are able to spend time with their family and friends!

Thanksgiving DIY: “Turkey” Feather Headband

Since Mila loved her Googly Eye Headband at Halloween, I knew she needed the perfect hair accessory for Thanksgiving.

With a little imagination and a lot of feathers, I came up with a Turkey Feather Headband.

I’ve said it once and I’ll say it again here, feathers are to Thanksgiving as eyes are to Halloween. They make all Thanksgiving crafts and activities just a little more special. The best part of each… they can both be found at dollar stores!

Another similarity… I got almost all of the items to make this headband at the dollar store too. Everything besides the yarn!

  • Feathers
  • Fluffy kitty headband
  • Hot glue/gun
  • Yarn

To start, I took off the ears of the kitty headband and hot glued them back on. I put them bottom on the band and close together. This way the feathers stick up.

Then I wrapped the band and the ears with yarn. This took a little bit of time, but make sure to use hot glue where the yarn starts and stops. I didn’t have to hot glue the entire time. Thankfully because that would have burnt my fingers.

After it’s covered in yarn, I stuck feathers in by the ear part through the yarn. I made sure to add a little hot glue so the feathers didn’t fall out.

I ended up using a ton of feathers, especially since I covered the front end back of the headband. At first I just had the front done, but I think having both made it more complete and full looking.

When Mila saw it, she instantly fell in love! Of course she wants to wear it to preschool one day this coming week!

I’ll try to make a clip with a few feathers too.

Maybe now she’ll want to dress up for Thanksgiving Day. We usually take a cute outfit AND something comfortable to wear. Especially after eating all the turkey!

No matter what, I think this Turkey Feather Headband will be making an appearance.


Let me know in the comments whether you dress up or down for Thanksgiving. I’ll let you know what Mila ends up deciding to do.

Pumpkin Pie Counting Paper Plate Activity

In this house, playing with your food is encouraged; especially when it helps with learning!

This Pumpkin Pie Counting Paper Plate Activity is perfect to help kids get excited about Thanksgiving, number recognition, and counting. All in one activity.

Last week I got Mila’s first preschool assessment. Overall, she did amazing! Sometimes I forgot that she’s only three and a half because she’s so smart and social. It makes me so proud to be her mom.

These assessments also gave me an idea of what we need to be working on at home.

One thing I’m not good at are numbers. Math definitely wasn’t my favorite subject in school, so sometimes I forget to add it into our play.

In her assessment, she counted to fifteen and only recognized a few numbers. I know she can count to 20, but I honestly didn’t know about her letter recognition skills. So, that’s what we’re going to try snd do more of.

Since the holidays are right around the corner and we’re excited for pies, I thought this activity would be perfect.

All you need for it is:

  • Paper plate
  • Orange, white, and tan paint
  • Scissors
  • Cotton balls

To make the pumpkin pie paper plate, you first need to paint it. I used tan paint for the crust and orange for the filling.

The orange took me two coats of paint and three for the tan.

Next, I cut the plate into eight slices and wrote the corresponding numbers on them with white paint.

After it was all dry, I added some decoration to make it more sparkly for Mila and gave her cotton balls to count with.

She had a lot of fun counting the cotton balls, but I saw her work out the different numbers in her head too.

It was amazing to see that even if she didn’t know the number at first, she would count around to figure it out. Hopefully the more she sees them, the more she’ll know!

Either way, we had fun pretending it was a pie and eating it too. I love how fun learning is with her.


What are some ways to help kids with number recognition?

Fine Motor Turkey Activity

Are feathers the googly eyes of November? I think so! This Fine Motor Turkey Activity is the BASTE way to play while prepping for Thanksgiving.

Another huge positive for this activity is you only need two things: feathers and a colander.

You can make a turkey face too if you’d like.

You can find feathers at any dollar store for only a dollar and you get a ton of them. You can use them for so many other crafts and activities throughout the year too. They also make for a great sensory object.

For this Fine Motor Turkey Activity, all I instructed Mila to do was make a turkey out of those materials.

Mila had fun sorting the colors and making the turkey look ‘silly.’ It gave me time to make dinner and it would be a fun race for the kids on Thanksgiving Day.

I truly believe the simplest activities make the biggest impact.

As usual, Mila did an amazing job and I know other kids would like this activity too.

I love how this activity could be used for little kids too. It’s a great sensory activity that works on motor skills!

For older kids, you could do a timed activity where they either need to put all the feathers in OR take them out the quickest. It’s simple for kids of all ages.


What sort of activities do you do during Thanksgiving? Or does your family play any fun games?

Make a Turkey Sensory Bin

Happy November! We’re celebrating this month and Thanksgiving with another fun sensory bin. You all know how much we love them! This time Mila did a Make a Turkey Sensory Bin.

Not only did she have fun playing with the different materials, she made Thanksgiving art.

This bin looks like a random grouping of items, but it all came together so perfectly. Here’s all that we used:

Like with all sensory activities, I let Mila explore the different materials. She was familiar with everything, but the beads threw her off. We usually only use beads for threading activities… or making bracelets.

It was fun to watch her interact with these materials with the thought of making a turkey too.

Obviously, she pointed out the feathers and eyes for the turkey, but everything else she made up on her own. I had a canvas with a brown circle glued down on it. This became the base of the turkey.

Then, I let her glue down everything else and put the items where ever she wanted.

This is how it turned out:

She says the beads were the turkey’s necklace, the candy corn it’s ears, and everything else is normal.

I just love her quirky turkey.

To extend this activity, you can have your child describe the texture and feeling of the items. You could also do a fun counting game with them too.

No matter what, it’s a great way to make memories with your child.


I have a few Thanksgiving and turkey activities lined up. As always, I’d love to hear about your traditions or activities you do too!

Let me know in the comments.