Shark Week Paper Craft

Duuun dun duuun dun… look out, it’s Shark Week!

This might be the first year that I’ve ever participated in Shark Week. They’re one of my biggest fears… good thing I live in Ohio. But, I’m raising Mila to be fearless, so we did a toddler-friendly shark inspired craft!

The set up is reminiscent of our Frida Kahlo portrait we did earlier this year. Just shark inspired.

Here’s what you’ll need to hammer it out:

Since Mila isn’t the Steven Spielberg of using scissors, I prepped this activity. If your kids are older, they’ll have fun with this.

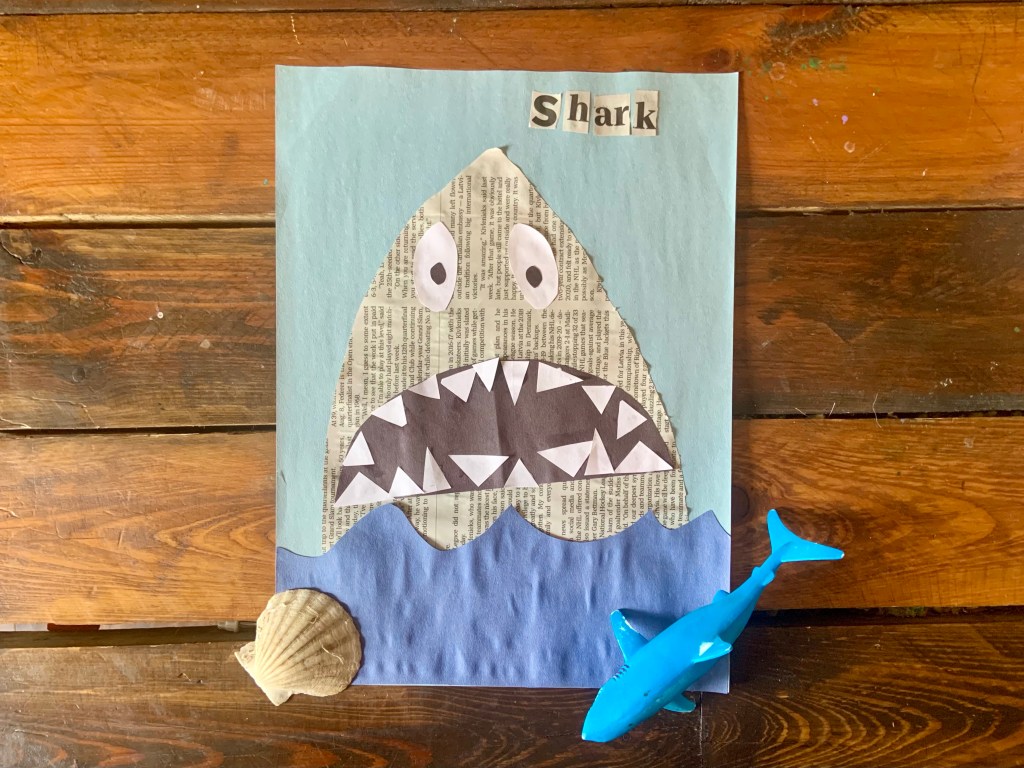
All I did was cut out different shapes of the shark and waves for her to put together.

  • Light blue for the background
  • Newspaper for the shark’s body
  • Black for the shark’s mouth and pupils
  • White for the eyes and teeth
  • Dark blue for the waves

Honestly, I just free-cut everything jaws because it was easier and I knew it wasn’t going to be ‘perfect.’ I’m so happy I did because the shark’s expression is amazing.

Once your done cutting the pieces out, have your child assemble their shark.

I let Mila place the shark’s parts however she wanted. She also had her toy shark for reference. The only thing I did tell her was that a shark’s mouth is FULL of teeth.

Take a bite out of this…

Shark’s will have 30,000 teeth over their lifespan. I told Mila that, but she doesn’t really know 30,000 is a huge number.

Back to the craft…

While Mila was working away, I found the letters to ‘shark’ in the newspaper to cut them out. There’s always an opportunity to learn letters, so we take them.

After the pieces are set, glue them down.

So, Mila’s shark is the only shark I probably would not be afraid of seeing in the water.

I mean, just look at him.

He’s not very ferocious and makes me laugh every time I look at him. I don’t know if it’s how big the eyes are or the mismatched teeth…

All I do know is Mila is extremely proud of her shark.

He’s currently hanging on our fridge. So every time I look in our kitchen, his bewildered face makes me smile.

Isn’t that fintastic?

We hope you liked our Shark Week paper craft! It’s always fun to see your child creating and learning at the same time.

What’s your favorite type of shark?

I’d you’re looking for other Shark Week activities, check these more ferocious ones out:

Advertisement

DIY Stars and Stripes Sign

Hello July!

I can’t think of a better way to start the month of than a DIY sign. Especially when a three year old is doing all the heavy lifting! With the Fourth of July right here, it seemed fitting to do a patriotic Stars and Stripes sign.

On Pinterest and Instagram, I’ve been seeing so many cute, patriotic signs. I knew Mila and I had to make one too. When I went to Joann Fabrics last, a wooden sign was calling out to me.

*I’ve looked all over Joann Fabrics’ website and Amazon to link the sign. There’s nothing comparable, but something still could be in your local craft store. Whenever I go, there’s a multitude of wood signs! Plus, you might find something else you like more!*

Unfortunately, I got too excited to actually take pictures of the plain wood. I painted the outside of the sign blue. Then, red and white went on the ‘stripes’ in the middle.

I just used craft paint and it worked fine!

Usually, I set up Mila’s activities and projects when she’s asleep or working on something else. When she saw me painting, she was not happy with me! She didn’t understand why she wasn’t painting either! Oops.

I promise the next part makes up for my apparent painting betrayal.

After the sign was dry, I laid out her part of the activity. She requested we use light blue in the sign too… which was a fantastic choice.

All we ended up using was:

Of course, I laid down brown paper to protect my table and a paper plate to dip in the paint.

Thankfully this isn’t the first time Mila has used something other than a brush to paint. She knew she had to push down hard to get the paint off.

It always amazes me how she creates art. I have no idea what her method is, but it always turns out so cute.

She ended up layering all the star sizes and blended the colors. I love how some of the stars turned out ombré from navy to light blue. The pops of light blue are actually my favorite.

Since the sign wasn’t huge, it didn’t take too long to fill the inside up.

I went back and forth on adding words or something on the blue ring of the sign. Eventually, I decided it was perfect how it was. I didn’t want anything to take away from the stars. Sometimes less is more.

If you can’t find star cookie cutters, sponges would be an amazing alternative. We haven’t used sponges to paint a ton, but it’s on our list this summer!

I am SO happy with how our DIY Stars and Stripes sign turned out. It’s proudly hanging on our front door now.

My favorite part is just making art with Mila. It’s something I’ll always treasure.

The next few days will be ones to treasure too! I’m excited to see her react to our community’s festivities and fireworks. As a child, I loved being around my family for the Fourth and hope Mila does too. Check out her second Fourth of July here.

I hope you have a fantastic July as well!

Do you craft or make signs for different holidays? If so, which is your favorite holiday to craft for?