Halloween Craft: Googly Eyed Monsters

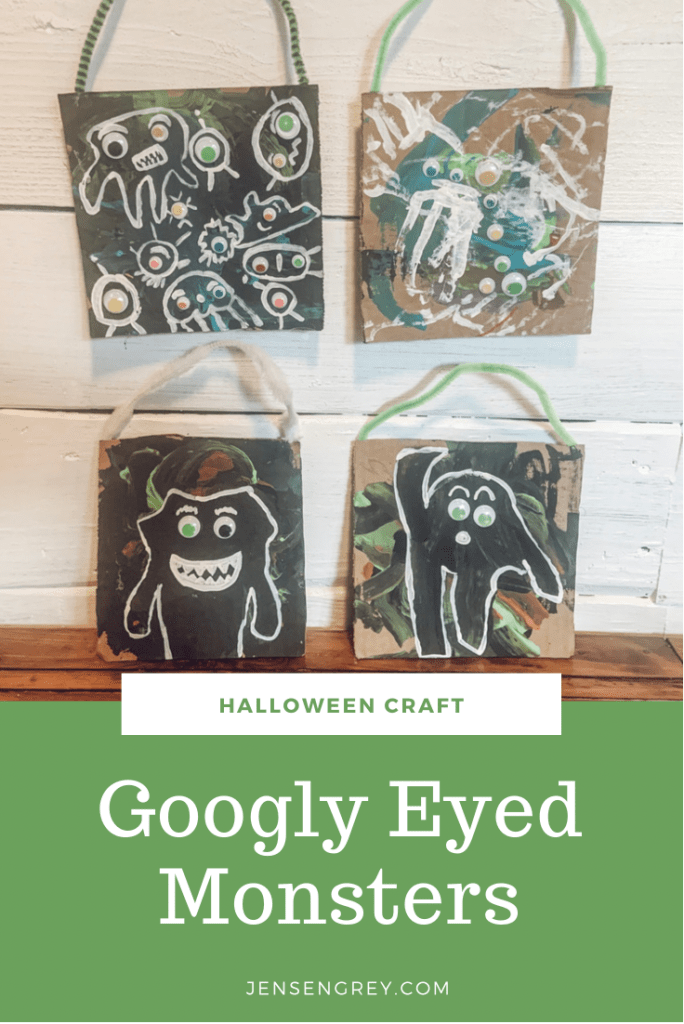
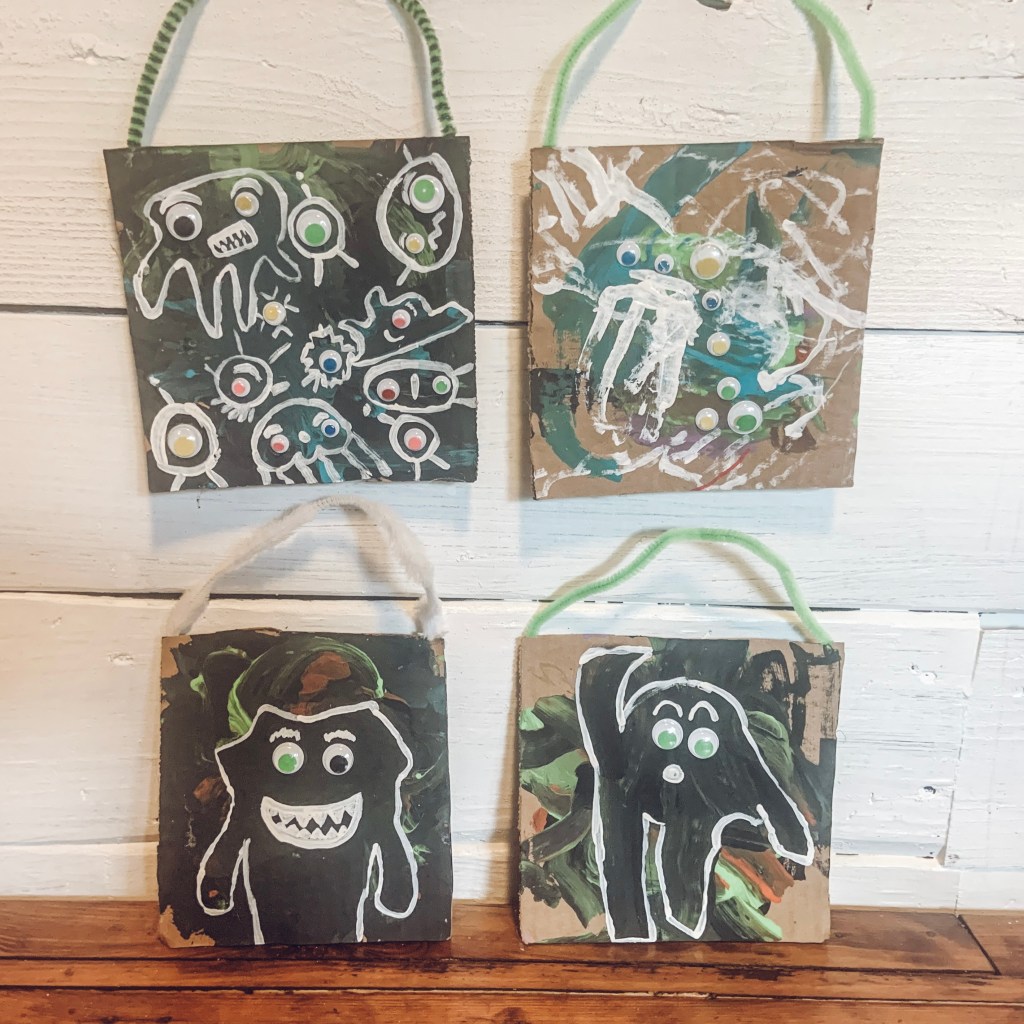
Halloween crafts and activities do not have to be complex. My preschooler’s favorite Halloween Craft are these Googly Eyed Monsters! Not only did she have a spook-tacular time making them, she loves making sure everyone sees them when they come in our home.

The best part about these monsters, you only really need to go buy googly eyes. Everything else are pretty common household items.

It looks pretty simple right? Here’s all we used:

To set up this craft for Mila, I cut some squares from old cardboard boxes. We love to upcycle and reuse items. If we can make memories by doing that, I’m all for it!

Then, I put out the colors of paint she wanted to use. I tried to persuade her to use more Halloween colors. She insisted on blue though, but I think it turned out super cute even though it’s not a traditional color.

I let her free paint and do whatever she wanted. They didn’t start off as monsters, just as big blobs.

If you have older kids, they’ll be able to do this next part on their own. I went in and drew outlines of monsters with her blobs. She might be able to do it now, but I just follow her interest and patience level with these types of activities. There’s no right or wrong ways to outline them. Just let their artwork speak to you!

When the monsters were finished and dried, Mila put the eyes where she wanted them to be. Let your child pick out how many eyes and the eye color they think they need. It’s so cute to see how they end up seeing their monsters.

Then, you can hot glue a pipe cleaner on the back of the cardboard pieces to hand them. This is an optional step, but I love it.

I love this little progression picture. This activity came out so adorable and I’ll definitely be hanging these up throughout future Halloweens. At first, Mila was afraid of some of her pictures. Now she thinks they’re cute. She’s really getting in the spooky mood!


Which is your favorite monster that she made?

Halloween DIY: Skeleton Animal Glow Ups

My entire house is fully prepped for Halloween! It’s been so fun to see the transformation. Our latest spooky DIY are these Skeleton Animal Glow Ups.

I have been back and forth with sharing these. They’re so creepy, but Mila loves them. Honestly, they’re sort of like a creepy Elf on a Shelf.

They were so easy to make and they fit our Halloween aesthetic. I found them at the Dollar Store for a dollar a piece. Not a bad price in my eyes; especially because it was a craft for both of us and they look so cute.

Cute as in… creepy. They can be both, right?

I will say, Mila had fun painting them, but it was a little tricky. She did them for a while, but I ended up finishing them.

If you do paint them and your kiddo wants to carry them around, I would suggest spraying them with a clear coat. It just helps the paint hold up a little longer. If you’re keeping them out of their hands, it should be okay!

Originally, I had them all on our dining room table. Like I said though, they’ve become our unofficial Halloween Elves on a Shelf.

I actually love how they turned out and will keep them for the years ahead.

Somehow they mesh really well with the white pumpkins and the general feel of my house. We like random things, so they make me smile.

Your Halloween decorations don’t have to be grand to make a statement. Sometimes all it takes is a little paint and a animal skeletons from the dollar store!


What’s your favorite way to decorate for this holiday: scary or pretty? Let me know in the comments.

Pumpkin Washing Sensory Bin.

Another day, another fall activity! Today’s play is a Pumpkin Washing Sensory Bin.

We love sensory play for so many reasons. To summarize all of its benefits, it helps children’s brains in a ton of ways! It also gives me a minute to do a chore or task that needs done around the house too.

Now that it’s spooky season, I’m finally letting Mila pick pumpkins from our pumpkin patch on the side of our house. It led straight to this activity.

Before we paint or decorate these pumpkins, I thought they needed to be cleaned off. Instead of me just doing it, I thought it would be so much fun for Mila… and I was right. All I had to do was set up this station.

The only materials I used were:

The only thing I told Mila was that the pumpkins needed cleaning and she could use more water and soap if she needed.

Let’s just say… she went to work right away!

This activity is so simple and Mila had came up with a big story of why they needed washed. She pretended they came from a different farm and not just outside our home. I always love listening to how her mind works.

That’s what makes sensory play so fun for everyone.

I actually left this activity out for the next day and she kept on playing. Lets hope painting or carving pumpkins goes this smoothly too.


Do you paint or carve pumpkins?

I’ve done both, but I’m thinking Mila may like painting more than carving this year. I’ll keep you all updated when it happens!

DIY Halloween Paper Chain Countdown Calendar

Looking for a fun way to count the days until Halloween? Try this cute Halloween Paper Chain Countdown Calendar.

Mila is SO excited for Halloween and keeps asking when it’s going to be. To show her how many days we have to wait to dress up, I thought this paper chain would be an amazing visual representation for her.

It’s filled with spooky and cute Halloween colors that would be perfect in any home. The graphics aren’t too scary either!

All you have to do is print the countdown, cut it out, and then staple it together.

Our little Halloween station is right by our front door. The Halloween Paper Chain Countdown Calendar made a boo-tiful addition to our spot.

I hope you like this little freebie. Make sure to take a picture and tag me in it on Instagram (@greyskies.rainbowhighs). It’d make me so happy to see it in your spot!

Again, click this for the Halloween Paper Chain Countdown Calendar.

Halloween Treats: Monster Rolls

Happy Spooky Season everyone!

Today we’re celebrating October with Monster Rolls for a fun boo brunch. It’s not really a DIY recipe, but a way to make food festive for Halloween. Either way, you’ll love it.

Even though I’m SHOCKED it’s October, I’m so excited to bring you fun activities, crafts, and treats all month long. I absolutely love Halloween and everything that goes along with it. Let’s just say, Mila and I have a lot planned for you.

These Monster Rolls are really simple, which are perfect for fall mornings.

Here’s all you’ll need:

  • Cinnamon rolls and icing (I used Pillsbury)
  • Food coloring
  • Eye sprinkles
  • Colored sugar

First, cook the cinnamon rolls as directed. Since everyone has their own different recipes or favorite brands, I’ll just leave this up to you!

Next, divide icing in different bowls. Add food coloring and mix. Mila absolutely loved helping with this step. As always, you can make it educational by talking about colors and it’s a great way to work on motor skills.

Then, set out the eye sprinkles and sugar to decorate.

Once the cinnamon rolls are done, I suggest dipping them into icing instead of spreading. It’s less messy and just is was easier in my opinion. Mila also helped with this step too!

After they’re all iced, it’s time to be creative.

I promise you eye sprinkles are a MUST for spooky season. They make any food or treat extra special for halloween. Mila loves them too and I think all kids would think they’re fun too. The ones I bought actually taste pretty good too.

Anyways, I just put the eyes in a little bowl and let her use the sugar dispenser. I let her know we were making monsters and she just went for it!

They were so fun to make… and eat too! I loved how quick they were to bake and that it gave Mila some creative time in the morning. We’ll be making these again this month because we both enjoyed them so much.


What did you think of our Monster Rolls? Do you have any Halloween classic breakfast foods, snacks, or treats that you make every year?